The Twelve Days of Christmas Cookie Project, Nine Ladies Dancing
Today’s guest is Sarah, of Klickitat Street. I’ve been a die-hard fan since I stumbled across her very first blog post almost a year {to the day} ago. Every time I read one of Sarah’s posts I am inspired to the point of giddy excitement.
These cookies are no exception. I’ve been thinking about them since the say they landed in my inbox. Aren’t they beautiful?
I am so excited to be posting here at SweetSugarBelle today! I couldn’t quite believe it when Callye asked me to be a part of this amazing project. Callye is such an inspiration and I think I’ve learned most of what I know about cookie decorating from stalking her!
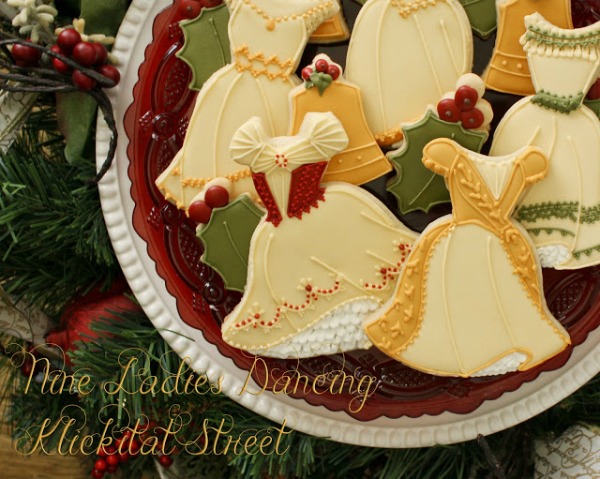
For my contribution to the 12 Days of Christmas cookie project I chose to interpret the nine ladies dancing….no really…I actually chose it! To simplify the design I decided to only make the dresses instead of the entire lady with hands and hair and all that craziness. It’s all about the dress anyway right?
To make these cookies you will need;
- bell cookie cutters in a variety of sizes
- ivory colored royal icing in piping and flood consistencies
- white, green, red and gold piping icing for trims and accents.
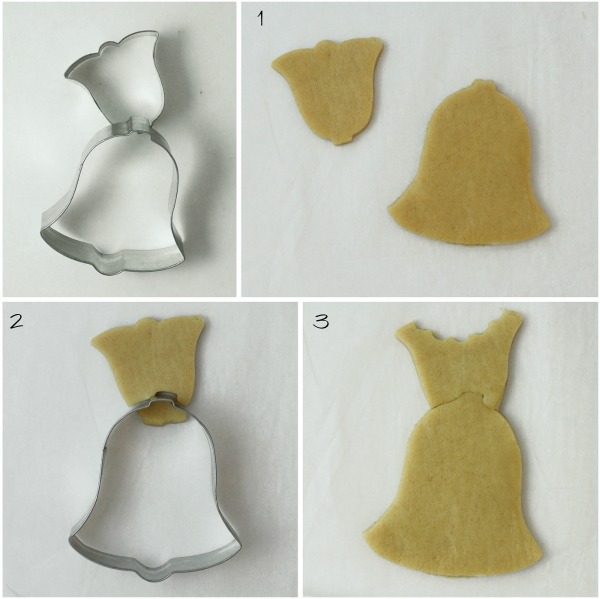
I cut the dress cookies by piecing together a variety of bell cookie cutters. The dress cutters I have are a bit on the small side and you have so much more creative control by piecing them together because you can change the size and style of the dress and you can add movement to the shape by tilting them this way and that Since bells always come in Christmas cookie cutter sets I have a lot of them to choose from but if you don’t have any little bells for the bodice then any cookie cutter with a tapered side will do. Anything like an ice cream cookie cutter or a party hat or a heart cutter will all work well for the dress bodice.
- To cut the dress cookies start by cutting both the bodice and the skirt shapes out of cookie dough.
- Then trim the bodice piece with the skirt cutter where you want the waist to be. Depending on the style you want for the dress you can cut a neckline out of the bodice with a circle or scallop, etc.
- Finally piece the two shapes together on your cookie sheet. Bake the cookies and when they are cool they will be strong enough to decorate.
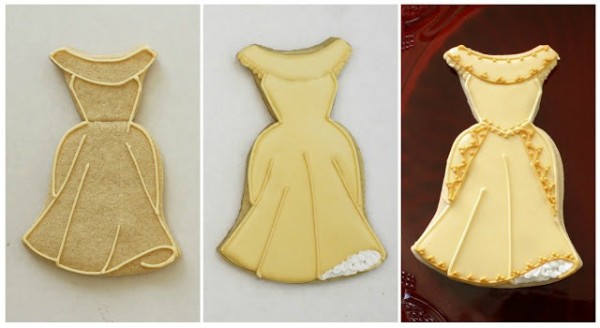
- To decorate the cookies start by outlining the dress in ivory piping icing. The inner lines of the swirls and twirls will likely be covered by the flood layer but it helps to lock down the drawing if you pipe them anyway.
- Flood the cookies with ivory flood icing and maybe add a peek of underskirt ruffle here and there with white piping incing.
- Let the flood layer dry overnight and now we are ready for the fun part! Since the piping and flooding for these cookies is all very basic you can spend more time adding trims and other details with piping icing. You can make the cookies as simple or as fancy as you like with the trimmings. The trim details all break down to just lines and dots and it turns out to be super easy. I’ve broken down some of the trim in steps just to get you started. It gets really addictive once you get going!
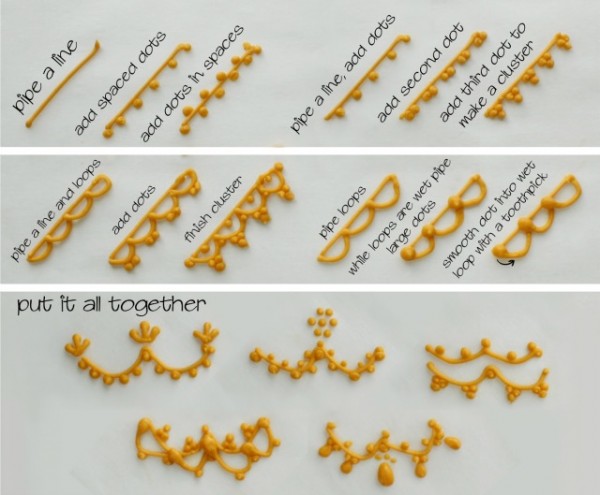 If you are going to make ribbon roses or other royal icing accents then a stiff piping consistency is a must but for this kind of detail I like to use a softer piping icing. The points on all those dots will settle down on their own if you use a little softer piping icing. If the dots are going to touch, let the first one set up for a minute or so before you add the one next to it.
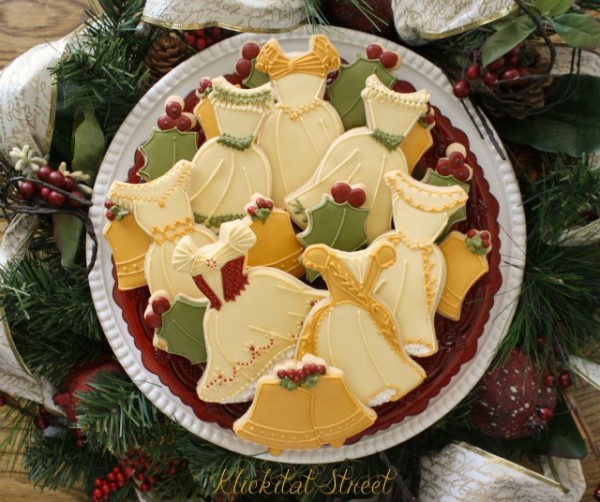 Merry Christmas everyone and thank you so much Callye for letting me post on SweetSugarBelle today!
Be sure to check out everyone else’s creations!
- Partridge in a Pear Tree Cookie
- Two Turtle Doves Cookie with The Cookie Artisan
- Three French Hens Cookie with Haniela’s
- Four Calling Birds Cookie with De Koekkenbaker
- Five Golden Rings with Ali-Bee’s Bake Shop
- Six Geese a Laying with Montreal Confections
- Seven Swans a Swimming with The Bearfoot Baker
- Eight Maids a Milking with Arty McGoo
- Ten Lords a Leaping with Kim’s Mom, Susan
- Eleven Pipers Piping with Lila Loa
- Twelve Drummers Drumming with Glorious Treats


Absolutely beautiful!
I’m in love wit these! That is all I can say at the moment! You know how much I love dot and lace and such, LOVE!
Stunning…the dresses are amazing!!!! Thank you Sarah!! –Katy
These are so beautiful and elegant. Thank you so much for sharing these gorgeous creations with us. And thank you, Callye for leading me to yet another great blog!
These are spectacular!
Another outstanding addition to the 12 Days of Christmas parade of cookies!!! I was so happy to see the little piping tutorial. I love learning how people put stuff together. GORGEOUS!
I LOVE these! I am a huge fan of yours Sarah! Everything looks PERFECT!!!!!
I cann’t believe how perfectly the 2 bells work to make a gorgeous dress shape the decoration adds such movement and flow, they are dancing! Each dress is more beautiful than the last, amazing work.
I think the movement is my favorite part also, Marlyn…and the color…and…
Such beautiful ladies dancing. I would love to dance in one of those dresses! 🙂
SO beautiful!! I would love to make some in girly colors for my niece’s upcoming birthday party too – what a great tutorial, thank you for sharing! Time to go follow another blog, thanks for sharing Sarah and Klickitat Street.
So pretty!! Thanks for the great ideas.
These dresses are all just stunning and to think you created them with bell cookie cutters! Your trim and piping detail is beautiful Sarah.
They are all so pretty!
Oh my goodness, these are just stunning! LOVE
these are beautiful! I love them! And the use of the bells is so clever 🙂
Stunning! The designs, the colors, wow! This project is so amazing!
Wow those are stunning cookies, they should be framed, not eaten! Love them!
Very pretty, great idea using the bells I never would of thought. The colours are so elegant too.
girl…smh…my jaw is still on the floor! Awesome!
Amazing detail! I love these.
Those gowns are MAGICAL! WOW!!!!!!!! What a fabulous tutorial that couldn’t have come at a better time when I have to do ball gowns for my daughter’s Cinderella play cast party! THANK YOU for saving me from handcutting dresses – you may have just saved my sanity!
These are so beautiful…might try some of those trim techniques on some bells to keep it simple for a beginner like me 🙂 Did you use a #1 tip for these trims?
You are brilliant! The dresses are exquisite!!
Thanks for including the how-to on the trim details! Beautiful cookies!
Pingback: Biscotti fashion | Mi arrangio da sola
I missed these? I did? Oh, I wish I hadn’t because these ARE magical!