How to Make Mexican Fiesta Dress Cookies
Growing up near the border has given me a lifelong love of the vibrant colors and patterns that are common in Mexico’s art and culture. I especially love the beautiful, embroidered Mexican dresses that were a part of my childhood. I wore them as a girl, and now, my girls wear the same beautiful dresses.
 Growing up near the border has given me a lifelong love of the vibrant colors and patterns that are common in Mexico’s art and culture. I especially love the beautiful, embroidered Mexican dresses that were a part of my childhood. I wore them as a girl, and now, my girls wear the same beautiful dresses.
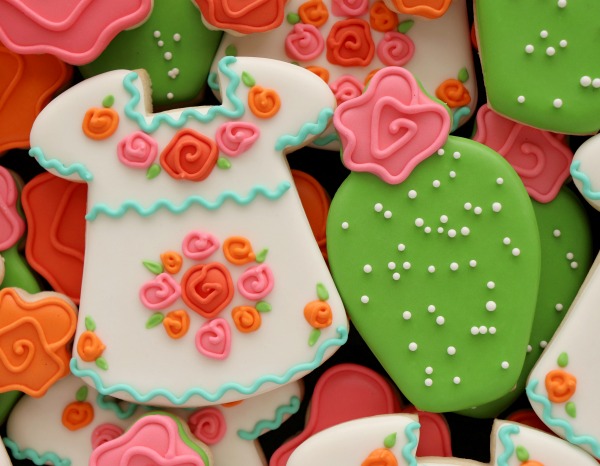
These cookies aren’t quite as beautiful as the real thing, but they’re definitely a close second. So, when planning your next fiesta, be sure to add these to the refreshment list!
To make these cookies you will need the following:
Supplies
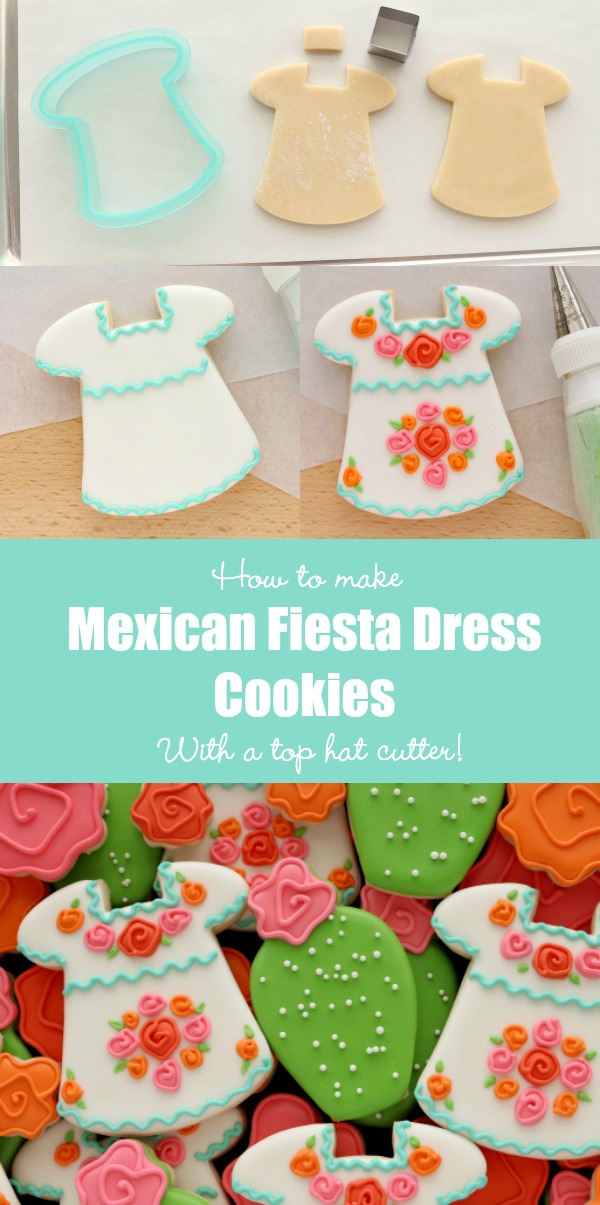
- Top hat cookie cutter, available in my new Shape Shifters TWO Cutter Set, available at HSN.com
- Small square cookie cutter (approximately 3/4-1 inch)
- Disposable decorating bags
- Couplers
- Icing bag ties
- Icing tips #2 and PME #1.5
- Icing bottle
Icing
- White piping and flood icing
- Turquoise piping icing
- Red piping and flood icing
- Pink piping and flood icing
- Orange piping and flood icing
- Green piping icing
Tip: You will only need a small amount of turquoise, red, pink, orange, and green icing. Plan ahead to avoid waste.
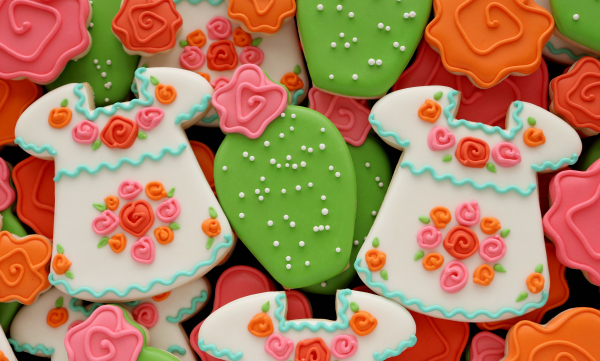
Step 1: Trim the top hat cutter from my new Shape Shifters Two set with a small square to create a neckline. This square is part of a graduated fondant cutter set, found in most crafts stores.
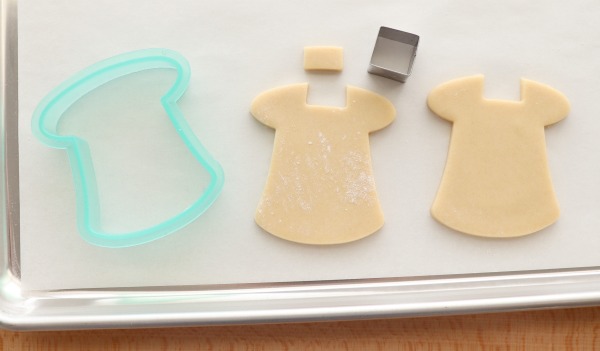
Tip: If you don’t own a small square cutter, use a knife or repurpose another cutter to create a collar notch. The cutout can also be round if you have a small circle cutter.
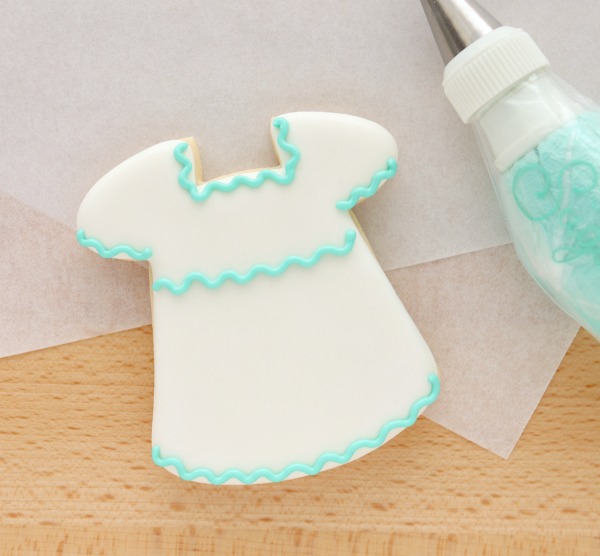
Step 2: Use white icing and a #2 tip to outline the cookie, then fill with flood icing once the border has set . At this point, let the cookie dry. This can take four to eight hours, depending on where you live.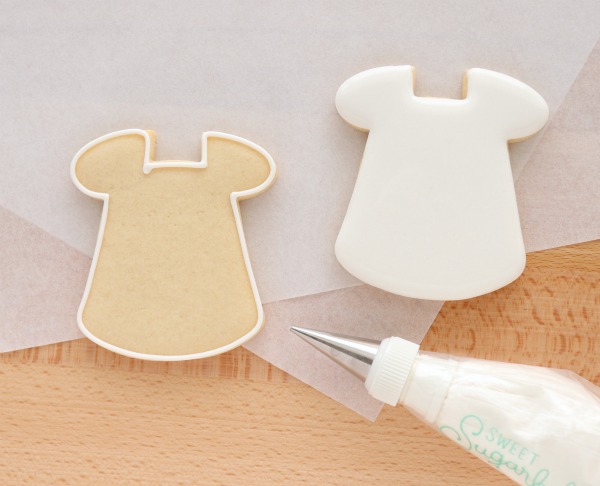
Step 3: Use a #2 tip to add turquoise ruffles along the collar, sleeves, bodice, and hem.
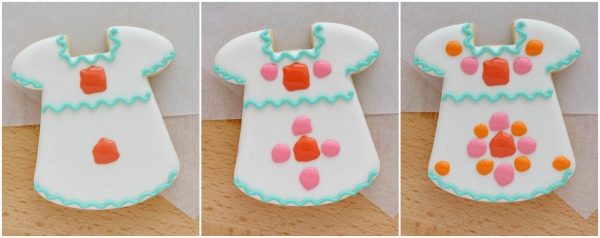
Step 4: From here on out, it’s all about layering. You can use a variety of techniques to create any floral pattern you like. This time, I went with one of my favorites, simple squiggle roses, but the possibilities are endless. I especially like the floral pattern on this version by Little Sparks Cookies.
Begin by adding larger red dots. They will kind of serve as “anchor points.” Next, add a little pink, then finish up with orange.
The first time I made these, I kept the flowers along the collar and hemline, but this time, I went with a cluster of roses in the center. Don’t be afraid to try out a few designs to see what you like best.
Step 5: Step five is about the same as step four. When the colored dots have dried a bit, use a PME #1.5 tip, to create roses by adding a matching “squiggle” to each dot, one color at a time.
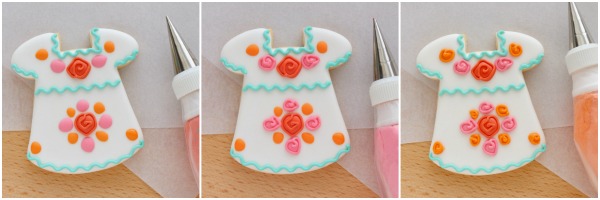
Tip: If you need a closer look at how to make squiggle roses, you can read more here or here. They can also be made ahead of time with leftover icing.
Step 6: Finish up by adding a few tiny leaves with a #1.5 tip.
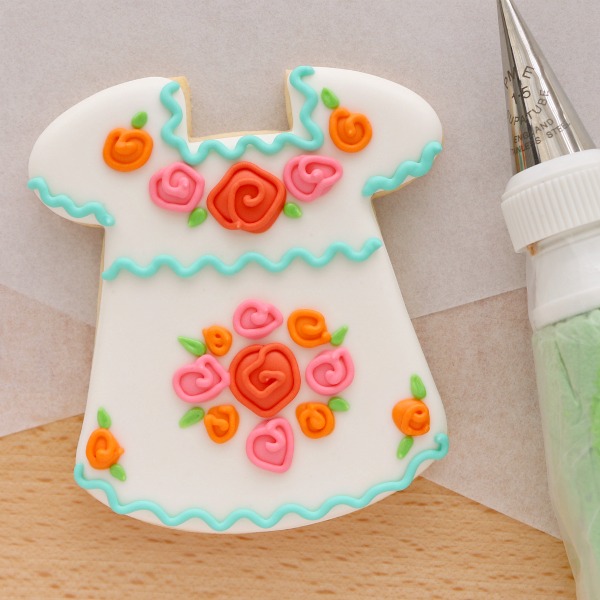
With a bit of imagination, this basic shape can also be used to create christening, baptism, Easter dress cookies, and more! The possibilities are endless!
These cookies make great favors, but also look amazing mixed with other fiesta faves like cacti (this cutter can be purchased here,) margaritas, or chili peppers.
For more fiesta-themed cookie ideas, be sure to check out the following links:
- Mexican Fiesta Señorita Dress Cookies via Little Sparks Cookies
- How to Make Cactus Cookies with Any Cutter via Craftsy
- Decorated Margarita Cookies via Glorious Treats
- Decorated Chili Pepper Cookies via The Bearfoot Baker
- Mexican Fiesta Border Cookies
- How to Make Frida Kahlo Cookies with a Skull Cutter


OMG! These are so cute!
These are too cute!
Love these. I bought the set when they were introduced. Your web site is a constant source of inspiration. Thank you for sharing.
Thank you for following along! It’s been tough to figure out how to maintain the blog, and come up with cutters, but I think I am finally figuring it out!
I love Sugarbelle’a blog! It’s how all began for me in the cookie world!
I can be having a rough day and seeing your cookies instantly brings a smile to my face! ? It takes me back to when I baked cookies with my Granny. Your cookies are works of art and your talent never ceases to amaze me! Keep up the gorgeously delicious work! ?
Sorry, I don’t know why there is a “?” After the sentence. ?
So cute!!! So happy to see you in my inbox today!!
TOTALLY Making these next week for teacher appreciation with taco cookies Taco Bout a Fantastic Teacher!
Will this set sold be in Michael’s stores ?
Not until April of next year, I believe. In the meantime, you can order them from HSN.com
Where can I purchase the cactus cookie cutter?
Heya! This one is from Bobbi’s Cookies! Here’s a link to her ETSY shop! https://www.etsy.com/listing/611888951/sweet-sugarbelle-cactus-with-flower?ref=shop_home_active_1
I bought your first cookie cutter today; Chrismtas cookie cutter kit. And then came to your website. I love what you shared on that lovely dress. You have lots of creativity. Thanks for sharing!