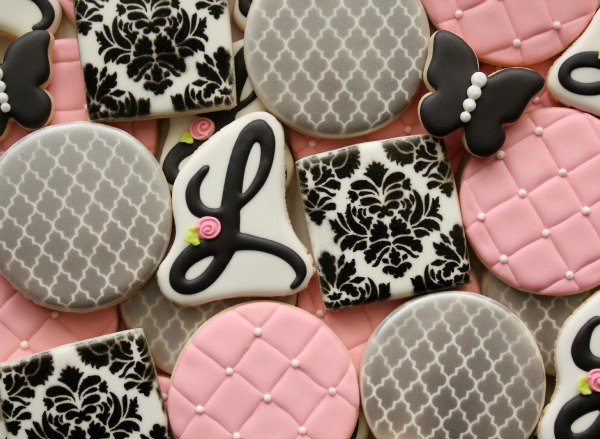
Perfectly Stenciled Cookies Every Single Time
Do you have cookie friends? If not, you should.
I have a cookie friend who’s kind of a genius. You’ve heard the old saying two heads are better than one? Well Kim is kind of like two heads. Add mine to the mix and we come up with things like this.
One night while our husbands were doing the things they do {football and X-box} we were having one of our cookie “text talks”. The topic? Stenciling.
Kim had an idea that magnets might be the perfect way to hold wiggly stencils in place. The thought had crossed my mind before too so I’d picked up a package then never tried.
That’s the good thing about cookie friends. They’re about all the encouragement you need to bust out the airbrush at ten o’ clock at night. I don’t know why either of us were surprised that it worked.
 For perfectly stenciled cookies you will need:
- A non-aluminum cookie sheet {make sure it’s magnetic}
- Simple magnets from the craft store
- Stencil
- Parchment Paper {for easy cleanup}
- Airbrush or food color spray
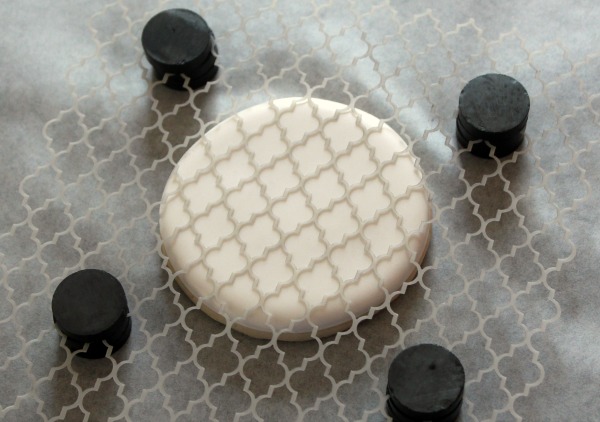
 Cover the cookie sheet with parchment paper and place eight magnets {two in each corner} in a square around the cookie. Two magnets are almost exactly the height of one of my iced cookies. If yours are a little taller or shorter it’s okay…the magnets will close the gap.
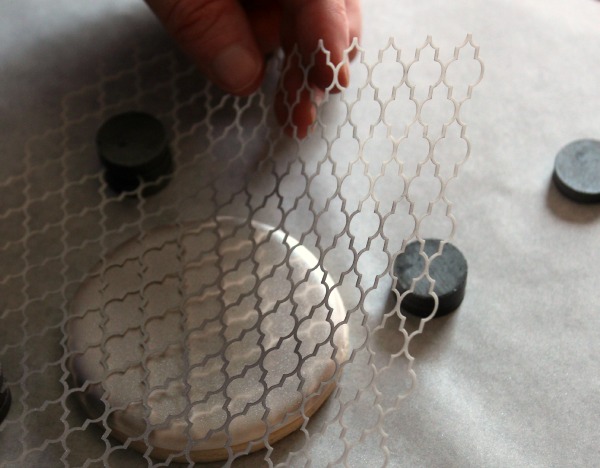
 Position the stencil over the cookie and use four more magnets to hold the stencil in place.
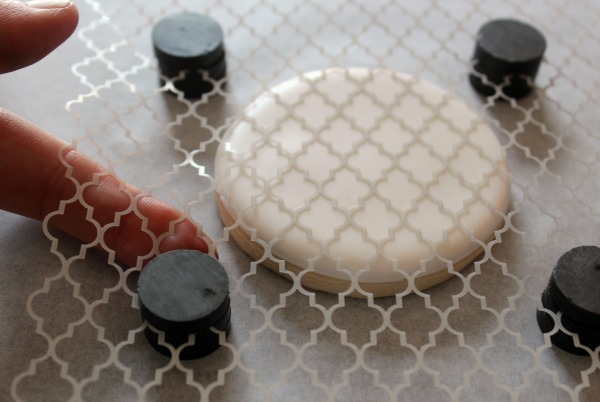
 You can use your fingers or a chopstick to move the magnets so the stencil is taut. If you need to add a couple more magnets you can {see photo 2 below}.
 Lightly mist the cookie with an airbrush or spray food color. For this particular cookie I used moonstone lustre dust mixed with vodka. If you have concerns about lustre dust and food safety, see the note at the end of this post.
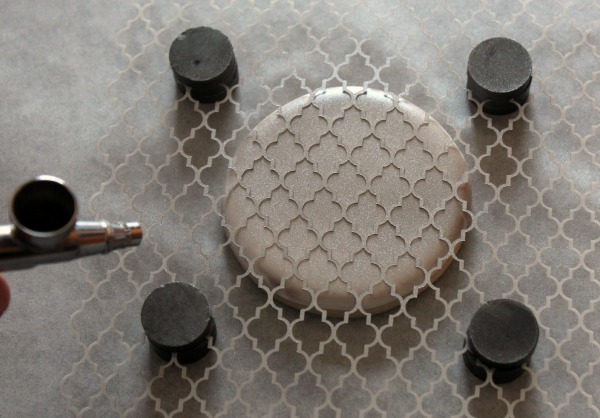 The key to a perfect finish is a using a light hand. Think nail polish. A few thinner coats are better than a globby, thick one. A light spray reduces the chance of liquid seeping under the stencil and muddling the design.
Remove the magnets from two adjacent corners, carefully pull back the stencil, and move the cookie to another sheet.
 The coolest thing about this technique is that positioning the next cookie is as easy as dropping it onto the clean spot on the parchment paper.
See? Stenciled cookie perfection.
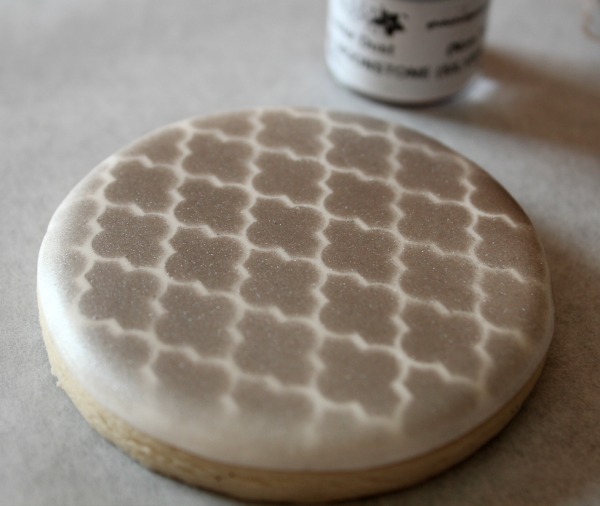 Here’s the closest shot I could manage. Clear, crisp, and beautiful.
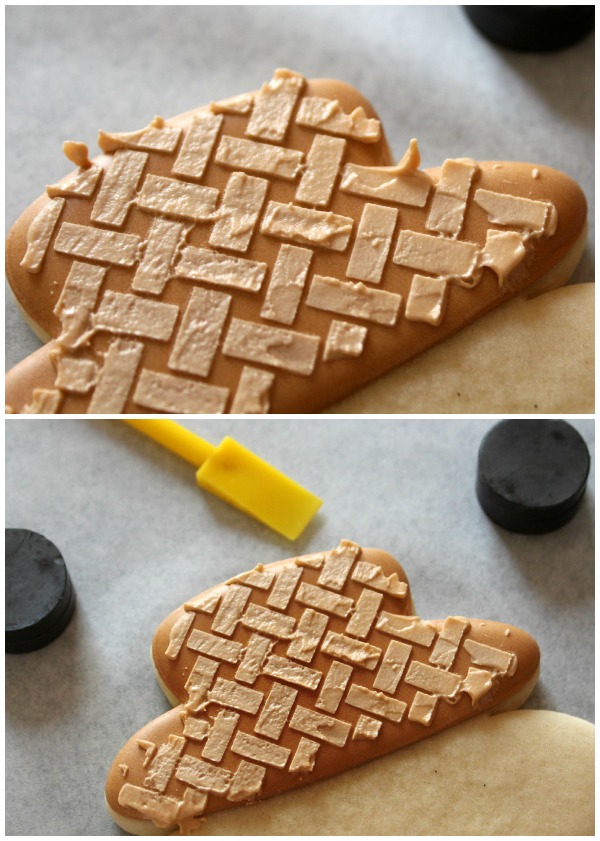
 This technique also works with royal icing. It’s like having a third hand. Same story…position, pull taut {use extra magnets if you have to}, spread, and lift. For a more in-depth look at stenciling with royal icing, click HERE.
One little side note, my metal offset spatula is magnetic. Be sure you’re keep it on a tight leash or you might get a little surprise.
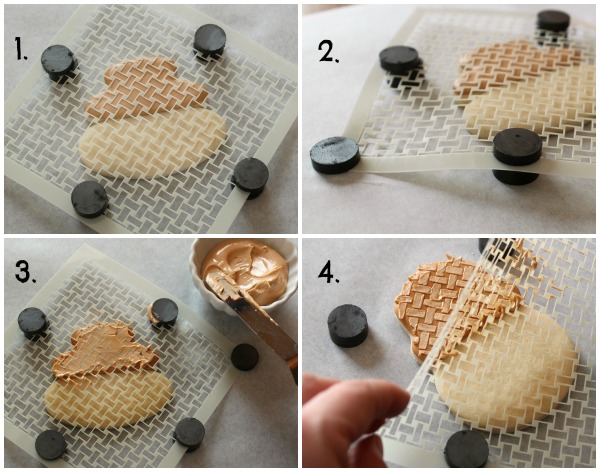 Pardon the sloppy stenciling, I took advantage of my more rustic design. In any case, you can clean up messy edges with a boo boo stick.
 Here are a few tips, products, and blog posts to help you on your way:
- Moonstone lustre dust {like many decorating items} are non-toxic but not edible. The decision to use these products is a personal one. If you’re worried about food safety, Country Kitchen has a great selection of edible lustre dusts HERE.
- These days I buy most of my stencils from Stencil Land on Etsy. You can check out the quatrefoil stencil I use HERE.
- How to Stencil on Cookies with Royal Icing
- Video: How to Stencil With Royal Icing via The Cookie Countess
- To stalk my genius friend Kim, check out this post {another one of her genius ideas} or check out her Facebook page.
- Since we’re on the subject of cookie sheets and magnets, I’ve always liked this idea. Just thought I would throw that in!


What a great technique! I saw your post earlier today on Facebook and hoped there would be a tutorial on this. Thanks for sharing!
I love when cookie people talk and text cookies. Something amazing always happens! Using magnets for stenciling is brilliant!!!!!
I have those magnets, I have a stencil and now I have something new to try. I wish I would have read this hours earlier, as I was trying to stencil and it was a disaster! 🙂 Can’t wait until tomorrow to try agagin!!!! Thanks for putting your heads together!
I was wondering where you get those delightful stencils?
Hi Cassie, I get them from Stencil Land on ETSY. There is a link to the actual stencil and the shop in the last paragraph.
I can’t wait to try this..don’t know if I’ll be busting out the cookie paraphernalia @ midnite though! Your cookies are always beautiful. Thanks for making it simple for those like myself that are definitely not cookie artists! 🙂
Genius! Seriously – what an amazing idea! I have to admit that I’ve never really stenciled on a cookie, but one of the main reasons I’ve never done it is because I was always worried that it would move, then the whole darn thing would be ruined. Your idea and Kim’s is just brilliant! Thanks so much for sharing yet another amazingly useful tip!
SO clever! Bravo! I look forward to trying this. 🙂
Oh geez, this is brilliant!! Imagine what would happen if we could connect all your brains, we could take over the world! Every problem would be solved and every problem would have a solution! I’m in awe at the things that come out of your blogs, all of you. You all give me such inspiration and make me feel like I can conquer any cookie obstacle.
Now I’m afraid my brain might explode with all the information I constantly get from all the cookiers I follow. Now we need to have someone make some magnet boxes (imagine a square magnet that’s cut out on the inside about 5″) . Put your cookie inside the first magnet box, lay the stencil on top and then the next magnet box. You’d have to make a few thicknesses for different sized cookies. Somebody patent it!!
You always write the best directions and are so generous with your knowledge. Congratulations on your new little addition to your family. I look forward to the updates!! xoxo
You and your friend are cookie geniuses! I hardly ever use stencils with my airbrush because of the sloppy/faded looking edges…now I have a reason to try, try again! Thank you!!!
I am so excited about this!!!!!!!!!!!!!!!! You and Kim rocked my world! xoxo
And of course I LOVE seeing the stencils from my shop in action! Thanks for using them & linking them!
What a great idea and just in time too, I’m fixin to break out my new airbrush. What stencil did you use for the scarecrow hat?
Sandy
Thank you & Kim for your awesome synergy! I was all fired up on airbrushing stencils, bought a slew of them & had pretty cookies dancing in my head. But the results I got were so disappointing! The only technique that worked great was the lace on a hoop approach. None of the solutions I thought of worked for the fuzzy results. This is such a PERFECT, low tech, inexpensive & doable solution!!! Gotta get those magnets & give it a shot!
What do you think of using make-up products instead of lustre dust?
I mean: I have a friend who makes flowers using gumpaste and fondant, when she needs to add some shadow or color accents on the flower she uses eyeshadows… Will you ever dare to do that?
It’s not for me, but I’ve heard of worse things. I usually leave the decision of what people put in their mouths up to them.
But…in her defense, I don’t think it will kill anyone. Unless he uses her own makeup and it had some weird fungus, lol!
Okay, third and final reply…you threw me for a loop. If I was making cookies forr a blog post and not going to eat them, I would not be above using a touch of shadow on something rather than ordering a $5 container of luster dust ($10 with shipping) IF it was close to an actual product readers could get.
To use on cookies people might actually eat, no. Not because I think it will kill them (I’m sure we ingest as much makeup from just wearing it) but because I’d feel like the customer/recipient might feel a little betrayed if they knew.
However, cakes are kind of a different story. Show cakes (like the ones they make for competition) are in a league of their own. I don’t really know the “rules” on that. Part of me thinks makeup might be outside of paremeters of okay, but I would have to ask. Cake wise, I figure if no one is going to eat it, what the heck. Same for cookies.
I’ve seen people use Sharpies, pencil, disco dust, non-FDA approved luster dust, scrap booking markers, and more in their cookies. I’ve also seen people eat them without dying. So, it’s hard for me to really say what’s okay and what’s not. That goes back to the personal thing.
You win the award for question of the day. I will probably be thinking about this all night, lol!
hehehe, gotcha with that one!
I’ve been talking to her yesterday: the make-up shadow palette she uses is used just for cake decorating purposes (she doesn’t use it as her regular make-up). In her defense she said that the amount used is really small, and that more can get into your body by just using it…
I’ll take it as an emergency resource.
And yes, I’ve seen the usage of sharpies on cookies too! LOL
LOL! You still did. It’s not often someone tongue ties me. I have heard of using chalk also.
Well… I’d rather eat eyeshadow than chalk!! *laffs*
Does the Vodka leave a taste?
This is genius!!! I love how you come up with such great ideas that I can jump right into!!!
Holy stencil/magnet madness, Batman!!! MAGNETS!?! I’m just blown away by this idea!!!! Where do you get the pretty stencils? Heading out to get magnets…STAT!
Brilliant!!! What a great idea. The shimmery quatrefoil is so beautiful!
What a clever idea. Will give it a try, though I doubt that mine will look quite as stunning as your do.
Simply gorgeous!!! I haven’t tried stencils yet with my cookies but can’t wait. With your brilliant tip of using magnets I am sure I’ll have a chance of getting mine to be half as pretty as yours! So pretty!
No, a human can generate a few hunrded watts for a few hours. The average house uses an average of 1200 watts on a continuous basis, but the peak power needed could be 10000 watts easily. An electric stove with all burners operating alone could be 10000 watts.A 2000 watt wind turbine ($1900+) has blades about 10 feet in diameter. But it only generates this power at the optimal speed, most of the time the power is a lot less, or zero..
Thanks for the tutorial. How did you clean these stencils? Just regular dish detergent and hot water? Thanks. I don’t want to ruin mine.
I just rinse them with very warm soapy water and I blew out a few tight spots in the quatrefoil with my airbrush. They’re really pretty durable.
Great idea, I am not really into stenciling but I so like your results 🙂 the cookies look amazing!!
That is just so stinkin’ clever! My last blog post shows what happens when the stencil moves 🙂 although, thankfully, my granddaughter didn’t seem to notice 🙂 I’ll be off to get magnets ASAP. You girls could rule the world!!!
This is a great idea! I haven’t done any stenciling on cookies yet but I’m looking forward to trying it out. Where did you get your airbrush?
What type of food coloring did you use for the airbrush part. Is that a grey color or a silver metallic?
This project is beautiful and am hoping to give your techniques a try for a baby shower I am catering for.
WOW! This REALLY works so well. So simple but so effective. I love low tech, low cost fixes. Thank you from saving my stencils and my cookie dreams!
Pingback: Scarecrow Cookies
Ahhh such a god idea!!
Pingback: Masking Cookie Stencils
Pingback: Chevron Turkey Cookies - The Bearfoot Baker
Thank you so much for such great blog!!
Okay, about stenciling cookies…I know, I know is the easiest thing in the world, right? hmmm well…came to find out that some of us (ME, for example) are stencilied-challenged 🙁 — no, I’m not kidding.
First of all, when I iced my cookies,I think, my icing was not the right consistency. I thought it did when I applied it, but when it dried my cookie did not have that smooth, neat surface that yours have… snif, snif. So, obviously when I attempted to stencill the cookies it was, sort of, like a mini-disaster buuu 🙁 Soooo, having said all that…how do you get such smooth/even surface on your cookies? what is the right icing consistency for stenciling? Please help!!
It’s got to be liquid enough that it flows flat inside the outline…like shampoo or honey.
Pingback: Sparkly Chevron Print Cookies
Hello,I really apiaceprte you as an Internet Marketer. You always have the right thing to tell Its great that you have put info. about the build an empire system on your blog. I reached your blog through google.com while I was looking for some info. on the current status of the system.Actually I had signed up 1 hour after the launch and got a confirmation email. But didn t receive anything for the next 24 hours, so I replied back to the confirmation email to ask about my status and got a reply from the support site. But its been 3 days since then and my emails are not being answered. Its getting really frustrating for me now..did anyone else receive any emails? I mailed them repeatedly to inquire about my status but no replies yet!! Can you please update me on the current status of all the applications? Do you know of anyone who has got his site up and running? It would be nice if you could help me with this:)Thanks for your time, Vaibhav
What type of airbrush do you use?
I use the Duff brand airbrush from Michaels.
where do you buy your stencil’s?
There’s a link to my favorite shop at the bottom of the post.
Pingback: Live Laugh Love Cookies - The Bearfoot Baker
Pingback: Stenciled Valentines Cookies - simplysweetsbyhoneybee.com
Pingback: Inspiration Challenge {Down The Rabbit Hole} | Ellie's Bites Decorated Cookies
Brilliant!! Again, still, always!!
Stenciling is high on my list of decorating techniques to try so thank you for these great tips!!
xo
Pingback: Rabbit Cookies with Chevron Ears and Video - The Bearfoot Baker
Pingback: When Yoga Meets Cookies | EZ the Baking Owl
If the first cookies aren’t iced with royal icing, what are they iced with? Thanks!
puoi gentilmente dirmi la misura dei magnete e dove posso acquistarli ??
Grazie !!
Pingback: Dinosaur Foot Cookies
Pingback: How to Make Bandana Print Cookies
I love these stencilled cookies and they be perfect at my sons wedding…where could I find a stencil like one used? Thanks.
Pingback: Decorated Jam Jar Cookies
Pingback: Decorated Football Cookies - The Bearfoot Baker
Pingback: Cookies | Pearltrees
Pingback: Decorated Hydrangea Cookies
What a marvellous idea! I’ll definitely use this the next time I stencil my cookies! Thanks!
I’ve tried magnets but my offset spatula flies out of my hand toward the magnets and makes a mess. I have 100 cookies to stencil by Monday…do plastic offset spatulas exist?
I’ve found this tool really helpful: http://a.co/goDz8Cu
Pingback: Musings about cutting stencils and stenciling cookies. - Sugar Coated Nanagrams
I was curious I noticed the cookie countess switches between magnets and a stencil genie, do you do this also? What is the difference? Why switch and any not just use magnets OR stencil genie? I’m curious as to the difference between them.
I switch. Depends on the project. Here are some posts about it: https://www.sweetsugarbelle.com/2013/10/perfectly-stenciled-cookies/
https://www.sweetsugarbelle.com/2015/09/how-to-use-the-stencil-genie-and-a-giveaway/
Do you post to australia or maybe these magnet stencils are availale here in australia. Please send me a link to buy from.
I love the concept.