The Twelve Days of Christmas Cookie Project, Five Golden Rings
I’m normally a busy busy girl. When I am not baking cookies and taking care of my kidlets, I am a cookie stalker. No kidding. It takes a lot of time and energy to be a stalker, but somehow I manage.

So Callye asked me if I would be part of her 12 days post line up and I was like REALLY??! ME?!! YAY!!!!!!!
Super excited. Told her to give me any day I could take it!
So she gave me 5 golden rings…and I was like…pickles.
It’s hard to get a juiced up about 5 golden rings…I mean it’s just 5 golden rings.
But it is jewelry! Which I’m always excited about. So instead of focusing on the rings, I focused on the ring holder. Oh yes, the jewelry box.
Now, I made my own design and template for this box….took a lot of math…and even then, it could use some tweaking. So I can’t tell you what cutters to use for this, but I can show you how I put it together.
Start out with your pieces. (I know the pieces and the math are all the hardest part. But really the most fun part to do. Give designing one a shot, OR deconstruct a gingerbread house. After you cut out the house sides, just chop off the large triangle bits. You’ll be left with the outline of a box.)
Base ice your pieces the color of your choosing. I chose white.

See those little rounds? Those will be your wreaths. Because I am not brave enough to test out my spacing on these. Took too long to cut and bake. I’m not taking any chances…
So take those little rounds and decorate them like wreaths.

I used a leaf tip and just piped leaves on in a haphazard fashion. Just go nuts. It looks more like real foliage that way. Then add your dragees and red berries if you want. I used 3mm silver dragees for mine.
Once you have all your wreaths piped, go ahead and space them on your pieces. This is why I did them separately I can easily space them in an even manner. 🙂 My OCD likes this.
Glue them down with some thick icing and then pipe around the sides with your leaf tip to hide your cookie edge.
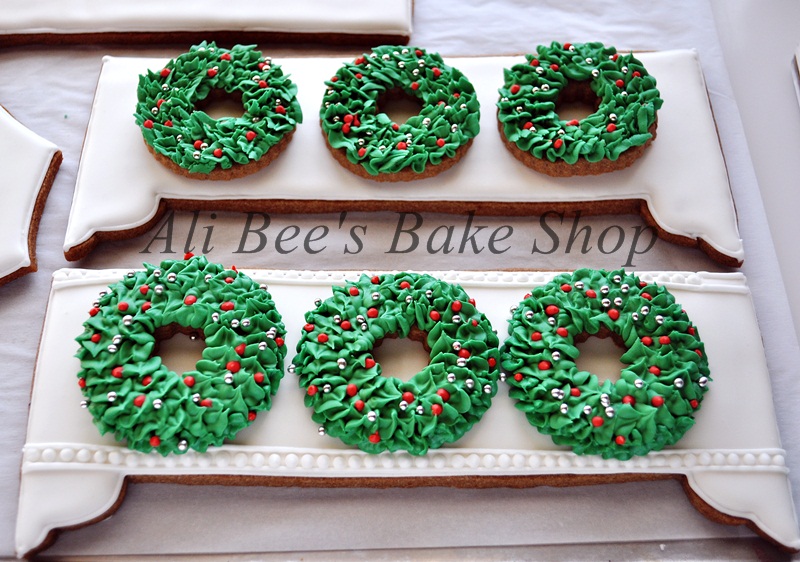
Looks all wreathy, no?
Anyway, continue to decorate your remaining pieces however you like. I cut a large piece for a lid. Felt like a decent jewelry box needed a lid.

Anyway, once they are all dry and ready. Place your pieces together. My pieces have “feet” on them so I turned them upside down to glue them together.

And I used cutters with squared off edges to help me keep my angles.
Just join them together with a really thick bead of icing down the inside seam.
Once it’s all dry, cover the outside seam with some icing and some details of your choosing. I used all these large pearls I picked up at the grocery store. They taste like sweet tarts. I’ve eaten a few…

Anyway, when your done, and your pieces are set, you can glue on a bottom (if you made a lid, just make an extra piece of the same size and stick it on the bottom. Cover the seams much like you did the sides). I had to get all mathy and make a bottom that dropped down in there because my box had feet.
Curse those feet….made everything so much harder to assemble.
But they sure look pretty….

See I didn’t forget the golden rings. Those are real golden rings folks. In fact, they’re my parents wedding rings. Sweet huh. 🙂
Thank you Callye for asking me to be a part of your 12 days lineup! Everyone so far has been amazing and I’m sure the rest of the countdown will be awesome too!!
Be sure to check out the other eleven days of Christmas!
- Partridge in a Pear Tree Cookie
- Two Turtle Doves Cookie with The Cookie Artisan
- Three French Hens Cookie with Haniela’s
- Four Calling Birds Cookie with De Koekkenbaker
- Six Geese a Laying with Montreal Confections
- Seven Swans a Swimming with The Bearfoot Baker
- Eight Maids a Milking with Arty McGoo
- Nine Ladies Dancing with Klickitat Street
- Ten Lords a Leaping with Kim’s Mom, Susan
- Eleven Pipers Piping with Lila Loa
- Twelve Drummers Drumming with Glorious Treats


Wow, this is all so amazing!
OH MY GOODNESS!! Jaw on the floor! That is INCREDIBLE!!!!
Excuse me but WOW!!! Ali, this project kicks! And Callye, thank you for this awesome series. Inspiration everyday!
I can’t even think of what to write that does this justice!!!! This is BEYOND AMAZING!!!!!!!!!!!!!!!!!!
Are you kidding me?! This jewelry box is unbelievable!! I can’t take the amount of awesome that’s on this art piece. It really should be in a museum!!
Stunning work, Ali, and I love your interpretation of this! It is always so fun to see what you come up with!
that is amazing, I just love it!
I’m dying over here! How could anyone top this unreal! Can we skip the 6th day lol
I KNOW!!! And the 11th too!! Callye could just post this for the next seven days and I wouldn’t get tired of looking at it!
The Oline is only gonna improve from here. beettr hope Glass Jaw Vick can take some hits cuz you skinny Azzz receivers are gonna be struggling to get off the line in press coverage all day? Btw-who’s your Left tackle this week? Mr. Ware wants to know who’s lunch he will be taking. Get ready Never won anything Philly cuz we are coming!!! Nick Foles should star warming up.
WOW. I just keep staring at the lid to that box. I really can’t make myself look away. It’s UNBELIEVABLE. Seriously, I can’t even fathom how a person would go about making that with icing and cookie. It’s GORGEOUS!!!!!
The design of this is beautiful and the decorating of it is stunning. I’m in awe!
Amazing! I am seriously in awe and can’t stop looking.
This is amazing! I am in love with this! Totally and completely!
actually I think the five golden rings are birds not jewelry. a french pheasant type. they have a yellow ring around their necks.
jeepers! that is impressive….I would never have this kind of patience! very nicely done Ali!
I love your site!
Have you done a tutorial on how to place a watermark on one’s photos?
A watermark that others cannot remove.
Amazing!
How much fun would it be to present someone a gift of jewelry in that beautiful cookie box. You might want to leave it out for Santa to fill. Such detail, wow!
THAT.IS.AMAZING!!!!!!
I am just blown away at the talent, creativity and dedication!
WOW.
Pingback: Twelve Days of Christmas Cookie Project, Day 6
I gasped when I first saw this posted. Unbelievable!
Ali,
You are beyond amazing, and I love your Golden Rings…how special!
thanks everyone 🙂
That is ridiculously cool! Just gorgeous.
you are a mathemagician Ali! This is beyond stunning. All those beaded details are utterly gorgeous and just the shape of the box is over the top. Bravo!
Hold on while I shut my mouth. I can’t believe that’s a cookie. I’m loving all these 12 Days posts and getting to see more amazing cookie designs from other people. Thank you Ali your cookies are beautiful.
This article post is amazingly unique and delicious; Ali did a great effort to create such a master quality product for the occasion of Christmas. I really like the concept to implement diamond rings in the cake. I eager to buy sapphires online, but none of the store providing me a good deal out of the product, then I find this helpful site, you may too find it useful here- http://www.sanfranciscoprovident.com/our-store
In a meantime I would really love to bake one piece for the coming future.
Katy Perry.
Last night surfing about david yurman bracelet sale through internet, suddenly found this amazing post of yours, really made my day here. Ali is amazingly creative person; Christmas cake is ideally suited for the occasion. Golden rings adds more illustrious spec to the scene, did your parents bought this rings from this site? – http://www.66mint.com/product-category/david-yurman/
Kate Anderson