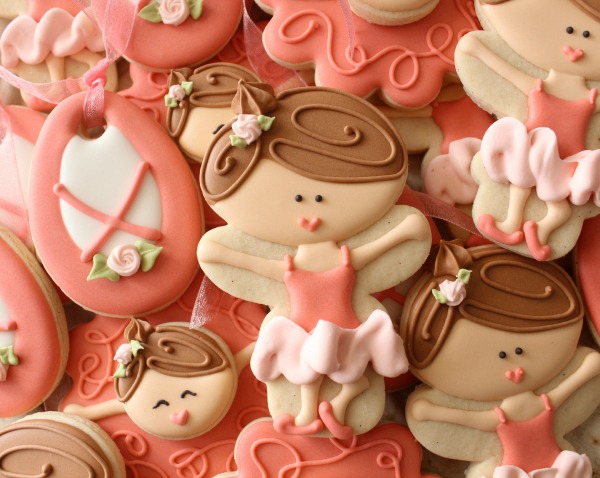
Decorated Ballerina Cookies
I’ve always loved the idea of ballet and ballerinas, but unfortunately I am about as light on my feet as an elephant. I fared about the same in the grace department. In other words, ballet and I just don’t mix. So, once again I’m living vicariously through cookies. Hey, whatever works, right?
 To make these cookies I used what may just be the most versatile cutter in my arsenal…a common plastic snowman cutter.
To decorate these cookies you will need:
- Fleshtone 20-second icing
- Stiff-ish brown piping and 20-second icing
- Coral piping and 20-second icing {for mixing instructions click here}
- Stiff-ish light coral icing
- Black piping icing {a very small amount}
- Stiff-ish light green piping icing {a very small amount}
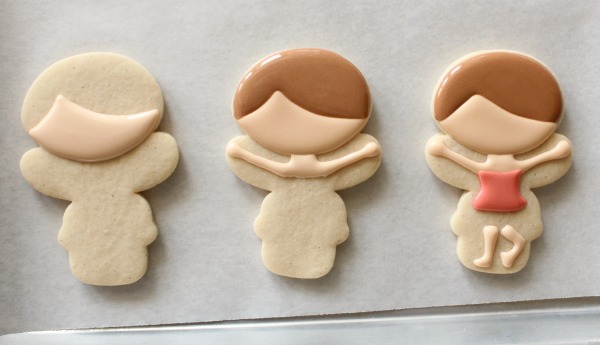
Begin by using 20-second icing to flood the base as pictured below. Add the face, move on to the hair, neck and arms, then finish up with a leotard and legs. The icing will need a few minutes to set between steps, but does not have to be completely dry to move on.
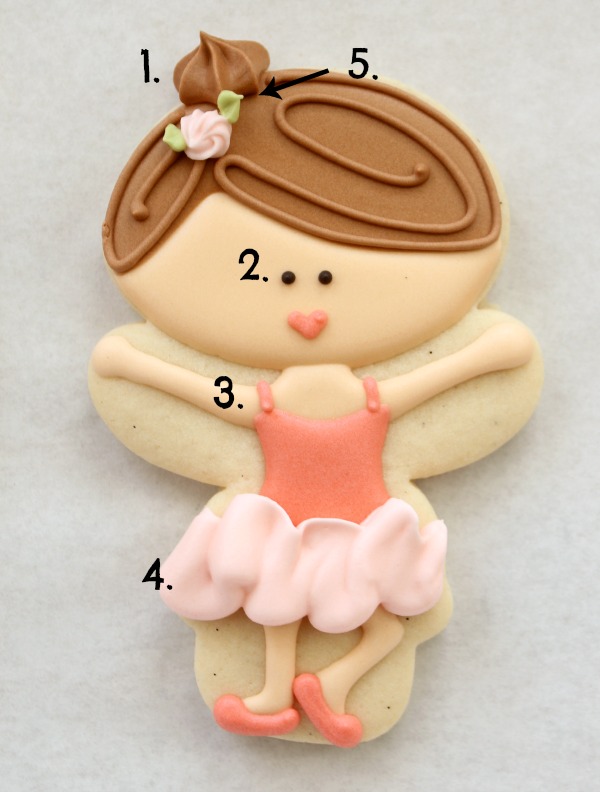
 Let the base dry overnight and finish up with the details:
- Use a #14-#18 tip to pipe a bun and a #1.5 tip to add a swirl detail to the hair.
- Add eyes
- Use piping icing and a small tip to add straps, lips, and shoes. This would also be a great time to add ribbons to the slippers, a detail I wish I had not forgotten.
- Use a large petal tip such as #103 or #104 to add a tutu. I held the bag at a ninety degree angle, with the thin side of the tip facing up.
- Add a small swirl rose beneath her bun using #13 and #65 tips. For instructions on piping swirl roses, click here.
This ballerina design is relatively manageable…as far as cookies go. A simple 20-second base is made interesting by details piped on top. This is a great way to simplify even the most intimidating cookie design.
If you’re worried about the thick later of icing used for the tutu being hard, you needn’t be. In my experience, the cookie softens the icing enough to remove or bite through easily.
For more ballet cookie inspiration check out the following posts:


Once again, another absolutely stunning, adorable cookie that you make seem so easy and doable. I should have known something special was coming when you did your coral icing tip last week. I am not disappointed. Thanks, Callye.
Oh my gosh, I love the piped bun and the petal tip tutu! She is so very cute!
Between you and Michelle, I realize I need to get one of those snowman cutters! 🙂
Callye is kicking up the snowman cutter game a ton, right Sue?! This ballerina is beyond adorable. The petal tip tutu for sure, but that little starry bun! Honestly, she just makes me smile 🙂
ADORABLE…but then I never expect less from you! Always the cutest cookies, ever!!
You are so talented, these are adorable. So creative and love the step by step instructions. Thank you for sharing your talent
Adorable!
So beautiful! I will need to get myself a snowman cutter. It is probably the best one to have!! Thank you for posting these. I really am enjoying all the different things you are showing that can be done with cookies!
WOW! You really know how to rock a snowman cutter! These are wonderful!
These are so perfectly made – and I wish I had them for a little girls dance recital!
These cookies are adorable! What great detail.
well i fell in love with your little blondie bowing ballerina cookies, but these are sooo cute too! The little rosette is my favorite little touch! Sooo sweet and girly 🙂
These are adorable. Your work is always so brilliant. I hope someday to be even a fraction this good with my decorated cookies. 🙂
These are so cute I need to make them for my granddaughter. Thank you for sharing your talents
Pingback: Party in Your PJs #8 - simplysweetsbyhoneybee.com
Yes!! Fattie snowman cutter!!! You know my sister and I tried and tried to make that snowman work – he was sort of on my cookie cutter naughty list (yes my oven is AWFUL and hot spots cause cookie spreading… even a totinos pizza is a failure)… anyhow – now I’m so happy you have all these uses for him! Yay!
Thanks for sharing!!! These ballerina cookies are adorable
Ohhhhh….. There are so cute!!! I love them!
Pingback: Simple Tutu Cookies
Hermosas, hermosas, hermosas!!! que galletas tan pulcras, felicitaciones. Saludos desde Bogotá-Colombia
Pingback: How to Make Mermaid Cookies with a Snowman Cutter