Royal Icing for Cookie Decorating
Cookie decorating is more than an adventure, it’s a journey. I’ve come a long way, and I feel like I’ve learned a lifetime of tips and information in just a few short years. I’ve used this knowledge and experience to change and tweak some of my methods and recipes. My royal icing is the perfect example.
When I originally shared my recipe, I was working from home, decorating twenty to thirty dozen cookies a week. The original recipe definitely reflects that.
Eventually, life changed as it tends to do, and I realized that most people will never ever need a four quarts of royal icing at once. So, here’s what that happens in my kitchen these days. It’s basically the same except half as much, with a few minor tweaks.
Ingredients
- 2 pounds {one bag} confectioner's sugar {907 grams}
- 5 tablespoons meringue powder {approximately 53 grams}
- 2-3 teaspoons oil-free extract or emulsion
- 1/2-3/4 cups warm water
Instructions
- Begin by stirring the flavoring into half the water.
- Using a paddle attachment, gently mix the sugar and meringue powder. It's not necessary to sift the sugar beforehand, but you can if you like.
- With the mixer on it's lowest setting slowly add the water/flavoring mix to the dry ingredients. As the water is added, the icing will become thick and lumpy.
- Continue to add the remaining water {this may or may not be the entire amount} until the mixture reaches a thick, honey like consistency. At this point, turn the mixer to medium speed and whip 2-4 minutes until this icing is thick and fluffy. Mixing time can vary greatly so watch carefully and stop mixing when the icing is this enough to form a soft peak.
Notes
Don't be afraid to experiment by adding corn syrup, glycerin, or cream of tartar to the mixture. Use a fan for a smooth shiny finish. Royal icing can be affected by many variables. With a little time and patience, you will find your perfect match.
First lets talk about the most obvious differences in my recipe/method between then and now:
- I generally use the paddle attachment rather than whisk to mix the icing: A couple of years ago, I received an email from a reader who made royal icing flowers for a living. She gave me a few pointers how each attachment affected the final product. What stuck with me most was her observation that icing mixed with a paddle does not separate as quickly as icing mixed with a whisk. I didn’t do any in-depth scientific experiments, but based on her knowledge and experience I gave it a try and liked the results. This doesn’t mean that on days when my paddles are dirty or lost that I won’t use a whisk, I just lean more toward the paddle these days.
- I don’t make super stiff icing anymore: This change was born out of practicality. When I first began making royal icing, I followed the Wilton recipe to a T. Then a couple of years ago, I took on a rush order {PS-I no longer take orders} for three-thousand double-sided mini-cookies. By the end of it, I had a stress fracture in my right wrist. It was then I realized it was much more work to begin with such stiff icing, especially since I rarely used that consistency anyway. Now, I stop mixing when the icing reaches a consistency that’s pretty close to piping. If I need stiff icing, I just add sugar. Much easier on the old wrist, and I may be able to put off the carpal tunnel surgery a few more years.
- I store my icing on the counter rather than the refrigerator: Again, wisdom from someone with more experience. When I baked cookies for the public, I used to worry that my icing would spoil. In my mind, meringue powder equaled eggs, which equaled food poisoning, so I was extra careful. Then, while chatting with a veteran cake decorator, I learned that I was being overly cautious by storing it in the refrigerator. Her forty years of experience was good enough for me. Her exact explanation is a little complicated {see link at the bottom of the post}, but if it’s any consolation, I haven’t killed anyone in the two years since moving my icing.
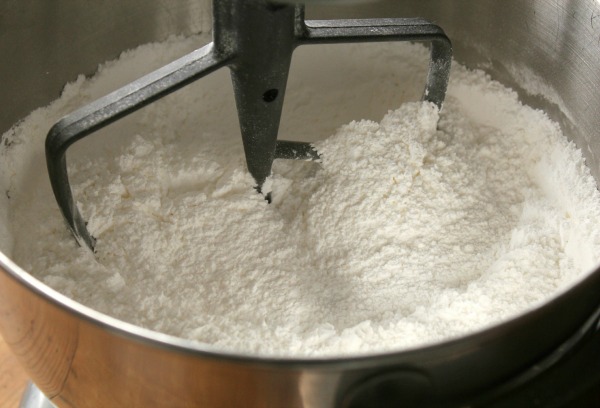
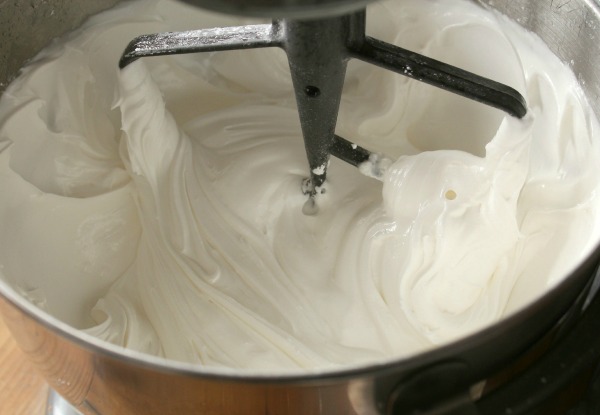
I took a few photos for those of you who like a visual. Begin by adding the confectioner’s sugar and meringue powder to your stand mixer. Using a paddle attachment, turn the mixer to it’s lowest setting {unless you like the Powder look} and gently stir together the dry ingredients.
 Before moving on, mix the flavoring {I use a mixture of almond and vanilla, with a touch of butter} and half of the water. Turn the mixer to slow-medium speed and carefully add to the dry ingredients. The mixture will become thick and sticky…don’t panic, this is normal.
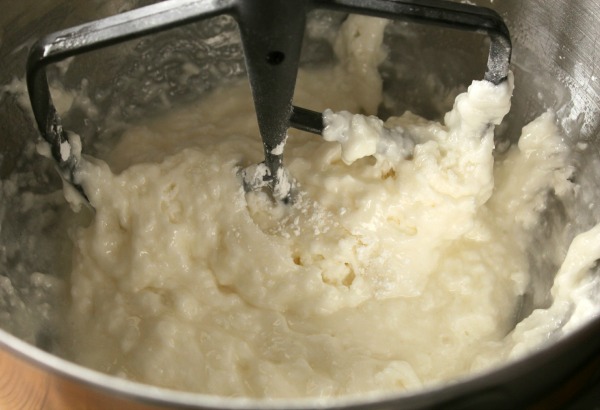 Continue adding the remaining water, little by little, until the icing reaches a thick, honey-like consistency. If you reach this BEFORE all of the water is gone, that’s okay. It’s not necessary to add it ALL.
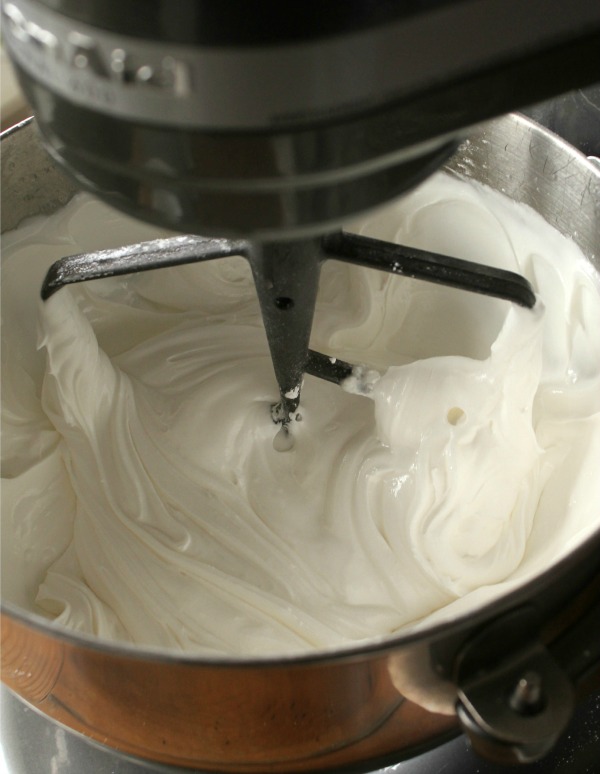
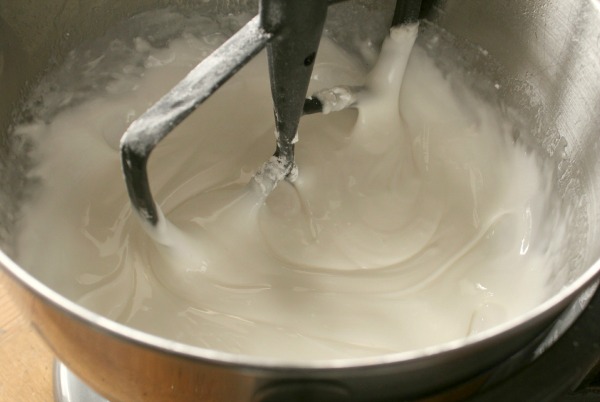 Turn the mixer to medium high and whip two to three minutes until the icing forms soft peaks. I like using a spray bottle of water to fine tune the final consistency.
 Store in a covered bowl or airtight container until ready to use. The icing can be left at room temperature or stored in the refrigerator. It’s totally up to you.
My very first icing post was originally called, “All Roads Lead to Rome” which pretty much means that there are several ways to get to the same point. This is especially true with royal icing. If my method isn’t for you, there are several more recipes out there. Don’t be afraid to experiment until you find what works best.
For more interesting reading, be sure to check out the following posts:
- Check out Spices Etc. for an amazing selection of natural flavorings and extracts
- How do Salt and Sugar Prevent Microbial Storage via Scientific American {for those of you who want to know more about why you CAN store royal icing on the counter}
- Egg White Royal Icing via Alton Brown {great for people that don’t have access to meringue powder or powdered egg whites}
- Royal Icing Recipe and Video via The Joy of Baking
- Corn Syrup Glaze Recipe via Cookie Crazie {alternative icing recipe for those with egg allergies or who don’t like the taste/texture of royal icing}
- How to Make Royal Icing Dry Shiny
- How to Color and Prepare Royal Icing
- Everything you Need to Know About Icing Consistency


Hi All
I made this recipe yday and halved the recipe to make some Royal Icing Penguins that I could place on my cupcakes. The recipe worked like a charm. I completely agree with ‘sugarbelle’ (Don’t know what else to call her) that if you follow Wilton’s recipe to the T its so stiff and difficult to work with. This is just my second attempt at making royal icing and it worked so so well. Thumbs up to the recipe.
why my icing crack a little bite when it dries out ? thanks.
If you add corn syrup to this recipe, would it change the amount of water you add?
Hi everyone!
I am new to cookie decorating- if I wanted to add color to my icing. Do I have to use the soft gel color or can I use normal food coloring?
Thanks!
You can use normal food colouring, but I definitely recommend the soft gel kind – you will get MUCH bolder colours using less colouring.
Hi, have you tried frosting sugar cookies decorated with glaze icing? Any specific instructions?
Pingback: Stenciled Halloween Cookies | Beansy Loves Cake
I’m making cookies ahead of time for a party. Can I freeze the icing? Can I store in the refrigerator for a few days? Should I frost the cookies 1 day or 2 days before a party?
My daughter has many life-threatening food allergies, including egg, dairy, and nuts. Do you know of a substitute for meringue powder that is free of those items? Same for bakery emulsions. Thanks!
I just made your royal icing for the very first time! I have been using a glaze recipe for that last few years and always thought it was just fine. I’d read that lots of people stay away from royal icing because of how it tastes and I suppose that kept me from trying it myself. After reading about your recipe on Sweet Hope’s page I thought I’d try it and I’m so glad I did! I can’t wait to decorate my cookies tomorrow! (They’re baking as I write!) I just wanted to say thanks and tell you how amazingly talented you are!
I am IN LOVE with royal icing!! My butterfly cookies turned out perfectly!! Wish I could post a pic!
Thank you!
hi i live in Jamaica so the merengue powder isn’t really available. is there any difference wen using regular egg whites? and what is the difference in measurement ? and is threw anything that need to be altered for the humid type climate
You will need about two egg whites for every three cups of confectioner’s sugar. It’s kind of a weird number, so to simplify, that’s about 3 ounces for every four cups =)
I heard that we can store RI on the counter and it will be just fine. For how long can u store icing for without it going bad? thank you 🙂
Can you buy meringue in bulk? The little thing of Wilton you find in av Moore doesn’t seem to be enough?
You can at Michael’s or Walmart. I got 8 oz for $10 at Michaels, but they always have coupons. They also had 16 oz option. Walmart had it in 16 oz for about $15 I believe.
You said in another recipe that you like to decorate your sugar cookies a day old. How long does it take until it is ready to eat including the icing decoration because I think it takes awhile for it to dry right? This will be my second attempt at sugar cookies and icing after I messed up the first time 🙁
Do you use this same recipe for outlining and flooding? Just want to make your cookies and want to make the icing right!
What is the difference between using cream of tartar vs meringue powder? Can they be used interchangeably? Thank you!
You can’t replace the meringue powder with cream of tartar. The cream of tartar would just be a small amount and would make the icing a little “glossier”.
How long can you store the icing? I’m making cookies and wondering if 2 days is too long.
Kenzie – I have been making this royal icing recipe from Sugarbelle for over two years now. I store the royal icing in an airtight container on the counter for 2 1/2 weeks. It’s totally fine for 2 DAYS 🙂
I stored mine in the counter for a week and it separated. The top looked fine but there was a yellowish liquid in the bottom. Is this normal?
When you say “oil free extract”. Do I buy the clear extract?! Vanilla or Almond ??
Thank You!!
Which brand of meringue powder do you prefer? By the way love all your cookies and have learned a lot from all your posts…looking forward to more of them. I am new to cookie decorating…just made my 12th batch but still have lots to learn between recipes for cookies and icing and techniques!
I dont have a paddle on my hand mixer. I do only have whisk. Can I just lessen the time?
Pingback: Christmas Cookie Decorating Ideas Royal Icing | simple - best kitchen ideas
You know, I honestly can’t think of a single time I’ve seen a DOUBLE-SIDED decorated cookie. WHO would want such a thing? Personally I’ve never cared for eating cookies that have been decorated most likely with royal icing. Of course that could be because anytime I was ever in the possession of one it was something purchased in a shop and possibly older than me. It was usually a shortbread type of cookie (not my favorite at all) and the icing was tasteless, dull, and nasty. But even considering that, and even following your site for ages and ages, I don’t remember seeing a double-sided decorated cookie. Can you post one sometime or do one just so we can see what they’re like? I would think one half of the cookie would be damaged. I can’t quite comprehend why a customer would want such a thing. Oh, and a p.s. You might want to check some of the “comments” on this page because there are some REALLY weird ones, ones that there is NO way intended for any cookie bakers out there. The one right before my for example. I followed the link they have on there and it goes to some site about construction conduit pipes or some such thing. Now I know tomorrow is “National Mechanical Day” or some such odd thing (who makes up all of these days and weeks anyway? like national socks day or national pi day or national wear pink day?) But this mechanical day must be a big deal as I’ve been hearing it in a multitude of places. But there is “accounting project help”, “hrm essay writing” (whatever that is) and so forth. There is a LOT of garbage that doesn’t belong here. Even though they’re usually annoying, I wonder if you need one of those things that verifies the writer is human? If you add one, please don’t use one of those where the letters and numbers are scrambled and covered with other items or in such odd scripts they’re impossible to read. I’ve had a few of those over the years that nearly put me into counseling. thanks!
Pingback: Cookie Decorating Tips | Apostrophe S
Pingback: For the Long Haul: 16 Activities that Keep Kids Busy for Days
Pingback: DIY Waterless Snow Globes and Snow Globe Cookies to Match! - Home. Made. Interest.
You said you use vanilla, almond and butter extract. Can you please tell me exactly how much of each? I need specifics! 🙂 Thabk you.
Pingback: Royal Icing Recipe – Cami's Cookie Jar
Hello. I was wondering if I could leave out the emulsion? I forgot to get this. Just curious. Thank you!
Pingback: Drumroll Please...Introducing Weekly Technique! Royal Icing Problem Solving – The Simple Cookie
Hello 🙂
I’d like to know if keeping sugar glazed biscuits in an air-conditioned room can affect the drying process, or if you recommend fan only? I live in a really hot country and we have ants which like to roam around – the cold room is so much easier. I just wanted some input before trying 🙂
Can you add karo syrup to make icing dry shiny?
I found you through Instagram and can’t get over how smooth your icing looks on cookies!!!
The recipe I use is exactly the same but maybe the way mixing is different. Do you have favorite merangue powder?
Love how pretty royal icing is but the “break your teeth” cement it turns into is a big turn off. Any way to prevent that? I’m not a fan of the glaze ones in texture more the way they dry. Happy medium?
I felt the same way I discovered Sweet Hope. It is half RI and half glaze. Perfect “bite” ?
How long advance can I prepare royal icing?
What flavor emulsion do you use in your royal icing recipe?
I like to mix Watkins brand clear vanilla, a touch of Lorann almond, and a touch of Lorann butter vanilla. It tastes like marshmallows.
What retail stores would I be able to get oil free extract?
Any grocery store, along with Hobby Lobby and Michaels.
Sweet sugar belle, do you have a specific brand of meringue powder that you prefer? I can only find Wilton brand in stores where I live and Sometimes it just has an off putting taste. I LOVE following you and your work, you are a master at your craft!! Such an inspiration
I like CK brand, and Fat Daddios. You can find both on Amazon here:https://www.amazon.com/shop/influencer-5e78a25a
Is there any place to buy meringue power in bulk?
Pingback: How to make a cute Easter bunny butt cupcake topper
Hi sugarbelle,. I am trying to make a color for toothpick roses for my granddaughter’s Communion and it’s a purple/ red,/ purple color. I tried everything to mix colors and cannot make this specific color. Do you think you can help? I can send you the image of the color but cannot this way. Can I send to you via your e-mailed?
Hi there! I`ve never tried this, do you flood cookies with this royal icing? and make details over the cookies? thanks!!!
Pingback: 4 simple sugar cookies that will make your 7 year old swoon - Peanut Blossom
Pingback: Tips For Decorating Sugar Cookies with Royal Icing - Jamie Kamber
Could you give me some suggestions as to why my dry royal icing became washed out and dull. It has the look of being faded in the sun. What could have happened. Thank you.
My grandson has many food allergies, including egg, and nuts. Do you know of a substitute for meringue powder that is free of those items? Thanks you for any help
Hello Fantastic Cookie Artist!
What is your secret for smooth icing on the cookie? And which icing recipe do you use for piping on the cookie as the border?
Do you have to wait in-between piping ad icing so both will set up?
You cookies are to beautiful to eat.
I don’t have a website. I just love to create. Thank you in advance.
I love your recipe but I decorated the cookies with RI yesterday and they didn’t dry completely- they are still tacky. What did I do wrong?
There are a couple of things that can cause that to happen. I think the main culprits are likely to be: oil contamination, over whipping, over coloring, or a very humid environment. Are any of these a possibiility?
When using this royal icing recipe to decorate cookies would you consider the consistency of this royal icing as “flood consistentcy” ? Thanks in advance!
Hello I made this frosting and having trouble with it becoming too hard on my cookies do you have any suggestions?
Hi Taylor I add 1 Tablespoon or 1 1/2 Tablespoons of clear Karo syrup to help soften my icing and it has worked for me. Experiment with it. I did. They came out with a soft bite. : )
Pingback: You’re Grate! Punny Cheese Grater Cookie Icing Color Palette – The Sweet Adventures of Sugar Belle
Hi….can you freeze the premade flowers in the freezer for later use? And if yes…how do u store them in freezer? Layer between waxed paper or just put in container?
I wouldn’t store them in the freezer, the moisture might damage them. Think of them like sprinkles. They’re shelf stable. I would store them in a cool dry place. Away from humidity (because water and RI don’t mix) and light so they won’t fade. Some people advise storing them in a shoebox, I use a flat plastic storage container and with a paper towel between layers.
Hi Taylor I add 1 Tablespoon or 1 1/2 Tablespoons of clear Karo syrup to help soften my icing and it has worked for me. Experiment with it. I did. They came out with a soft bite. : )
Newbie here! Wondering how to get the different consistencies for the flood and the outlines? Is it the same? Kinda confused
Newbie here! Wondering how to get the different consistencies for the flood and the outlines? Is it the same? Kinda confused
Thank you! I just ordered some lemon flavoring from Spices, etc. I like that lemon cuts the sweetness of the royal icing but find that I get an uneven surface on my flood when I use lemon juice to flavor the icing as part of the water – I don’t know if it’s too much acid or something? Anyway I went back to using vanilla & water only and had 4 batches without a single dimple/uneven surface so it must just be the lemon juice. Which made me so sad, but now I’ll try this flavoring and see if that gives me the same zesty flavor. Thanks for the referral!