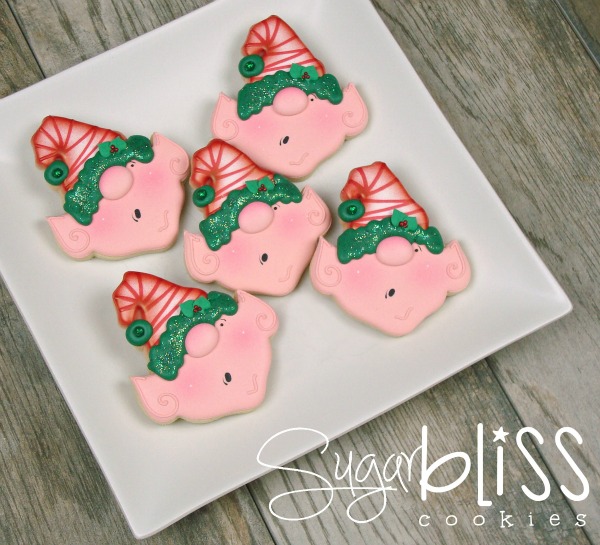
Decorated Elf Cookies with SugarBliss Cookies
Christmas is almost here, and I could not let it pass without sharing these silly little elves from one of my all-time favorite cookie decorators, the girls of SugarBliss!
Follow along as they teach us how they made their perfect Christmas elf cookies! ![]()
We can not believe how fast times flies. Christmas is right around the corner! Are you ready? It feels like we’ve barely come up for air in between all of the Christmas cookies we’ve been working on. We’re guessing most of you feel the same way! A few months ago when things weren’t so crazy, we had some time to sit down and plan some new designs for Christmas this year. We even had a few of them made into cutters by Truly Mad Plastics. When Callye asked us to make a Christmas tutorial for you, we were really excited to be able to share one of those designs with you.
 It’s ok if you don’t have the exact cutter. This design would work on most any shape you can use as an elf. If you’re already stuck, Callye has a few tutorials for making an elf cookie by piecing together some cutters you might already have or by re-purposing another shape. We want this design to be easy for you! Especially if you’re still hunting for a last minute cookie idea. These come together really quickly and many of you might already have these frosting colors ready to go in your kitchen.
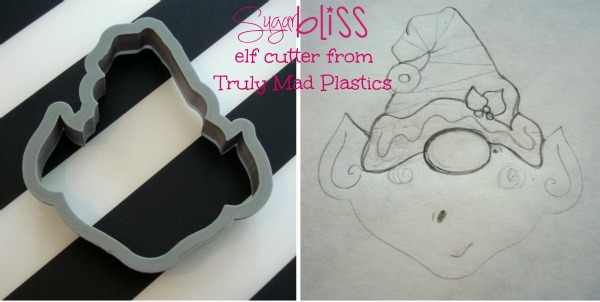 Here is the cutter we designed along side our original drawing. Most of our designs begin as a simple pencil sketch. From there, we start making decisions on how to execute the different details so we know what order things have to be done.
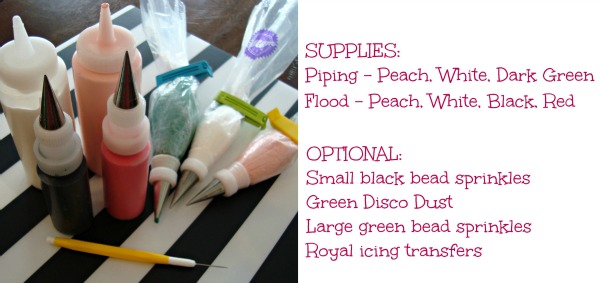 Here is what you’ll need. As a general note, we typically outline with a 1.5 PME tip. This tutorial is full of options and choices. Do what you are comfortable with and look for ways to make it easy on yourself. Notice the optional list. This is a great place to get creative. If you don’t want to use the bead sprinkles for eyes you can just pipe a dot of frosting. If you’re not a disco dust eater, you can use sanding sugar or nothing at all. Look for opportunities to use what you have on hand.
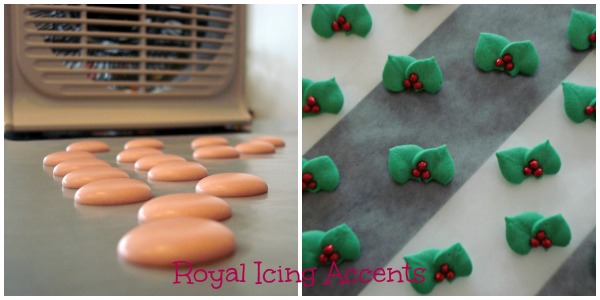 We made these little holly transfers last week with some left over icing. If you don’t have any holly royal icing accents ready to go then you can substitute with a sprinkle you like.
If you want to make you’re own holly royal icing accents click here for a tutorial.
The noses were another royal icing accent we chose to use. Making them first thing sure helps the process move along. It also helps keep the nose a nice oval shape. We didn’t have these made ahead but they were the first thing we worked on before we started outlining and flooding cookies. They were dry and ready to go when we needed them. We make them with a peach flood consistency (no outline) and we piped them on wax paper right in front of the heater fan while the fan is running. It keeps them nice and puffy and prevents craters. You can use our drawing for a template under our wax paper to keep the size consistent or just wing it! If you’re not in the mood to make them first, you can just pipe them directly on the top of the cookie later.
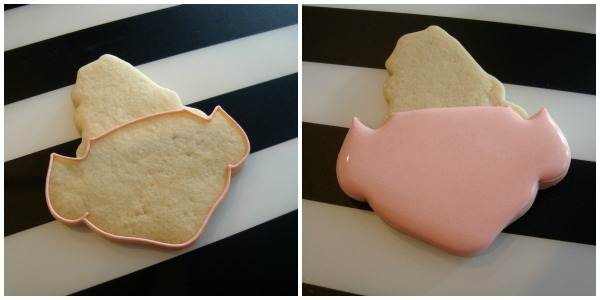 You can print our drawing of the design and use it as a template to trace. If you own a projector you can use that here OR you can just wing it. Start by outlining with peach piping consistency and filling in with peach flood. Remember how we said these come together quick? Here goes! While the face is wet you’re going to add a few more details. QUICK!
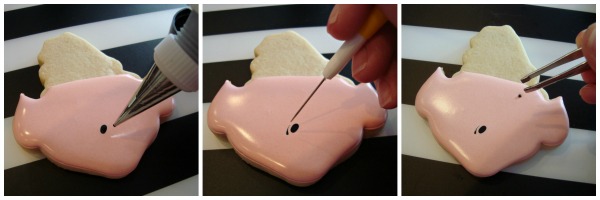 With the flood consistency use the black to drop an oval shaped dot for his mouth. We chose to go a little off center but you can do what you like. Then, dip a toothpick or scribe tool in some black flood and drag it through the peach to create that little line detail to the side of his mouth. THEN, drop a small black bead sprinkle in for his eye. Don’t get too nervous about placement on this. You’ll be able to make it work in the end. Just try for the approximate area. We set our cookies in front of the fan for a few minutes so we could keep going. Fan or air drying, wait for the frosting to crust and then you’re ready to move on.
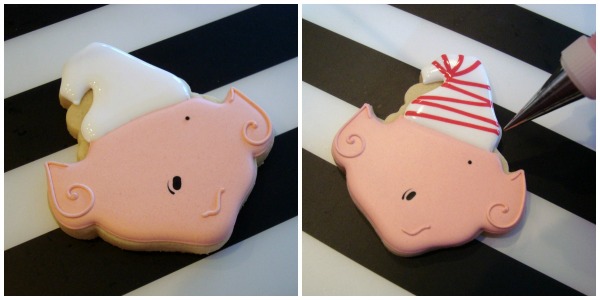 Outline the hat with white piping consistency and then fill it in with white flood. While the white is still wet, drop in some red flood consistency wet on wet lines. We liked them uneven but you can change this detail up if you want. Polka dots would even be cute here!
You’ll also add the little piped detail to his ears and his chin now. Use the peach piping consistency to draw them on.
Put him back in front of the fan for a few minutes to dry.
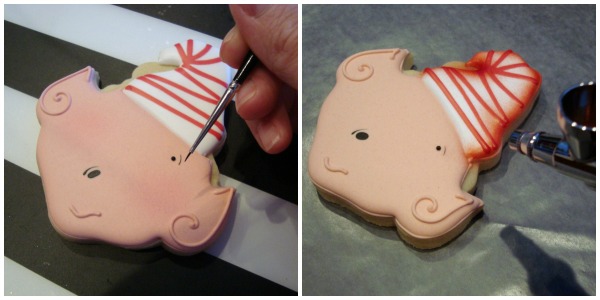 Once that white frosting has crusted over, you’re ready to move on. Now we’re going to add a little red airbrush color around the edges of his hat. We used Americolor Super Red. If you don’t own an airbrush (or maybe you own one but you never use it because it makes you nervous 🙂 ) you could use petal dust here or even go at it with a paintbrush and some red gel color. You’ll just need to wait for the frosting to dry a bit longer before adding this detail.
This little elf also needs an eyebrow and it is easier to put it on now rather than trying to make it work after we’ve added the detail on his hat. We like to use a small paintbrush and a little drop of black airbrush color. The nice thing about this, we don’t have to wait for that cookie to completely dry before adding this detail. The paintbrush doesn’t require any pressure (like a marker does) so we don’t have to worry about it puncturing through the frosting. If a marker is all you have, it would work just fine here. HOWEVER, you’ll have to stop at this step for a while longer to allow the peach frosting to dry more before you’ll be able to draw it on. If your elf doesn’t need an eyebrow, you can skip it!
 If you have an airbrush, we’re going to use it a little bit more here. If you don’t or just prefer petal dust, move on to the next step and you’ll add our pink cheeks and rosey color to the nose after he is all put together and dry. If you’re airbrushing, we used Americolor deep pink. Make sure you’re VERY easy on the trigger pressure. You can also turn the compressor down to low if it’s easier for you to work with. Spray just the top edge of the nose with a bit of pink and spray the elf’s cheeks just next to his ears. Aiming takes practice, just don’t stress it. Spraying them before we add them to the cookie makes it so much easier! We don’t have to worry about accidentally turning his whole face pink. You can go as dark or as light as you like.
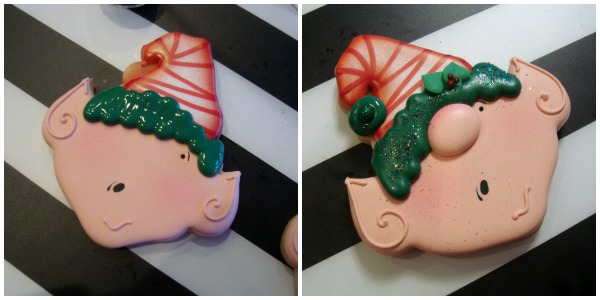 Last step! Pipe the green edging on his hat. We used a size 4 PME tip for this. We drew a zigzag up and down across the front covering where his white hat and face color met. Again, we chose to make this line irregular but you get to decide. As you pipe across his face, just make sure you pipe up away from his one little eye that is peeking out from under his hat. We don’t want to cover it up! While the green piping is wet, you’re going to add the last few details. Drop on your cute holly royal icing accent (or the sprinkle you have chosen). Next, drop on one of the noses you made so it is overlapping the green frosting about half way. If you didn’t make noses first, you’ll have to wait for this to dry a little before you can pipe a nose directly on. To finish him up, you can add your green disco dust or sanding sugar here.
Use the same green piping to add a small dot for the pompom on the end of his hat. You can also add a coordinating sprinkle to the center. This is where we added the large green bead sprinkle.
You can add little white dots to his cheeks if you like them. Dip your scribe tool or toothpick in a drop of white flood and lightly touch it down in the center of his rosey cheeks.
Leave them out to air dry over night or until you’re comfortable cleaning them up a bit for packaging. Use a dusting brush to clean off the excess green disco dust or sugar you used. If you didn’t airbrush them before, now is the time to add pink petal dust to his cheeks and nose. Now, he’s ready to go!


These elves are ADORABLE!! TYFS!!
These are awesome!! My sister would love these. She has a thing for elves, and these would be right up her alley! Thanks for sharing and teaching us. Happy Holidays!
Really cute – need to try this. thanks for the ideas.
So stinking cute!
Totally adorable! Thank you for sharing your wonderful and clever ideas!
SO Cute!