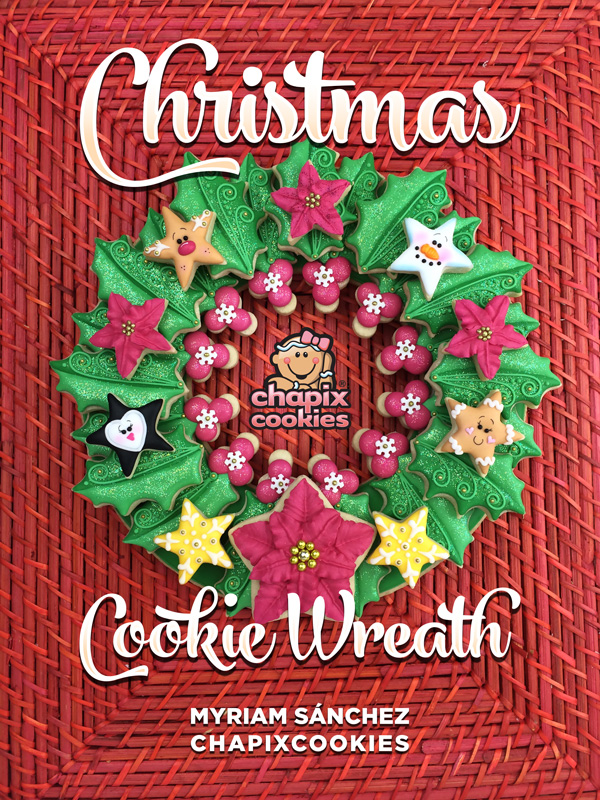
Christmas Cookie Wreath with Chapix Cookies {Guest Post}
Have you ever been so excited about something that you could barely contain yourself? That’s how I feel about today’s guest. One of my very first cookie idols, Myri, of Chapix Cookies is sharing her first online tutorial here, today, in MY space!
For years, I’ve dreamed of attending one of her classes, but until then, this is the next best thing.
Follow along as she demonstrates how to make her magnificent Christmas cookie wreath.
![]()
Cookies (made with your favorite recipe):
- 1 cookie ring base, approximately 8.5 inches (The size of the wreath can be as big as desired).
- Holly leaves with berries and some others without berries
- 1 medium star
- 6 mini stars
Royal Icing:
- Thick consistency in Electric Pink color.
- Medium consistency in Leaf Green, Light Leaf Green, Egg Yellow, Warm Brown, Black and White. (The amount of Royal Icing will depend on the size of the cookies).
- Thin consistency in Leaf Green
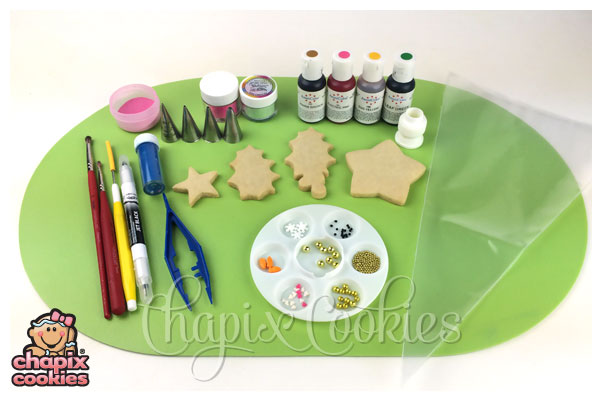
Other Supplies:
- Dusting powders pink and blue
- Black Edible pen fine point
- Tips: #2, #3 round tip # 66 #67 leaf tip and PME #1 tip.
- 7 Couplers
- 7 Piping bags
- 2 Fine paint brushes
- Disco Dust: Hot pink and pastel green
- Scribe tool
- Accent Tweezers
- Sprinkles: Snowflakes, black nonpareils, carrot, mini hearts
- Edible black pearls 4mm
- Gold dragees in three sizes: large, medium and mini.
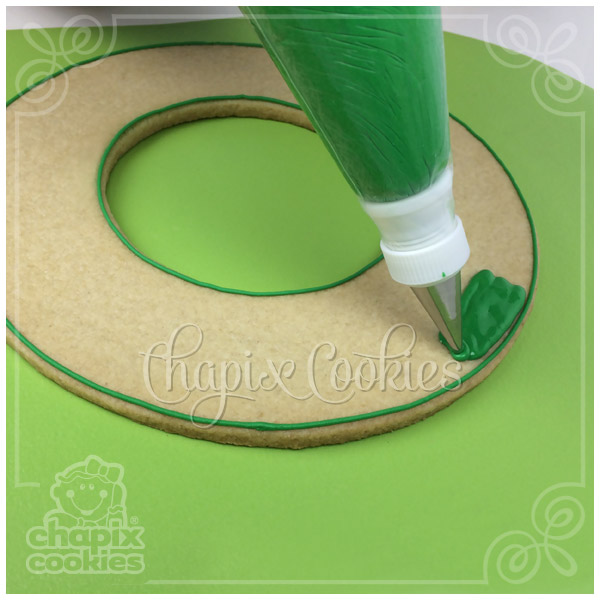
Step 1: To create the base ring cookie, make a circle using a lid, bowl or pan. Diameter is approximately 8.5 inches . Cut a smaller 4 inch circle inside to form the base ring.
Outline with medium consistency in leaf green color using a #1 tip and flood with a thin consistency in leaf green color using #3 tip.
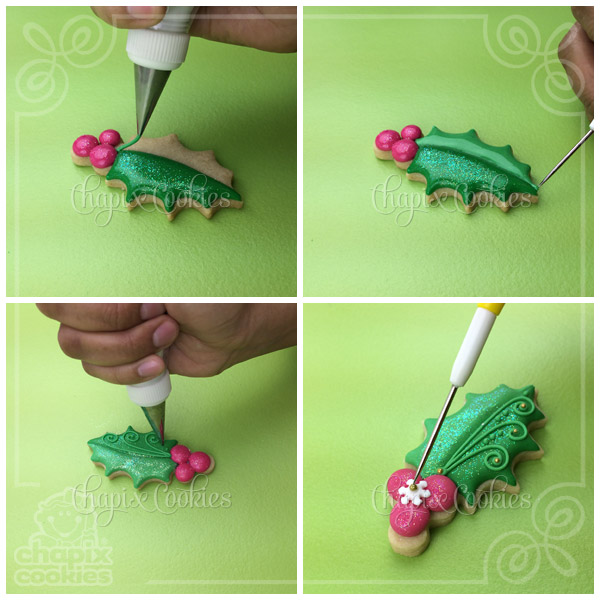
 Step 2: Outline and flood the upper half of the holly leaves with Leaf Green royal icing, using tip #2 and medium consistency. Immediately sprinkle a small amount of disco dust in pastel green color with the scribe tool. Let it dry.
Make the berries using medium consistency Electric Pink royal icing, one at a time. Immediately sprinkle a small amount of disco dust in hot pink color with the scribe tool. Allow it to dry enough to keep decorating.
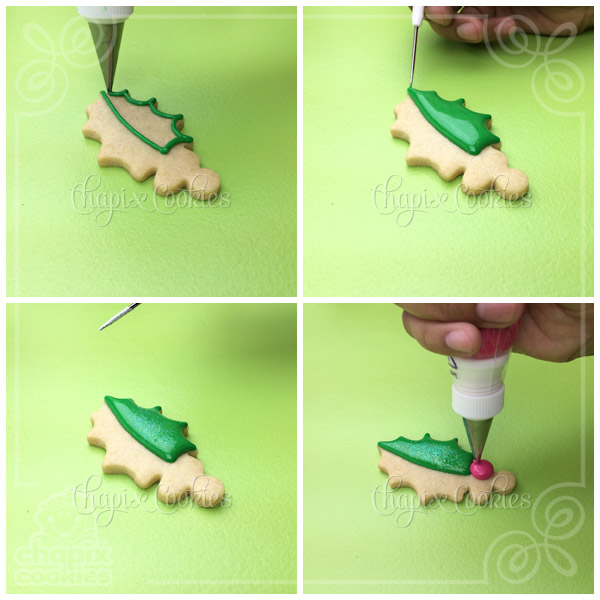 Step 3: Outline and flood the second half of the holly leaves with Light Leaf Green royal icing, use #2 tip and medium consistency. Let it dry.
Using PME #1 tip and medium consistency, pipe the swirls and dots. Decorate the ends with some mini golden dragees. Place a snowflake sprinkle between the berries and one more mini dragee in the center.
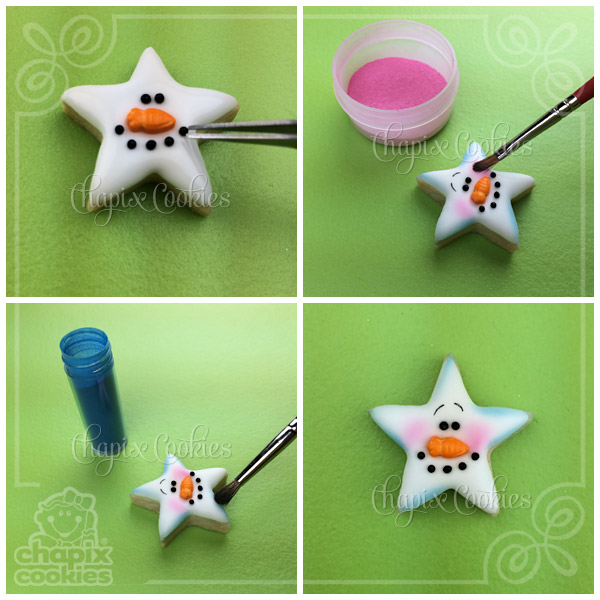
 Step 4: To make Frosty, begin with a small star, outline and flood the surface with white Royal Icing in medium consistency. Immediately, place the carrot at the center of the star and use nonpareils for the eyes and mouth. When the surface is completely dry, blush the cheeks with pink dust. Blush the edges of the star slightly with blue dust. Draw eyebrows very carefully with the black edible pen.
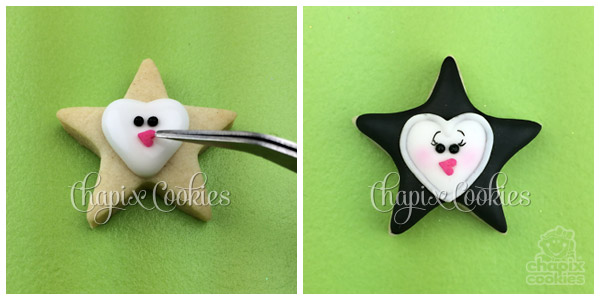
 Step 5: To create the penguin cookie pipe a white heart at the center of the second star with Royal Icing at medium consistency. Immediately place two nonpareils as eyes and one heart as mouth. Let it dry. Pipe the rest of the cookie with black royal icing. Draw some eyelashes and eyebrows with the black edible pen. Pipe an extra white outline around the heart with a #1 tip.
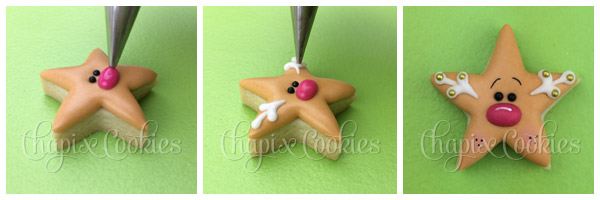
 Step 6: To make the reindeer cookie outline and flood the star with warm brown Royal Icing at medium consistency. Add two nonpareils as eyes. Let it dry. Then pipe a nose with the electric pink color using a PME #1 tip. Pipe the horns in white icing using a PME #1 tip. Decorate the ends with some mini golden dragees. Draw eyebrows, eyelashes and a smile on the cheeks with the black edible pen.
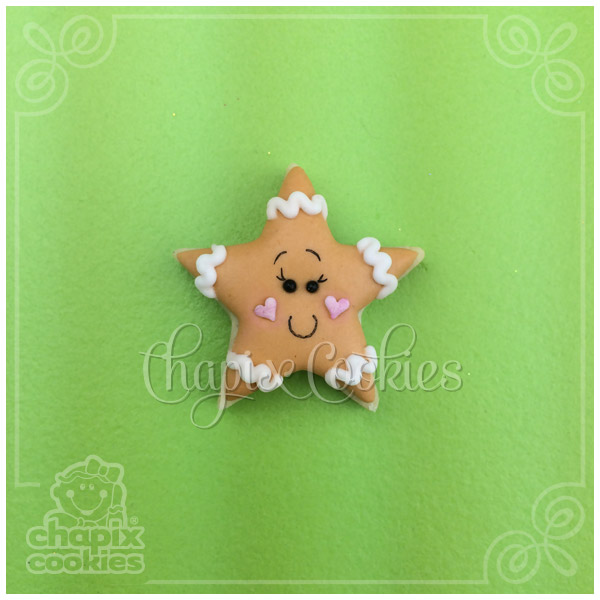
 Step 7: To make the gingerbread cookie outline and flood a fourth small star using the same technique and color as the reindeer. Add two nonpareils as eyes and two mini white hearts as cheeks. Pipe zig-zag lines in each point using the PME #1 tip. Draw eyebrows and dots on the cheeks with the black edible pen.
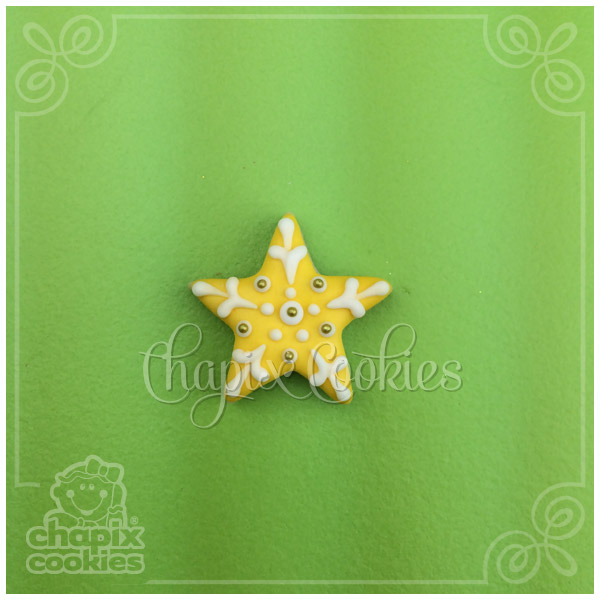
 Step 8: To make yellow stars, outline and flood using the same technique as the rest of the characters in yellow royal icing. Decorate piping filigree in white icing using a PME #1 tip. Glue some mini gold dragees to the filigree.
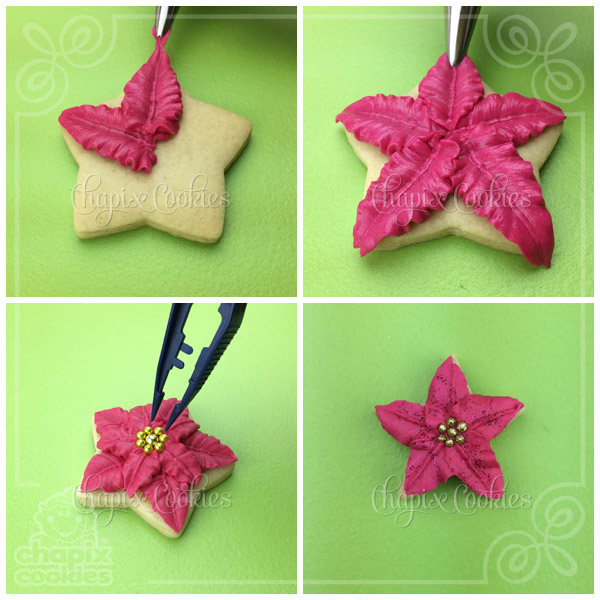
 Step 9: To decorate the medium and small stars as a poinsettia, use a thick royal icing in electric pink color. Use a #67 leaf tip to decorate the medium star. Starting at the center of the star, pipe each petal squeezing gently and releasing on the outside. Repeat until the five petals are done. In the center of the biggest star, glue one large gold dragee with medium size dragees around of it. Decorate 3 mini stars with the same technique and a #66 leaf tip, glue gold mini dragees in the center.
 Step 10: Now you are ready to assemble your wreath. Use Leaf Green royal icing to glue the larger leaves all over the cookie ring, placing the leaves with the berries pointing toward the center of the Christmas wreath.
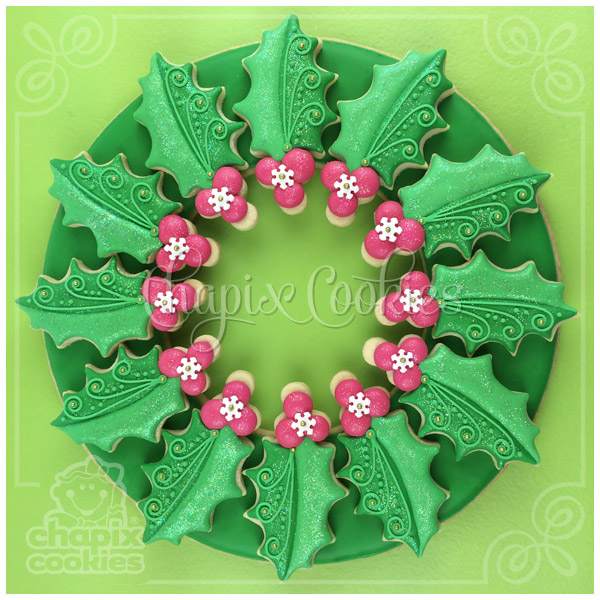 Step 11: Make a second layer with the rest of the leaves (without berries) placing them in between the spaces of the previous layer, leaving enough space in the lower area to glue the medium poinsettia.
On a third layer, arrange and glue the remaining pieces and characters. Let the icing dry before moving the wreath.
 Now you’re ready to share your cookie masterpiece with family and friends. I hope you will visit my Facebook page, Chapix Cookies to keep up with my latest projects and upcoming classes.
![]() Award winning cookie decorator and instructor, Myriam Sanchez, of Chapix Cookies is a graphic designer from Mexico. She became a cookie artist for the love of her daughter and now teaches cookie decorating classes all over the world.
Award winning cookie decorator and instructor, Myriam Sanchez, of Chapix Cookies is a graphic designer from Mexico. She became a cookie artist for the love of her daughter and now teaches cookie decorating classes all over the world.


Myri! I love this idea! And, of course, your execution is perfect. 🙂 I loved watching you decorate at CookieCon and I love seeing your work. What an adorable wreath!
So glad Sugarbelle had you guest blog today! <3
This is so cute! I love the idea and there are so many ways to go with this! Awesome!!
I’ve always admired your creations Myri and I’m so happy to finally get a chance to see how you create your works of cookie art! Love this!
HOW CUTE! I love the star penguin and reindeer! What a great idea!!!
Oh my goodness!!! SO CUTE!!! thank you for showing step by step so well! I LOVE it!!! So much detail! How fun! definitely will want to try this out!!!!
Ahhhhhhhhhh-may-zing!!!! I love every detail!
She is so amazingly talented! ????????????????????????????
Idk why those ? Marks are there. :-/
I just LOVE every face you’ve ever made Myri!!!! They are so so adorable!!!
Myri, this is absolutely wonderful! Every single one of these designs is just perfect and I always love the precious character that you give your faces. Such wonderful photography too! Congratulations on your first tutorial with hopefully many more to come. This is fabulous!
Hi Myri, What a wonderful cookie project, I love you cookies so much! Wishing you and your family a wonderful holiday xo Marlyn
I am so excited to see your first tutorial. I have been an admirer of yours since I saw your butterfly on a stick. Great job Mryiam.
I would love to join
Love the wreath and all techniques applied! Thank you Myri and Callye for sharing!
Love it!!! Love it!!! Love it!!!!
beautiful!!
Myri, I couldn’t wait to see you in action! Once again, your work is breathtaking!
I found this tutorial awesome and so beautiful.
I love , love, love the poinsettia !
Gracias Myriam por ser una mujer talentosa y creativa. Todo lo que haces es perfección. Que dios te bendiga y gracias por compartir con nosotros tu primer tutoría.
Thank you Myriam for being a talented and creative woman . All that you do is perfection. May god bless you and thank you for sharing with us your first tutorial.
I fell in love with Myri’s cookies at CookieCon and the love affair continues! This wreath is so beautiful!
Thank you so much Anne! <3
I’m so excited for this tutorial! Myri is one of the sweetest, BEST cookie decorators out there and I just adore this wreath! Thank you for sharing with us, Myri!!!!
You are welcome Christine! You are one of my favorites cookie decorators out there, I LOVE your work! <3
Thank you for the wonderful tutorial.
The wreath is so cute, I wouldn’t be able to eat it…lol!
you are absolutely one of the most talented cookie artists i have seen! lovely…just lovely!
Beautiful!
EXCELLENT WORK, YOU ARE SO TALENTED.
Maravillosas cómo todo tu trabajo