Happy New Year Cookies
I love the days after Christmas almost as much as Christmas. It gives me time to relax, regroup, and to get excited about the upcoming year. I’m ready for 2012 because I have a feeling it’s going to be a good year!
I am often asked what I think of Kopykakes, and if I own one. Yes, I own one, but these days, I don’t use it often. Unless I am making a LOT of cookies it’s not worth digging out of the closet.
For those of you who make a high volume of cookies, I highly recommend purchasing one. It really saves a lot of time and frustration but if you’re a hobbyist or beginner, don’t shell out any money before reading this.
By learning one simple trick almost anyone can make perfect cookies like these, without a Kopycake.
Begin with a cookie that “2012” will fit on. This oval was a little over three and a half inches long, and two inches tall. If you don’t have an oval cutter try THIS LITTLE TRICK. Chances are you have just what you need already!
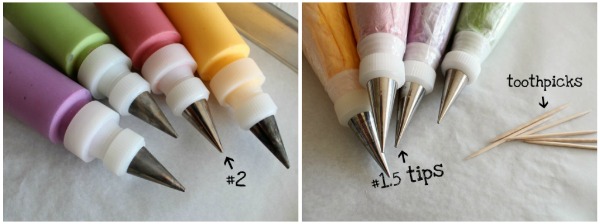
Outline and flood the cookies with white icing and let dry them completely. The next day, mix up flood and piping icing in the colors of your choice. I used a #2 tip for flood icing and a PME #1.5 for the piping icing.
Twenty-second icing works VERY well for this application, but since I was working on other cookies that required piping, I used both consistencies. Also, don’t forget the toothpicks!
Use a food color marker to write 2012 on the plain white cookies. make the numbers pretty large. For the sake of demonstration I chose black but normally I use with the old yellow one I don’t need very often.
Don’t let the writing part intimidate you. Just do what comes naturally. Since you’re writing, which is often more comfortable than piping, you have the freedom to move as slowly as necessary to to get it right. Nothing is more comfortable than your own natural motions. Just relax and and try not to over think it.
Now for the fun part. You’ll be amazed at how much a little outlining can change a cookie. Begin by using the piping icing to outline the written letter then quickly come back and flood.
For the most part, this is pretty simple, but every once in a while for no apparent reason, that mysterious and infuriating icing cratering thing happens. I KNOW y’all know what I’m talking about…
To avoid this, when I fill my outline I start very close to the surface of the cookie and fill small sections, connecting them as I go.
I lightly drag the icing tip against the base {white} icing to make sure I am filling the entire area.
I really think that the cratering is the result of a void of some sort, {perhaps air being trapped} between the bottom and flood layers of icing, maybe as a result of being filled to quickly. But I am not 100% sure on that
I hope that made sense. Although I can visualize it, it’s hard to explain. But it seems like as the icing dries, and the air is displaced that the “voids” fall into each other.
In any case, don’t quote me on that, it’s just a theory, but it’s the best one I have. Mystery of life?
Anywho, finish flooding the outlined area.
When it is full, quickly drag a toothpick through it three or four times to remove any air between the bottom layer of icing and the flooded area.
To finish, come back and add more flood icing, building it up and giving it that “poufy” look. It doesn’t hurt to give it another toothpick drag while you’re at it. Obviously you can’t be pokey when doing this or you’re going to have trouble. When you’re playing with royal icing, you’ve gotta move FAST.
When you’re finished, the cookie should look like this…
Since I had a few extra cookies, I did a little experimenting while I was working. Using the technique I described above, this was what I came up with. A little sinkage, {most often at corners and bends} but no cratering.
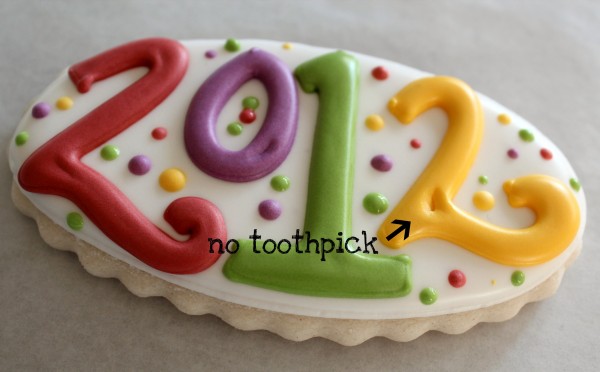
On the other hand, check out what happened when I didn’t use the toothpick.
My kids got this one, but if you happen to get a crater don’t freak, be creative. Add a little highlight, flower, maybe even a dot. In a pinch, almost any cookie can be salvaged, but just in case, have a few backups handy.
While I was in experimentation mode, I also tried a few other things…drying them with and without a fan, more and less icing, and also using different consistencies.
Although I still don’t have a definitive answer, it seems to me that CONSISTENCY is the best weapon against cookie craters. With 20-second icing, which I used for this blue set, I almost never have cratering problems *knocking on wood*.
I wish I had a more solid answer for you, but so far, this is the best I can come up with. If you’d like a little more insight on the subject, check out Sweetopia’s helpful article HERE and Anne’s tip {AKA Flour Box Bakery} HERE.
In any case, craters or not, cookies are a great way to start a new year!
As I said before, I am pretty excited about 2012. I feel a lightness and almost little giddy about the things to come. This is about the time of year I began decorating cookies myself, and now, three years later I hope there’s another girl {or boy} just like me, excited to learn all about cookie decorating too.
I already have several resolutions goals to better myself over the next year. How about you? I want to hear all about them, just in case I missed one.
Happy New Year y’all!


Pingback: Glorious Treats » Joyful Christmas Cookies
Pingback: Miniature Graduation Cookies
Pingback: Custom Alphabet Cookies
Pingback: Friday Favorites–New Year’s DIYs | Crafty Staci
Hi!
Love your site/cookies/everything.
Was wondering if you could help me. What cutters could I use to make the streamers from the blue set?
Thanks,
Shannon
Guess what… I was wondering the same thing, and she addresses it in a graduation post.
She uses different snowman cutters upside down :o)