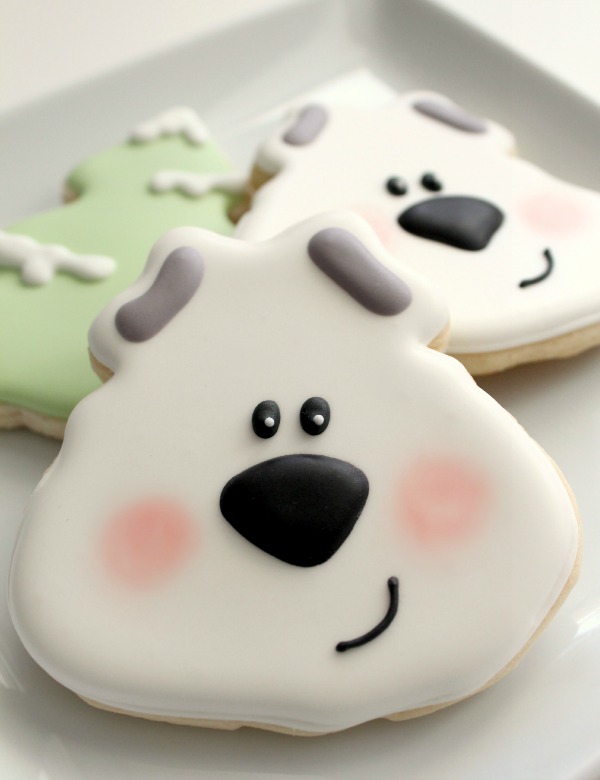
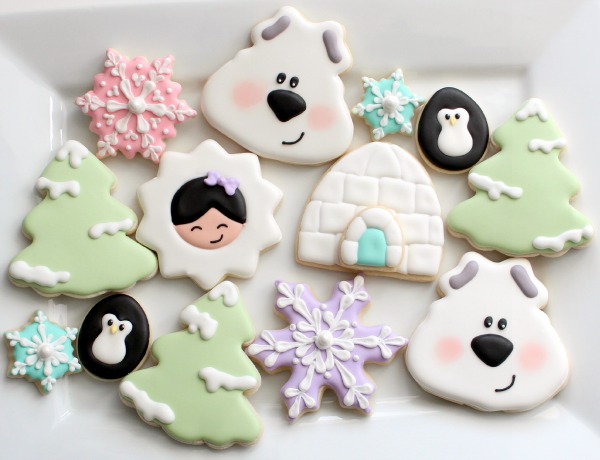
Easy Polar Bear Cookies
Finally, it’s beginning to feel like winter around here, so, naturally I made cookies. Although I’d never wish for Arctic temperatures, I’ll take these cuties any day of the week!
My “bear” cutter is a bit unusual, but I’ve found that with a bit of trimming, it works perfectly.
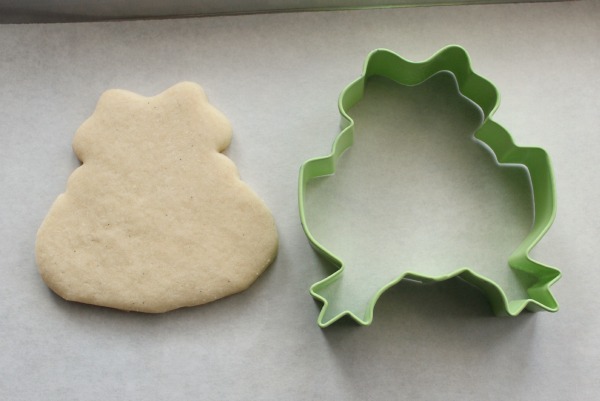 I’ve also used this frog for other animals such as Carebears, pigs, and a panda {which I can’t find a photo of right this minute} and can see him working well for other ideas such as dogs or owls.
If you don’t have a frog cutter, get one as soon as possible. This cutter is just like mine, but Bobbi’s Cookies also has a printed version here. Both are a great addition to any collection.
To make these cookies you will need:
- White piping and flood icing
- Black piping and 20-second icing
- Gray 20-second icing
- Light pink petal or lustre dust (optional)
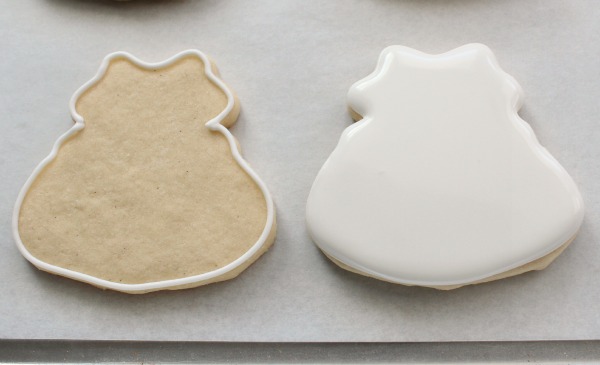
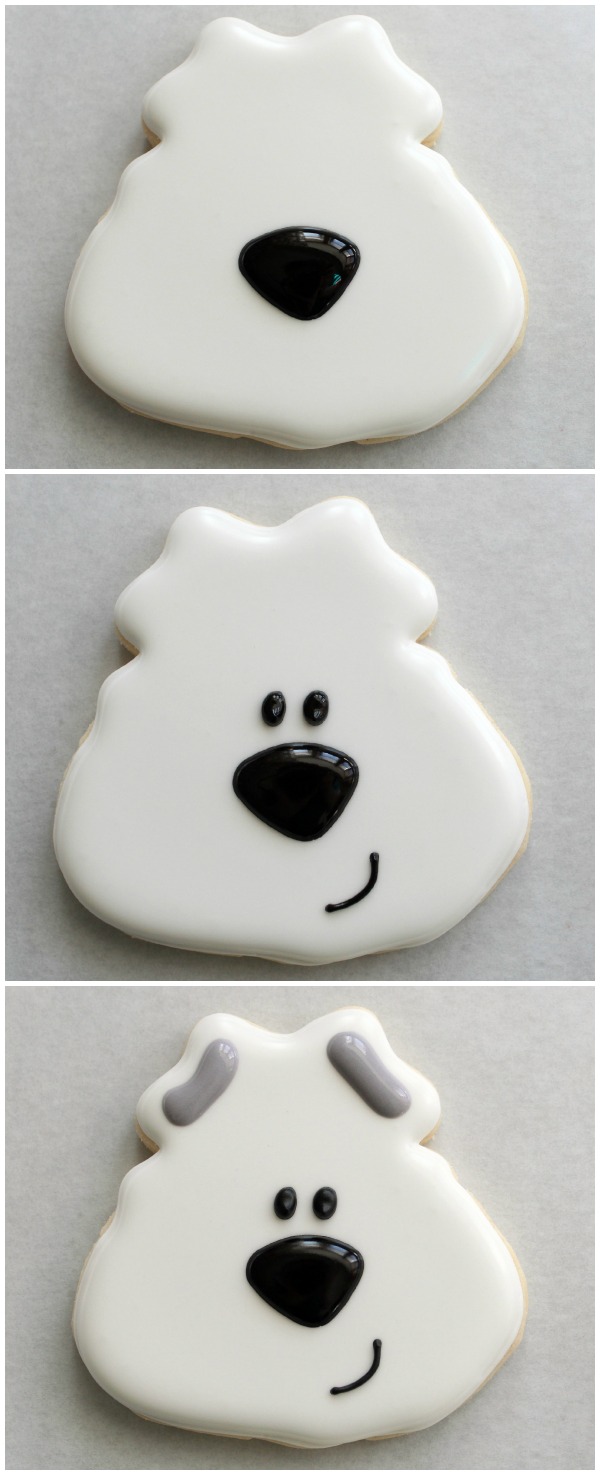
Begin by outlining and flooding the cookie and let dry overnight. This is especially important if you have bleeding issues.
This is a little off subject, but I wanted to take a second to talk about one of the most important things you as a cookie decorator can do to improve your final product…SKETCH.
People often ask me how I come up with ideas. Truth is, that part comes naturally. However, no matter how great the idea, I’ve learned that taking a minute to sketch out a design can make the difference between a really ugly or really amazing cookies.
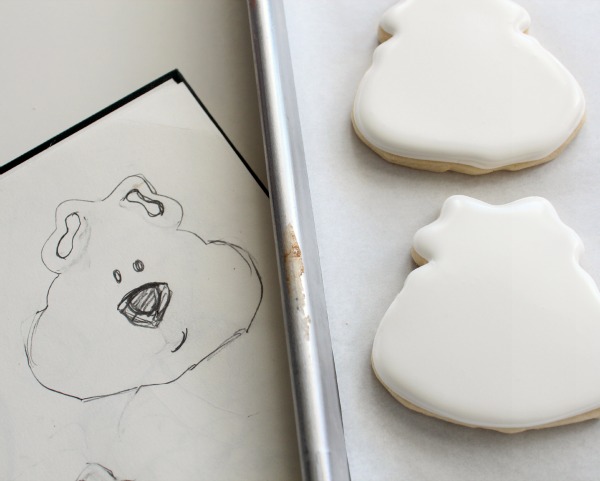
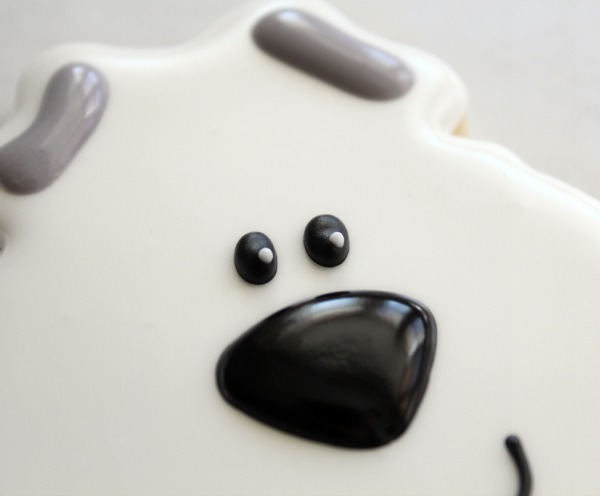
Anywho, that said, once the icing is dry, add the facial features. This part is really simple. Black 20-second icing for the nose, piping icing for the eyes and mouth, and gray icing for ears.
 I’m also big on adding a little “sparkle” when I make eyes. Use white piping or flood icing.
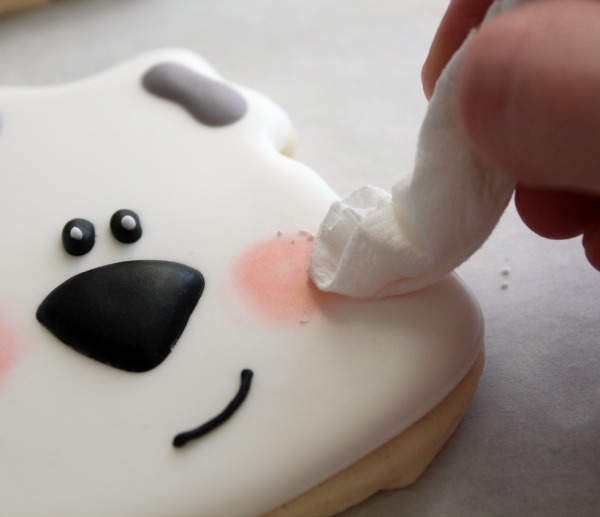
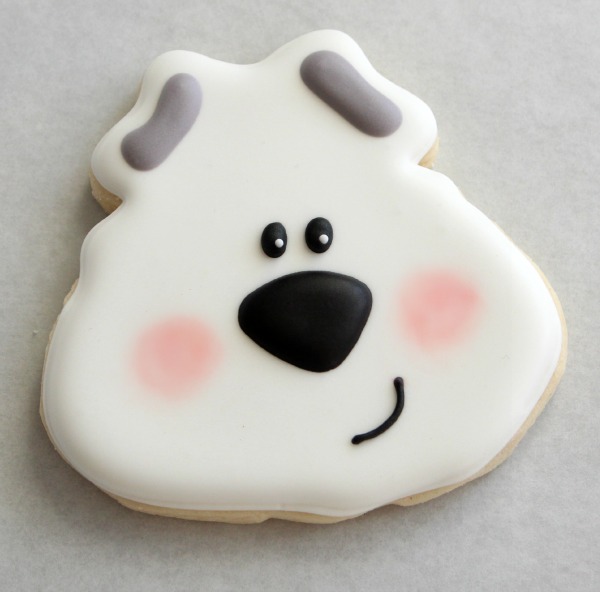
 Mr. Bear is good as is, but I was in the mood for a little extra cuteness so I used pink petal dust and a cotton swab to give his cheeks a bit of color.
When applying and kind of color in this manner, GO EASY. Too little is better than too much. I usually get the best results working out of the lid of each color rather than the actual container.
In this case the dust is applied dry although you can also use an alcohol based liquid to create a wet solution, which you can read about HERE.
 Remember I mentioned going easy? That isn’t because I don’t trust you, it’s because this is one of the most common mistakes I make. If you go overboard or get dust in a funky place it isn’t usually easy to fix, so be careful.
If you manage to go overboard try not to panic. The situation isn’t completely hopeless. A few years a friend of mine suggested using a tissue dipped into a bit of cornstarch to blend overly intense color. It’s not a cure all, but in my experience it does help.
 There you have it, Mr. Bear. Cute and easy too!
 And since all cuddly bears need friends, I made sure he had a few.
 These are the cutters I used. The tree was an eBay find, the sunflower from THIS SET, a bunch of random snowflakes {pretty easy to find}, a couple of egg cutters, and of course my froggie.
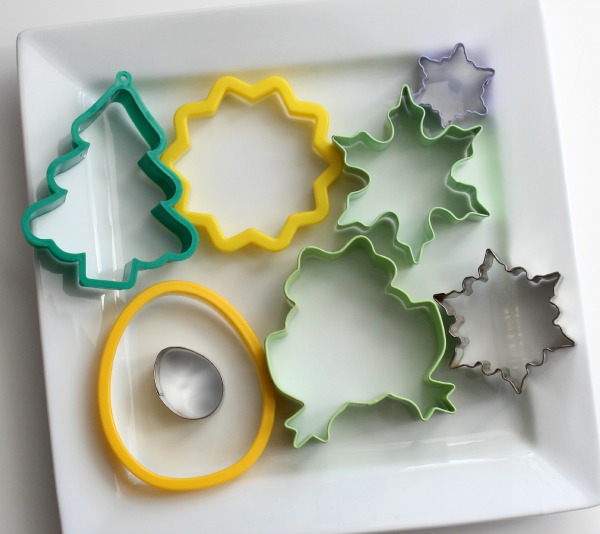
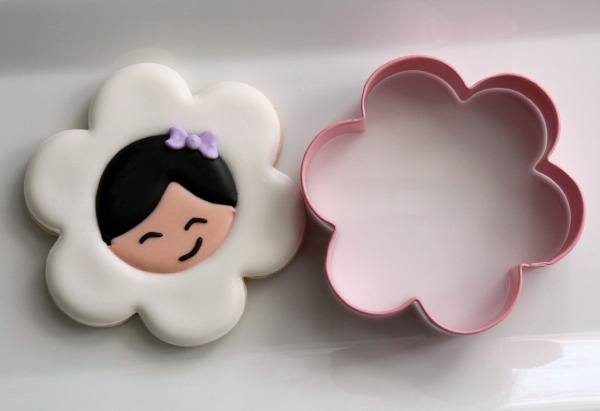
Keep in mind, if you don’t have the exact sunflower/sun cutter I used any flower cutter makes for adorable Eskimo cookies.
If you like these cookies I’m sure you’ll love these fun ideas:
- Polar Bear Cookies by The Bearfoot Baker
- Wintery Christmas Cookies via Sweetopia
- Creative Sled Cookies via Artfully Delicious Cookies {I wish I had remembered to include these in this set}
- Eskimo Cookies by Bake at 350
Have a warm and wonderful Saturday, everyone!


So adorable with their rosey cheeks!
What an incredibly cute set!! I just got some petal dust about a month ago and I still haven’t used it yet! I can’t wait 🙂
OMG!!! those are beautiful!!! How do u do Black royal icing. I bought the black but is too thin and it flows out the cookies!!!!
I.CANT.TAKE the cuteness!
Super, super cute collection! The little Eskimo girl reminds me of your daughter 🙂
Wow, you are a real artist! Today it´s cold in Sweden aswell, in Gothenburg we have minus 14 degrees celcius but in the nothern parts it´s almost minus 40 degrees.
I love this set!! I never knew a frog cutter could be so universal! Thanks for sharing this awesome tutorial.
These are so pretty! And happy looking. Love them!
Super adorable! I love the attention to detail with the blush effect 🙂
Super duper, duper cutest ever! LOVE 😀
Adorable! You make the most incredible cookies! You are an artist with cookies and icing. Love everything you post including your tutorials. Every party, I go to your website for a design to try with your cookie and icing recipe for my guests. 🙂
Awwww!!! I want to marry that Polar Bear and live happily ever after in a very cold place!!!
Oh my goodness these are adorable!!!! You really amaze me with your ideas. You are a great inspiration.
I think I just LOVE all your cookie creations. I’ve followed you for a while. I started to pin your cookies’ pictures to interest, but then I stopped because it was kind of silly to pin ALL of your pictures. Truly inspirational! God bless your creativity and talent!
They’re super cute! I love those rosy cheeks. I have a question though, is petal dust edible? I wanted to make some shiny cookies but we don’t have a lot of disco dust here, so I was going to get petal dust which comes in a lot of colors. But the seller told me it’s meant for fondant decorations that you’re not going to eat (hence the name petal dust), though it’s obviously not toxic of course. What do you think?
Oooh, that’s a tough one. Technically petal dust, lustre dust, and disco dust aren’t edible, but they are non toxic and made to use in food so I think consuming a tiny bit won’t kill you. I wouldn’t eat bottles of it daily of course…
Anywho, some peoe are more cautious than I am so if you’re making cookies for other it never hurts to ask. Perhaps, if thy do mind you can skip it all together, create the same affect with icing, or perhaps use a tiny bit of powdered KOOL aid or something similar…
I see, thanks for clarifying! Using kool aid sounds like a great idea.
I just love those piggies!!!
So creative, kiss a frog and you`ll get it!!!
These are just too cute!! I love the polar bears! Looks like I need to find myself this frog cutter. 😉
I have a polar bear and penguin fetish. These are super adorable and you are so incredibly resourceful with your cookie cutters! Thanks for sharing!
OMG, those penguins are ADORABLE! Could I request a blog post about doing penguin cookies? I have a SERIOUS thing for penguins, so that would be like… omg, so cool. And it’s even penguin season!
Ohh I missed you!!! I am glad you are back, and as always, thanks for sharing your knowledge and creativity!!!
Okay I am on cuteness overload here!!
You amaze me! I love seeing all your creations. They are incredible. thanks for sharing!
So adorable. I would never have thought that a frog cutter could make so many cute animal faces. Looks like I’m going to need to get one asap!
SO cute! I especially LOVE the Eskimo and igloo!
They are so cute, and I just love the snow capped trees !!!!
way too cute!
Super cute cookie; polar bears are one of my favorite animals. I actually have that frog cutter, which is amazing, since it is 1 of only about 10 cutters I have that are non-Christmas.
My only problem is–shaky hands:(
Any suggestions/tricks for hands that shake a little bit?? (luckily its only my left hand that tends to shake)
I’m so glad you’re back into the swing of things!!! I missed your blog (which I check everyday). These were really really cute!!!!
Oh my goodness…these are too cute. And the little penguins…*swoon*
These are so adorable!! I love polar bear smile/smirk! The penguins are adorable too!! =)
You never cease to amaze me with what you see in your cookie cutters! Very sweet winter collection, thanks for sharing!
You are the best!!! OMG, I love these cookies! This polar bear is sooo cute 😀
I am also in love with the care bear, I was such a huge fan when I was a child… ^_^
i love these cookies!!!!! specially the carebear 😀 definetely gonna try to make them !
These are wonderful! I struggled with what to make for my January project, being stuck between Christmas and Valentine’s Day… I settled on snowflakes, but I wish I’d tried something like this.
Those cookies are so beautiful ! And I do agree with Jolynn, you never stop amazing me.
Pingback: El bazar I – Galletaslombardero | cookies on time
Pingback: Baby It’s Cold Outside | Spoonful of Sequins
Wow! I love these! The polar bear is absolutely gorgeous, my favourite. Just found your blog, amazed looking through all you’ve done. Very talented, thanks for sharing!
Pingback: Christmas Bear in a Boot Cookies
the lil penguins are too cute. do you make and sell them . my niece is having a penguin baby shower and those would be super cute . if you do sell them please send me the information
It is truly amazing how you look at a frog cutter and find a polar bear. The bears are so totally adorable as are all the other designs.
OMG!!! OMG!! Those are the cutest polar bears I have ever seen! I would love to be inside of your head for just 5 minutes. 5 minutes is all I’m asking for. LOL
Pingback: Decorated Skunk Face Cookies
Pingback: Polar Pals Cookies
Pingback: Panda Face Cookies
Pingback: 50+ Ways to say, "Happy Valentine's Day" with Cookies
Pingback: Decorated Bear Cookies
Pingback: Decorated Polar Bear Cookies | The Bearfoot Baker