Patriotic Candy Buttons
Is it just me, or does everyone think of the darnedest things while they’re taking a shower? My thoughts range from what I have to do that day to long, involved conspiracy theories. Then sometimes I just think about candy. This is my latest shower-time epiphany.
 When I first decided to make candy button flags, I did a bit of Googling and found this tutorial from Tikkido. I would like to say I patiently read the post but I got as far as freezer paper and went on my merry way. Take it from me, if you’ll read the whole thing BEFORE you start it will save you a bit of frustration. I’ll skip the gory details.
Before I even thought about icing, I cut out sheets of freezer paper for my buttons. I planned on putting them in four inch favor bags, so I made a 3.75×18 poster board template {the roll of freezer paper is 18 inches wide} to use as a guide. First I cut several long sections then I cut those into smaller five-inch sections.
PS-I did not injure myself while making these…apparently my sweet little kitty, Stanley, is NOT as sweet as I thought he was!
 If your strips curl up at the ends, flatten them out a little before you begin. I used a cookie sheet with heavy books on top. If I’d have read better I might have decided to make one large sheet of buttons and cut them apart AFTER the fact…but y’all know how that went.
") In the meantime, after wasting an embarrassing amount of time trying to figure it out myself, I read the Tikkido tutorial in its entirety and figured out I should mark everything out on graph paper to ensure the buttons were evenly spaced. Somewhere down the line my insane brain also decided that I needed a sturdy spatula-like thingy to move them around as I finished, so I used the pushpin trick to transfer it onto a sturdier poster board base. I cannot explain my knack for complicating things. It is what it is.
In the meantime, after wasting an embarrassing amount of time trying to figure it out myself, I read the Tikkido tutorial in its entirety and figured out I should mark everything out on graph paper to ensure the buttons were evenly spaced. Somewhere down the line my insane brain also decided that I needed a sturdy spatula-like thingy to move them around as I finished, so I used the pushpin trick to transfer it onto a sturdier poster board base. I cannot explain my knack for complicating things. It is what it is.
 To begin the button making process, I mixed up a batch of my royal icing flavored with marshmallow extract from Spices Ect. and made red, white, and blue 20-second icing. By the way, I used tulip red because it’s tasteless which you can read about here.
The next part was easy. I placed the little grid under each piece of freezer paper and piped away. I started with the blue and then moved onto the stripes. Be sure to pipe them onto the dull side of the paper. If you use the shiny side they will fall right off.
 After piping a gazillion tiny little buttons, I let them dry overnight.
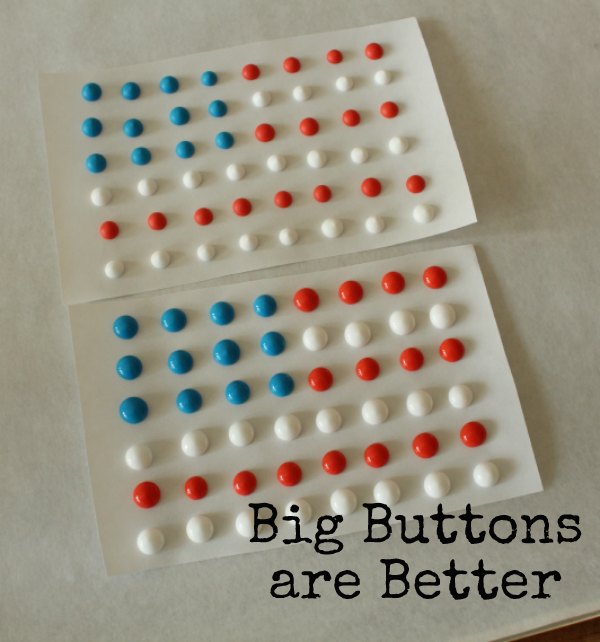
 Somewhere along the way I learned that big buttons are way cuter than little ones.
 The next day my little buttons were ready to wrap.
 I kept the packaging simple because I didn’t want to take away from the flag design. I started by sliding the button sheets into simple favor bags. If your bags are gusseted be sure to slide them in over the gussets…and just in case you don’t know what a gusset is, it’s the little fold in the side of the bag. Thank goodness for Glorious Treats, or I might have just had to call them “the little folds on the side of the bag” and you’d have never known. Unless you knew already, of course.
 The toppers were made from simple paper sacks. This was actually my neighbor’s idea, which is why she gets all my leftover cookies. Not only did she think of it, she also gave me the bags!
I wanted a two inch topper, so I measured out a four inch strips and used pretty scrapbook scissors to make the ruffly edge. Then I used the bag to measure the length of each topper and cut them to size.
 To attach them, I simply trimmed the top of the favor bag, used double sided tape to secure them, (yet another great idea from Glorious Treats, the pretty packaging queen) and folded them over.
 When that was done I finished them off with cute little labels but you can write directly on the topper if you’d like.
 Aren’t they cute? I know they look a little tedious, but the toppers and labels actually took the longest to make.
 The best part is, my kiddos thought I was the coolest mom around. For that day, at least!
 This project is great because its relatively inexpensive, doesn’t require an oven, is a great way to use up leftover icing, and can be made way ahead of time. And just in case you’re interested, there are exactly 57 calories in each flag so it’s a pretty guilt-free sugar fix.
Also, if you’re not familiar with freezer/butcher paper, check your local grocery store. Chances are, they carry it.
I hope everyone is staying safe and cool this summer. Have a great Wednesday!


Are you kidding me! This is sooooooooooooooooooooooooooooooo awesome! I’m completely in love with this concept and I will be making these immediately! You are, as always. COMPLETELY FREAKING GENIUS! (and I think I should start taking more showers).
I thought you were about to say I should start taking more showers 😉
I’m with Ashleigh although I’m afraid I would have to add a semi-rude expletive (okay, an utterly rude! expletive) after the “Are you . . . ” portion of the sentance! These are unbelievable!!! And: Where’s the book?!
PS Would I be banned from your site if I told Ashleigh I think she needs to start taking more showers, too? ; )
Sentence. Sentence, sentence, sentence.
Woof.
What a fun idea. You always have the cutest ideas, LOVE them!
So, so, so cute!! As soon as I finish my holiday cookies I think I’ll hand over the icing bags to the munchkins and let them give this a try!! Thanks Miss Sugarbelle!
I…like…big…buttons and I cannot lie…no other….
I totally tried to leave a serious comment….but I’m now going to be singing that song for the next three days so I thought I’d share the love….;)
I. CAN’T. STOP. LAUGHING.
Callye,
Those are freaking stinking adorable! Dang, I wish that worked with glaze but that many dots would create an equal number of craters and that would cause me to lose what little hold I have on sanity. So I will just look at your photos, admire and drool.
These are super cute, like everything else on your site. I just wanted to say that i made my first batch of sugar cookies this past weekend and i used your recipe. It was very easy and supper yummy, eveyone loved them! Although they were nowhere near as beautiful as yours, i did learn a couple of things from my first try and ill keep practicing! Thank you for the recipe.
These are adorable!!!
Love it – I’m a sucker for cute packaging 🙂
And, bigger is always better, right? Especially in Texas!!
these are just too cute, but our flag is way harder, you lucky Americans:)
So very cute! I think of things mostly when I’m driving…always the worst times when I don’t have my phone or a pen to jot the ideas down!
This is the coolest thing ever…. and even I could do it! So excited!!
Sorry about the cat attack 🙁
These candy buttons are awesome!! Great idea 🙂
These rock! Sharing on my face book fan page today
This is so cool. Who knew you could make homemade button candy??!!
The ever-talented Callye strikes again. How awesome are these?
this is just the cutest thing!! i love it so much…thank you for sharing and for being so talented!
? loves
I never heard of freezer paper before. I don’t think I’ve seen it either. I wonder if wax paper or parchment paper would work as well.
Great idea for left over icing (if there is any).
So adorable! I wish I had ideas as great as this when I’m in the shower!
You’re such a genius. So adorable. I’d never think to make something like this.
Hello Genius! I heart you and your adorable creations!
LOVE IT! Awesome idea! Your brilliant.
OMG, these were my favorite candy as a kid…and what the what is marshmallow extract?….heading over there to shop now! So cute! I’d be showering a lot more often if I could think up this stuff in there!
I would love to sell these in my shop! What did you do with them all ?
They went to the neighborhood kids and my neighbor :-). Her seat daughter had major surgery on her spine about 4 weeks ago and is having to live in a rehab facility until she’s healed, so we’ve been loading the nurses and PTs up with sweet surprises 🙂
Dar-ling.
What a cute idea!! Love this – thanks! (PS – sorry to hear about your cat, we’ve got one too. Let me know if you want to compare scars!)
Pretty darned clever!
Oh I love these – my kids would go nuts for these!
Love this! It would be cute in the favor bags of my rainbow birthday party, with a row of each color of the rainbow.
So cool! Great idea!
Is there anthing you can’t do?! OMG I love this! I use the candy buttons as a backdrop for photos
sometimes.<3 Donna
Is there anything you can’t do?! I love this! I use the candy buttons as backdrops for photos sometimes. <3 Donna
Hi! Did you try parchment paper? Wondering if that would work as weel.
They fall off of that too easily. Regular paper works also, but some people get really funny about food safety so I went with freezer paper 🙂
Thanks. Going to give this a shot
It’s strangely relaxing lol!!!
This is a fabulous idea….. I LOVED candy buttons as a kid and mine love em’ too…such s cute fun idea that can be customized in so many different ways..
This is such an awesome idea! I have already ordered the marshmallow extract. This is a definite must for the 4th this year!!
Haha, I love that you calculated the calories for these! You come up with some pretty super ideas in the shower. 🙂
You can also use cheap computer paper! Works great 🙂
Callye these are adorable!
My epiphanies always come when I’m walking the dog…or in the middle of the night, in the form of some weird-ass dreams. I love that you made your own candy buttons. So cute!
Hahaha! I wish I got good ideas from my weird ass dreams! Mine are
Mostly scary, BOOOO!
These are adorable! What a great idea!
HI! You made my day by stopping by! Nothing like a visit from a buddy who shares my love for corn grits. I ate them in Albuquerque, but they just tasted better in Louisiana!
Super cute! You are amazing!
I love how you packaged those! Super cute! And oh my goodness, the patience it must have taken to pipe all those little candies! amazing. 🙂
It’s funny that you did a tutorial on making candy buttons because just the other night a friend and I were just talking about them and then I bought a package of them at Michaels crafts a few days later and now I have learned how to make my own to match whatever theme or occasion I want to go with, you are so creative I just love reading your blog it’s one of my favorites!
These are cute as a “Patriotic” Button!!!! (I don’t remember if I commented yet, if so, I’m commenting again, they deserve another comment anyway!) 🙂
You are brilliant and ideas like this is why you are my hero!!!!! BRILLIANT!!!!!
Thank you for the cute idea. I love your honesty too, how you sometimes overthink things and make it more complicated than it needs to be.. Sounds like me! You are so sweet to share such a fun idea. Dot candy is one of my sons (age 22!) favorite candies.. I never thought to make them homemade, and marshmallow flavors sounds yummy!
I may need to come to Texas and shower!!! I have never had such a great idea in my shower!! I’ll bring my own towel 🙂
Such a cute and nostalgic treat!
When I was in 6th grade we moved from WA to OH and myself and my brothers and sisters flew and my mom drove. We were all pretty young and scared to fly. I remember my grandparents picked us up at the airport and when we got out to the car, my grandma had little bags for each of us and the beautiful, bright and colorful candy buttons were the first thing I saw! To this day they still comfort me and make me smile 🙂
I will be making these for all occasions. I never throw away my leftover royal icing because of your suggestions. I make flowers, hearts, lots and lots of dots, whatever I can think of. Everyone loves to eat them as candy. I usually use them for cupcakes.
These are adorable! I was reading your tutorial I have never made beautiful cookies so I’m not familiar with royal icing. You say you made a batch of your favorite Royal icing recipe and 20 sec. icing. which do you use where? I would love to try these Thanks
20-second icing is actually a consistency of my royal icing recipe. You can read more about it by clicking on the phrase 20-second icing. That will take you directly to the instructions.
Thanks I just read it and can’t wait to make these.
I cannot even begin to tell you how head-over-heels in love I am with your flag candy buttons!!!
These are adorable!! My mom and I love the button candies but it seems like they dont taste right lately. Making my own sounds like the cure! Did you use an entire batch of your icing for these? How many did it make? I guess if i have left over icing i can just put them on cookies right……….to much icing is a great problem to have right?!
What a great idea….you have such patience. If our flag had one star and one stripe I might be able to do this. I admire your creativity! Have a Happy Fourth of July.
Love your tutorial and want to make it but cant fine the freezer paper anywhere here in PR, may I use parchment paper or some other?
That is a lot of work but they sure turned out great!
Pingback: 25+ Fourth of July Desserts
Pingback: Patriotic July 4th Dessert Ideas on FamilyFreshCooking.com | Red, white and Blue Recipe Round Up — Family Fresh Cooking
These are AMAZING! Love it. So going to have to make these.
So cute! Did you have a problem with craters at all? Or does is consistency of icing not prone to cratering? I know if I piped out a bunch of dots it would be Crater City all the way!
Pingback: How-To: Patriotic Candy Buttons @Craftzine.com blog
Pingback: 4th of July: 15 Patriotic Treats
This is such a great idea!! Super cute!! Thanks so much for sharing! 🙂
Too cute and such a fun idea!!
I featured your candy buttons on my blog today, feel free to come check it out 🙂
http://www.artsyfartsymama.com/2012/07/pinteresting-features-n-shtuff-38.html
Pingback: Cheryl Sousan: Patriotic Party Décor, Games and Recipes
Pingback: Hard Candy Christmas Tree [Free Printable} | Sweet Anne Handcrafted Designs
You inspire me with your creativity! These are the perfect solution to how to do raised braille on conversation heart cookies I’m making for Valentines Day for a blind friend! Thank you so much. 🙂
I must make these this year. Thanks!
I’m kind of in love with these! SO CUTE! I’m pinning these!
I am a little confused. Near the beginning of explaining the process, you said you mixed up a batch of your royal icing and your red, white, and blue 20 second icing. Are the buttons made from the royal icing? And if so, what is the 20 second icing for? Looking forward to trying this!! So stinkin’ cute!
Did you make the printable that is on your topper? Is there somewhere we can go to download it?? These are super cute!!! I love them!
Thanks,
Jordan
Can you use waxed paper instead?
Pingback: Fourth of July Inspiration - The Cards We Drew
Pingback: Fabulous Friday: 11 American Flag Inspired Crafts | Vicki O'Dell... The Creative GoddessVicki O'Dell... The Creative Goddess
I’m definitely doing this with my leftover icing. Great post and funny too!!!!
Ahhhh! Very very clever there little lady!!! So that’s what you were up to!!!! hahahaha!!!!
Can I buy these?
I saw this on a 4th of July roundup and just had to pin it. I hope you’ll share your best post of the week on my Friday Flash Blog Linky Party going on ALL weekend at The Jenny Evolution.
Jennifer
thejennyevolution.com
Pingback: Ridiculous Red, White, and Blue Recipes for 4th of July -
Do you have a link for the printable? Love this~doing it with my girls! Thank you!
I can’t seem to find it on Thirty Handmade Day’s blog, but I bet if you email it she will still have the file =)
Pingback: 25 Fabulous Fourth of July Ideas You Are Gonna Love | Our Family 2 Yours
Pingback: Sweet Treat: Easy Homemade Candy Buttons | Five Marigolds
Pingback: 4th of July Sweet Treats