Consistency Is KEY…Twenty-Second Icing and Beyond
You might as well sit down and get comfortable, because the dreaded icing consistency lecture is finally here.
If you read many cookie blogs, you might have noticed that consistency is a pretty hot topic lately. That’s because as a cookie decorator, icing consistency is the single most important factor in your success OR failure as a decorator.
Hear what I am saying, this is important stuff.
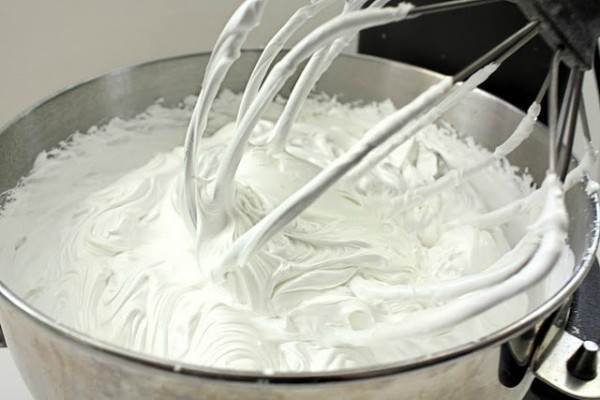
When I make cookies, I ALWAYS start with my basic royal icing, which you can read about HERE. This is what it looks like.
 From there, I generally use three to four consistencies of icing. Piping icing, 20-second icing, {which I’ve explained in-depth HERE and HERE} flood icing, and very stiff piping icing for when I make things like THESE ROSES.
Lots of people ask what my favorite consistency is. Truth is, I don’t really have a favorite. It really depends on what I am doing that day.
When dreaming up cookie designs, I begin by picturing the steps I will take to create the picture in my mind. I usually do it in my head, but it you’re a beginner, it really helps to sketch or write out the design before you begin.
After I have plan, I decide what consistencies to use. This is based on a variety of factors including design, how much work time I have, whether or not I am in the mood to make 38 different bags of icing, and whatever else comes up. I can’t offer a lot of advice on which to what consistency to choose and when, except to say practice makes perfect. The more cookies you make, the more you’ll learn about what works best for you.
Now to break down the consistencies…
Piping Icing
Piping icing is similar to toothpaste in consistency. When you squeeze the bag, it should come out in a smooth line without breaking or cracking. I most often use this consistency for outlining, detail work, and writing. You can see my video on piping consistency icing HERE.
 For tips on outlining cookies, click HERE, or watch my YouTube video HERE.
Twenty-Second Icing
This is the icing consistency I get the most questions about. First of all, there is no special recipe for twenty-second icing. It regular royal icing thinned with water . I most often use this consistency to create dimension, decrease prep and decorating time, and to prevent cratering when filling small spaces. Here are a few examples.
I made these cookies in a hurry so I used 20-second icing to skip outlining.
 For these cookies, I used 20-second icing to create dimension.
 For these New Year cookies, I used 20-second icing to reduce cratering when filling small spaces.
 Now, I have to say that 20-second icing in not the only way. I’ve heard it called by many names. It really boils down to personal preference and how fast you count. Marian calls it 10-second icing, Georgeanne prefers 12-second icing, Lisa does the 15-second version. If you want to get technical, I think my 20-second icing might be a little closer to 17-second icing. The point is, it has to be thin enough to flow, while remaining thick enough that it doesn’t fall off the side of the cookie. Tomato, to-mah-to, right?
Anywho, my most favorite thing about 20-second icing is that when I use it to outline and fill it creates a nice “poofy” look.
 To see a video about 20-second icing, click HERE.
Flood Icing
Finally, let’s talk about to flood icing. Flood icing is probably the easiest icing to make because as long as it has a nice flow you pretty much have it right.
The way flood icing works is pretty simple. Begin by thinning regular royal icing down to liquid form, being very careful not to make it TOO thin. My personal preference is a flow that resembles that of shampoo or honey. After outlining the space you want to fill with a #2 or #3 tip, the liquifies icing is used to “flood” the enclosed area.
 I used mostly flood icing to create the cookie above. Not only did it work well as a base, I also used it to create smooth, even royal icing run-outs, or transfers, to drop onto the flooded cookie.
 I love the liquidity of it {I made that word up, I think} because it flows nicely into a smooth flat surface. This is what it looks like when I flood cookies.
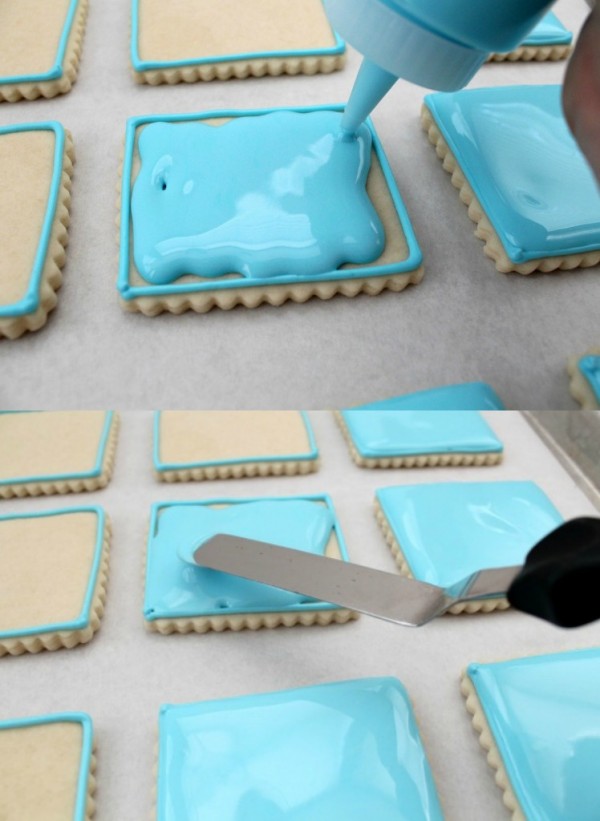 If you’d rather see a video of flood icing consistency click HERE.
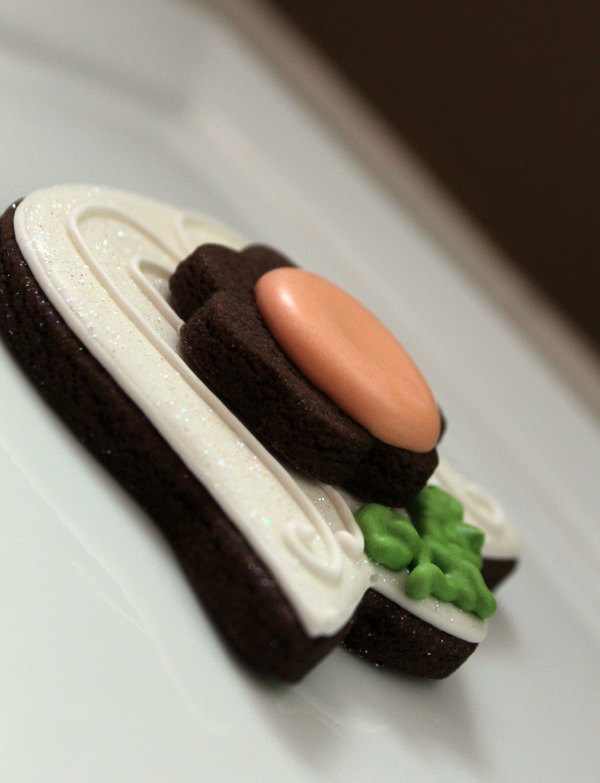
Here is a cookie using that eventually featured all four consistencies explained above. It’s kind of hard to tell from the photo, but after I finished, these cookies became blushing brides. I ultimately used stiff icing to create ribbon roses for the bouquet. Can you see where each consistency was used?
 Okay, I’m finished. I hope that wasn’t too painful. I really could go on and on about the importance of mastering icing consistency, but I am going to stop here and leave you with a few tips:
- First and foremost, do what works best for you. This is the golden rule of cookie decorating. Remember that cookies are art, and like any artist, each cookie decorator has their own style. So, if you’re not down with the 20-second thing, play with it until you find what you like.
- Try using a spray bottle as Gail suggested HERE for thinning your icing. It is probably the most useful tip I have ever learned regarding icing consistency.
- Speaking of coloring and preparing royal icing, I have a helpful little tutorial on that HERE.
- Sketch and plan. I’m a little bit of a hypocrite in this department, but it really can prevent some big boo boos save you lots of frustration.
I hope this wasn’t too painful. Now that we got that over with, we can get back to the business of creating fun cookies. As I said, mastering icing consistency is the key to successful decorating. Hopefully this sheds a little light on the subject.
Have a great weekend, I’ll soon be back with more cookie fun!


Thank you so much for your frosting explanation. It was perfect. My cookies turned out beautifully! I will be sharing this review with my friends. Thanks again!
Love your blog, your hints & into regarding icing! You are amazing ! Thank you !
Dear Sugarbelle – I have been trying to view your videos but none of them are available any longer. Is there a new place to view them?
Hi
Also trying to view video about piping royal icing but it is unavailable . Help please
Thank you much for sharing your magic. I’m just entering the wonderful world of royal icing and I’d love to watch your videos as well. Are you going to re-post them sometime? …always late to the party.
how can I view the discontinued videos? the links do not open in youtube
https://www.youtube.com/playlist?list=PL8nrNt9KgS_KKYYVHvKni46TLvoqnG02r
Hi, I am trying to get to the videos that are linked to the piping icing video and the link has an error on YouTube. Anything I should be doing differently?
Thanks!
Do you prefer piping with a pastry bag or using the squeeze bottles.
I know I’m not Sugarbelle but in regards to the squeeze bottles…I love working with them when I have a large surface area and a ton of cookies to flood. I actually got a set that included 3 bottles and 2 smaller ones that had smaller tips and couplers so I could use my own tips. I used those for detail work in conjunction with my piping bags. I will say that the bottles are a little more difficult to fill. Hope that helps!
Pingback: Cookie Decorating Tips | Apostrophe S
Liquidity works- actually descriptive, but the term you’re looking for is viscosity; the same term that refers to the thickness or liquidity of motor oil. Now you know 🙂 love your blog by the way.
Thank you, lol!
Pingback: The Harvest House – a Gingerbread Thanksgiving – The Gingerbread Journal
The flood icing video isn’t available. IS there another link for it? I think I pretty much have mine right, I’m just tryng to make sure!
I new to icing and find your tips and explanation extremely helpful. With luck I’ll get this right the first time.
You are a life-saver! I have been using the same recipe to flood, write, decorate and outline! Of course I had to learn the hard way that adding a little water isn’t always the answer. In the middle of a two dozen birthday order I broke down crying and swore off cookies all together. Reading your blog and articles gave me hope again. I’ve got your recipes and because of you I am actually looking forward to giving it another try, thank you, truly!
Look all your tips! Great information. Unfortunately, I can not get the links to the videos to work. Would love to see them. Always helpful to see an actual demonstration.
Thanks for sharing.
Pingback: Flamingo Cookies Decorating Tutorial - Moms & Munchkins
What food color did you use to make the gold and silver numbers?
I used a gray and light gold base and painted them with shimmer dust =)
Please help. I purchased decorator icing so I wouldn[t have to make it. I have to decorate 600 cookies by Monday. I planned on flooding the cookies and spraying the pink ribbon on. Can you give me the amounts of ingredients to make enough royal icing? Unless you have some magic of turning cake icing into the consistency of royal icing. I am so stuck! I will have someone to help me, but I wanted to start this weekend to get the project rolling.
I’m trying to watch your utube video on 20 second icing? But it says it’s unavailable?
I am a beginner and have watched many videos and tutorials. I am having a heck of a time with my tips getting clogged. I have sifted my powder sugar they clogged. Then I read from a couple of people they don’t sift…they still clogged. The tips 1 and 2 barely get going and they clog very quickly. The 3 tip finally worked pretty consistently yesterday. I am obviously doing something very wrong. Any guidance would be very much appreciated! Thank you!
I tried both piping and flooding icing and they just don’t pipe without cracking or breaking and the flooding icing is not glass smooth like yours
Here are a few things to try. If the icing is cracking, it might still be too thick, OR you may not be maintaining consistency pressure on the bag as you squeeze. It also sounds like you may need to thin the flood icing a little more.
My icing does not have the same sheen yours has, and it seems fragile and chips easily after a day or two. It almost seems more opaque. Any tips?
Any tips on preventing the biscuits become soggy while letting the icing dry in a subtropical humid climate?
A fan alone doesn’t seem to cut it while it is 32’C + outside with 300.000% humidity and hubby will kill me if I put the aircon on all day because need my biscuits to dry 😉 thanks in advance!
Pingback: Rose Heart Cookies Decorating Tutorial - Moms & Munchkins
Sometimes when I dye my royal icing with darker colors I find the that they don’t set properly. Any tips?
Pingback: Easter Bunny Cookies Decorating Tutorial - Moms & Munchkins
Hi! the links to videos are not working. I’ve search in youtube but they are not there. Hope you can fix this error.
Pingback: Cut Out Chocolate Gingerbread Cookies - Vintage Kitty
I am interested in the drying time no one speaks about this does the icing stay playable the whole time decorating or does it get stiff.
Why are all the videos gone? How do I learn when you click on HERE and get a 400 error for all of them? Is it on my end? You went to all this trouble and I can’t see it. Please help. Thank you! Amy
Hello!
I love your videos and blogs! Also having trouble viewing the videos. Do you have any other links?
Pingback: Pumpkin Pie Cut-Out Cookies - Love and Confections
Pingback: CHRISTMAS IN JULY COOKIE CONTEST: Vanilla Pod Butter/Tiffany Snowflake Cookies at Recipes Family
Pingback: Pecan Pie Cut-Out Cookies #ChristmasCookies - Love and Confections
I’m having a hard time with my colors bleeding into one another. I know it has to be a consistency thing doesn’t it? What do you suggest.
Hi. I’m trying to understand why you’re answering every question except – WHERE ARE YOUR VIDEOS? There are some cookie people who are not pulling their videos so for others frustrated by broken links just take a minute to do a YouTube search. I heard in 2019 people who make videos kids might watch are getting less money somehow or being held to a stricter standard but I JUST heard this so I haven’t researched yet. HOWEVER – a person giving a class in this might make $200 bucks for a few hours, they are schlepping equipment and buying new materials each time and expending the effort over and over and over again. A video might get hundreds of thousands of views and continue to earn after expending the energy ONCE. Suddenly video producers are pulling content because they want more money? It seems like it’s already a pretty unfair income based on effort compared to, say, a JOB, so I’m having a hard time getting on board with sympathy here. I’ll really have to do more research here. At least Sugarbelle taught things. Some YouTubers put their groceries away and clean their houses in camera and make money so think about they for a second…
Hi! I’m so sorry I haven’t answered that question yet. Here’s the entire story. Ten years ago when I started my blog, I made a YouTube account and posted videos. As a newbie, I didn’t understand that you could only use one account across the board if you wanted to monetize videos, so I ended up using one for my blog and another for youtube. Because of my ignorance, I ended up losing my first YouTube channel AND my videos, because in my technological ignorance, I didn’t have them backed up or anything. Now, I know better, but between my kids, learning all the stuff that goes with blogging, equipment, and starting in product development, remaking them got pushed to the back burner. ESPECIALLY, since 15-20 second icing is now a widely accepted term. I figured with the amount of stuff online, it might be redundant? In any case, I see where you’re coming from, and I’m sorry if I frustrated you. That’s the last thing I want to do. I have big plans to reshoot some of these videos in 2020, though, so if you’re willing to stick with me, I’m working on it. Thanks for your comment and perspective. Xoxo Callye
Pingback: Patchwork Christmas Cookies | Sugar Lake House