I meant to do this tutorial two weeks ago, but time got away from me. Luckily, I met a new friend who got me in gear AND helped me to make it easier for others to make Lego man cookies for their own kiddos.
Some of you might remember that I made Lego man cookies for my son’s Valentine’s Day party a few weeks ago. Not long afterward, I “met” Andrea of Knitty Bitties who was planning on making these for her own son’s birthday and had a few questions.
After I replied, I realized I REALLY overexplained. {Andrea is pretty darn crafty herself}. She already had an idea AND something even better. She’d created a template for the project and was more than willing to share =)
If you click on the image above, it will take you to Andrea’s blog, Knitty Bitties where you can check out her Lego party, get this time saving template, and maybe even thank her for doing the difficult part and creating this easy INK SAVING outline=)
Now to learn something.
I hand cut a LOT of cookies. Especially if I don’t need enough of them to justify making or buying a cutter.
Templates can be made out of plain paper, manila folders, velum {stencil} paper, cardboard…
You get the idea. It really doesn’t matter how you do it, as long as it works for you.
However, since I tend to use them more than once, I came up with my own little method of making templates.
They are sturdy, can be washed, and don’t require anything that is not readily available.
Have I mentioned that I live in a pretty rural area? It’s a long haul to the craft store, so I use what I have.
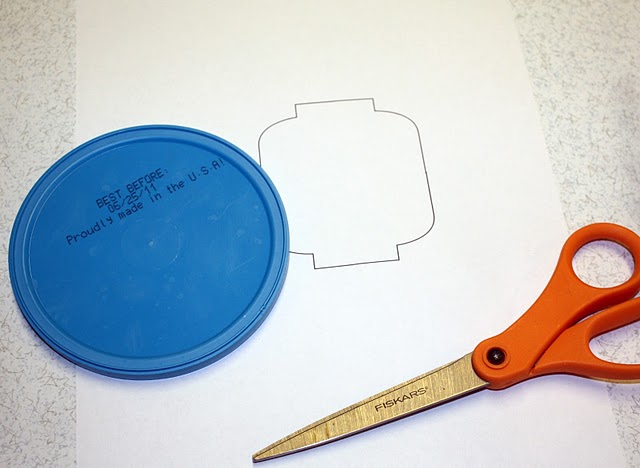
To begin you will need three things. Scissors, the printout from Andrea, and a lid from any disposable plastic container.
*It always makes me feel good when I find a way to recycle items from around my house =)*
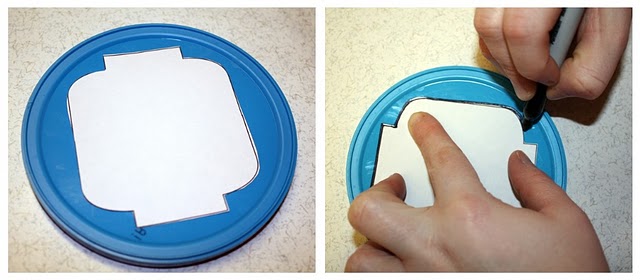
To get started, place the template on the lid and trace around it with a permanent marker.
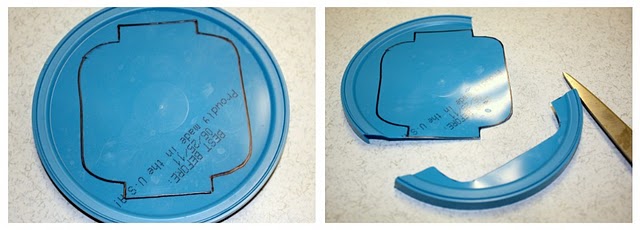
Once you have traced your image onto the plastic, cut it out and you are ready to go!
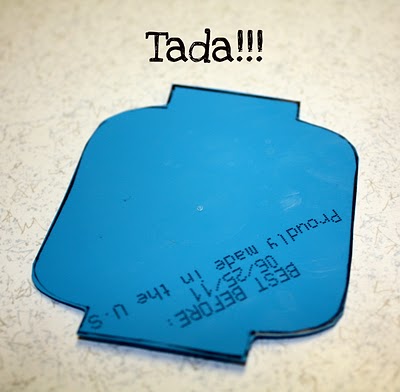
You now have a perfect, re-usable Lego man template!
PS-DO NOT THROW THE PAPER TEMPLATE AWAY WHEN YOU’RE FINISHED, WE’LL USE IT AGAIN!
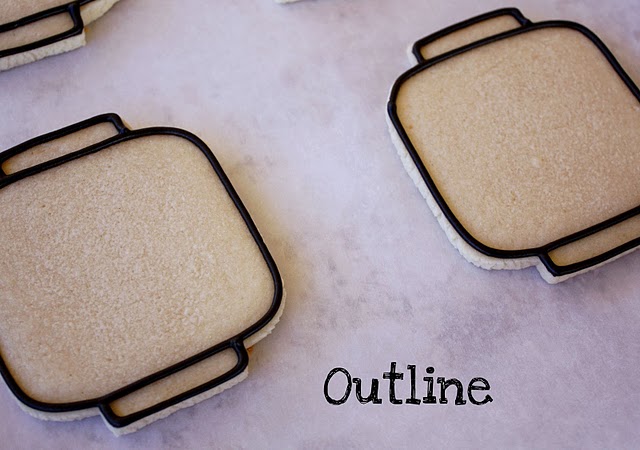
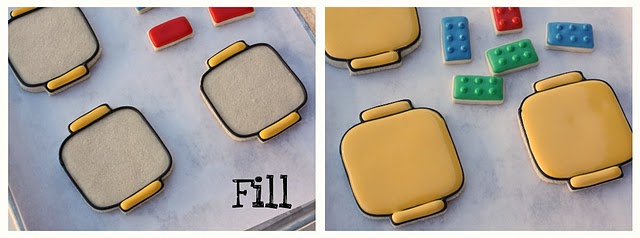
To make the cookies, follow these steps:
*When I fill cookies like this, I always fill in sections. I do the small areas first and let them dry for 30 minutes or more, and then come back and fill the middle. This keeps the sections from running together. {if you notice in the picture to the right, I didn’t follow my own advice. We’ll fix that later}
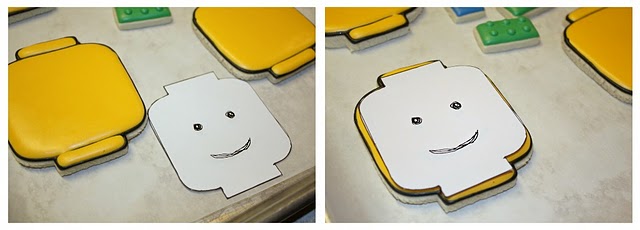
Now here’s where the paper template comes back into play.
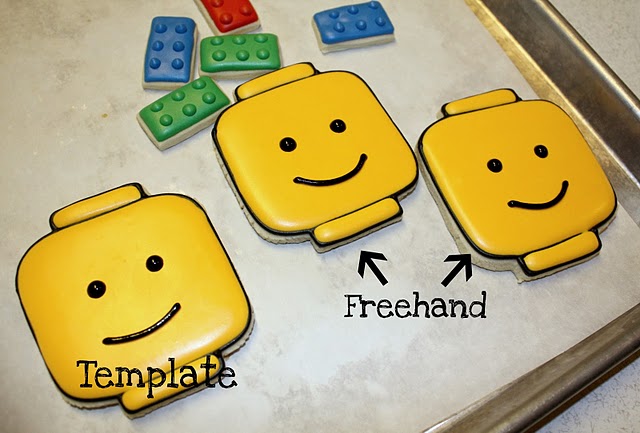
Normally, I freehand faces, since I have had a lot of practice, but if you’re a little unsure of yourself, try this little trick.
When the cookie is COMPLETELY dry {I’m talking eight hours or so} draw the face on the template, {use pencil in case you are afraid of goofing} then place it on the cookie.
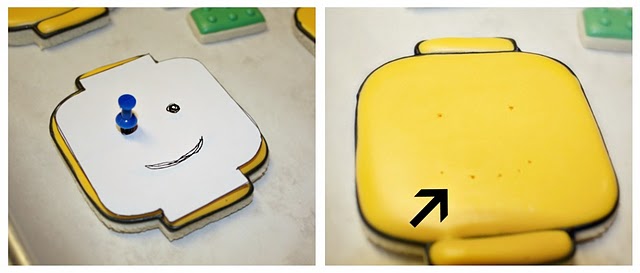
I giggled after I saw the next photo because it actually looks quite violent, but it’s a little cookie trick I use from time to time.
Using an push pin, gently poke holes through the paper to mark where you would like to place your piping.
It’s a little hard to see, but the pin marks your cookie, kind of like a dot-to-dot.
Always remember, BE NICE to your cookie! It is still possible to damage it, even if it’s dry.
Just for example’s sake, I decided to show you the cookie I made using the pushpin trick and the ones I did freehand.
Surprisingly, I actually prefer the freehand ones. If you were to compare them with “THE Lego Man”, they are technically smiling too much, but that makes me happy.
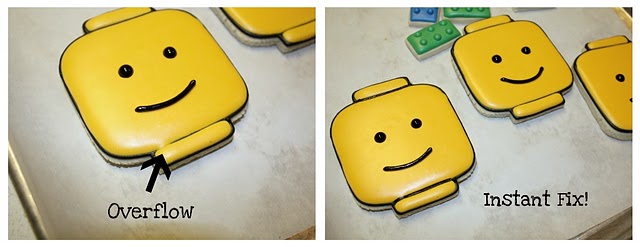
Also, before I run, I wanted to show you another little trick to fix a common mistake.
Remember before, I mentioned to wait between filling each section? Well, because I was running out of daylight, I rushed and I got a little overflow.
To some people it’s not a big deal, but this REALLY bugs me, so to fix it, I took my food color marker and I went back over the place where the separation was supposed to be.
It’s that simple.
I hope some of you will try this this weekend. It might be Lego men, or maybe you have an image you’ve been itching to translate into cookie form. No matter what you are working on, this plastic template trick is perfect for the job.
Many thanks to Andrea for sharing her Lego man with us, and for also encouraging me work on this.
Be sure to come back tomorrow for a special guest post from my friend
Pam “Cookie Crazie” Sneed, that includes a fun tutorial using another type of cookie icing,
the often misunderstood GLAZE.I hope that y’all made it thorough all this awake and enlightened…if I left something out, just ask.
To learn how to make simple Lego cookies, click
HERE.
Good luck and happy decorating!


Thank you sooooo much for the tutorial you promised for Thursday!!! I've made my template and I have to say it looks amazingly good! I'm making these cookies for my son's 8th birthday party. He'll be absolutely thrilled to bits!
I have been following your blog for a couple months now (i just started decorating cookies in october) and i have never posted anything, but i wanted to say how much i LOVE this tutorial. It can be used for so many different projects–just fantastic:-) and im sure you have heard this a zillion times, but you are so creative and talented! i am always inspired by your work:-)
Wow what an awesome tutorial!
I LOVE LEGO!!!
Your cookie art has so inspired me. Yesterday being Texas Independence Day, I attempted to make Texas flag and Texas map cookies. They were less than satisfactory. Question: what are some tips for getting the flood icing to blend seamlessly into the piped outline? Your cookies accomplish this beautifully. My outline icing was the consistency of toothpaste; flood was consistency of Elmer's glue. Should I have flooded immediately after I outlined each cookie? Also, I would love to see you do a set of Texas cookies that include the lone star flag and map. Love the blog.
Ellen, I have had a lot of questions about that so I am going to so a
tutorial soon soon…I will try to set it up in the next week 🙂
I am stopping by from Tidy Mom.
You are amazingly talented! Beautiful work! I am in awe.
Funny thing- I am giving my twins a lego b-day party this weekend… love these cookies and would so make them if I had time.
Girl, you're good!
This is so cool, I can make it for my son's birthday. Thank you!
These are just terrific!! My boys would love them. Your work is unreal!!
Pingback: The Push-pin Trick {WFMW}
Thanks so much for your tutorial…. I used it this week to make Lego man cookies for my 9 year olds birthday party and can’t wait to try making more cookies. I’d never made them before but they still turned out pretty good!
love these cookies and would like to try making them for my son’s upcoming lego party. was wondering what type of icing you use? would you mind sharing a recipe? they look perfectly smooth. thanks!
I love these, they are adorable. My sons 5th birthday is Lego themed. Do you share the icing and cookie recipes? I want them to be smooth like that! Thanks for this 😉
yes it’s on the site =) search royal icing 101 and basic sugar cookie recipe
Pingback: Lego For The Lego Maniac | Farrah's Kitchen
Where do you find the small spatulas?
I love the way your cookies turned out (that actually holds true for alllll of your cookies!). My youngest nephew has decided he wants a Lego cake for his birthday. I think I’ll send him a small box of Lego themed cookies (he’s a couple of states away from me) to help build up his anticipation. I can only hope they turn out half as nice as did your’s. Thanks for sharing the tutorial for them!
(I’m living with a Longhorn fan too (dh of 28 years) and he LOVED those cookies!)
All the best to you!
Jeanne
Thanks so much for the idea, I cna’t wait to make these for my son’s birthday party 🙂 he is going to be so excited.
Question, could I make these ahead of time and freeze them?
Felicia
Pingback: Lego Themed Birthday Party « Miss Multitasker
I ran across your website a couple of weeks ago. I saw these lego cookies and thought I’d try to make them for my son’s birthday party. I don’t cook or bake so my husband found it strange that I wanted to try these. I made two batches and they turned out perfectly! Everyone enjoyed them! I’m now inspired to branch out and decorate all kinds of cookies 🙂 Thanks!
Any idea how to print the template for some reason it does not open for me. Also do you use the royal icing for the outline also?
Hi, first of all, thanks for your inspiration. I’m gg try to make this for my loved ones as birthday gift. It will be my first time and I would like to know how to make the bricks? Hope to hear from u soon! Keep inspiring us! 🙂
Hi, I would like to know how far in advance I could make these cookies?
Thanks,
Arlene
What size tip did you use for the black outline? : )
What size tip did you use for the black outline ? : )
Sorry for the double post!!
Fantastic way to kick off the whole thing, and as usual some great conversation. I often wondreed about Nnenn’s approach, and it was great to get his artistic perspective on building which explains why he will sometimes cut or customize aesthetics first it would seem. Anyway, best of luck cranking out these interviews. You’ve got my full attention for a good 31 days!
Pingback: How to Bake the Perfect Sugar Cookie
Hey there! I love this idea! Found you just doing a search for lego cookies. Just wondering…the link to the template isn’t working!! Anyone else have that problem?
Yes, thanks for reminding me, I need to fix it…as soon as I hear back from Andrea I’ll fix it =)
Pingback: “Building” Memories- Lego Themed First Birthday Party « Dazzle the World
what kind of frosting do i use? or how do i make the frosting?
thanks for your help!
I use royal icing. You can find the recipe under the recipes tab =) Good luck!
I’m just wondering… what cookie recipe did you use?
Love these! Where can I find a food color marker?
Do you have any recommendations for making the perfect circles on the Lego block cookies? Thanks in advance!
Hi there! Fantastic cookies, my little man would LOVE these! Question is, what is a food color pen and where do I get one? My lines are never that nice with just a piping bag lol!
Hi, i am new to your site and i LOVE IT. my little guy LOVES legos, but is not a big fan of cake. His birthday is coming up and i thought these would be perfect. Do you cut the shapes befor or after cooking?
Also, the link for the template isn’t working….
Pingback: Simple Lego Cookies
Oh this made me smile! Pinned!
What a clever idea and crafty too!
Pingback: Lego – Pinterest Friday » Mom-ology
Pingback: Lego – Pinterest Friday
Oh these are PERFECT for my middle son he is obsessed with legos. I will be using this technique for his next birthday. Thank you.
Pingback: Cookie Ideas – Lego Cookies « Tried, Tested, and True Mommy
These are awesome! I have a Lego-lover in my house, and he would love these! Question for you: how do you get your frosting to turn out so black in color? I always have trouble with getting a nice black color using the Wilton coloring pastes. I have heard to use store-bought chocolate frosting as a base, but this would not really work for piping frosting. Thanks!
I love these… you have truly inspired me to keep trying. I got discouraged after a few tries but thanks to you I want to try again. I clicked on the link for the lego template and it is unavailable. Help! My step son would love these…
These are so cute! I am so glad I found your website … you have truly inspired me to keep trying. I clicked on the link of the lego man and it says the page is unavailable. Please help! My son would love these …
Pingback: Lego cookies | Calm and Chaos: Life with kids
I love these cookies. I will be making these for my youngest son’s 7 th birthday soon. thanks so much for the idea.
Thank you for this awesome site with creative and colorful directions! Can’t wait to surprise my 8 yr old grandson who loves Legos.
This is a wonderful idea that I am planning on trying out for my Lego combo gift set! I was just wondering, and I am no cookie decorator so bear with me, how do you get the frosting on the cookie to be so smooth? Does that even make sense? the top of your cookies look uniform and not like what i expect a tip to produce.
What kind of icing did you use?
There is no link to print this template! Help please! Would like to make these in 2 weeks!!
Pingback: Lego Cookies and Lego Cake Pops, an Alternative to the Birthday Cake « Spicy Homemaker
Hi Sugar Belle,
I just discovered your site and I am COMPLETELY AMAZED!!!!
I have one question regarding the Lego-mam cookies — once you cut off your template, what do you use to cut out your cookies? An Exacto knife?
Thank you in advance and congratulations for your wonderful work & website!
Caroline Grenache
hi, lovely. Question: how did you actually cut / make the lego man shape cookies before decorating them?
HI, Fab blog. Thank you. I have a question. Once you have cut the template from plastic how do you then cut out the biscuits? Do you cut around the template with a knife? Thanks
what kind of frosting or paste do you use for the lego cookies
HI, Fab blog. Thank you. I have a question. Once you have cut the template from plastic how do you then cut out the biscuits? Do you cut around the template with a knife? Thanks
My housemate is Lego crazy and for his birthday I wanted to make some Lego cookies. I’ve been looking everywhere for a cookie cutter but thanks to your blog the search is over. It’s an idea I wouldn’t have thought of so thanks very much. Great blog by the way 🙂
Hi, I love your cookies!! Can I have the recipe for the icing you use to fill the outlined shape with? Not sure if its just royal icing, but how do you get it thin enough?
Thanks!
Monica
Pingback: Busy as a Melissa Joy Bee |
Pingback: Ninja! – yankeegirlyummies
Join your local DC Music Events Examiner on Thursday at jiffy lube live
arena to stop at 11pm sharp, or pay a steep fine.
The Skullcandy Stage will include performances by: Kaskade, Markus
Schulz * just added, Rusko, and Avicii; the Dim Mak Stage will include performances by:
Steve Lawler, Manufactured Superstars, Whiteshadow, and Chad Hugo.
O S, and Looks That Kill, barely taking a breath.
Pingback: Creative Lego Ideas
I have the same question! How do you actually cut out the cookie? Thanks! Blessings from Bama!
Pingback: Lego Party …
Pingback: LEGO PARTY TABLE | PARTY IDEAS FOR KIDS | ENCORE EVENTS RENTALS
Pingback: Cheap and Easy DIY Cookie Cutters
Pingback: Ultimate LEGO Birthday Party Planner | The Divine Miss Mommy | Atlanta Georgia Mom Blogger | Travel Blogger
Pingback: Lego Cookies. | Constant Circus
I like your step by step to making the template, but then there is nothing on how to make the cookie. With the straight edges of your cookies I am assuming you cut the head shape out only after the sugar cookie was baked. Did you cut while it was still warm from the oven? Wouldn’t it crack? Your icing looks great too. Can you post the recipe for hard cookie icing please? Thank you for your great idea.
Hi There, just wanted to pop in and say a quick thanks for this tutorial. I made these for my son’s birthday last year and he loved them and so did everyone else. They taste great, even though they didn’t come out quite as perfectly as one could have hoped.
Your cookies look amazing! Just in time for the Lego movie coming out next month:)
If you could post your icing recipe that would be fantastic!!!
Pingback: Lego My Organic Waffle | Shake Bake and Party
Hello, I don’t know if this is a silly question… But how do you used the template to shape the Lego man cookies? I am looking to make this for my kids Lego Party 🙂 I have already used the template to make invitations and help make center pieces. But I don’t understand how I can use it to make cookies!
Thank you!
Thinking exactly the same thing!
Hi,
I was looking for your lego head template and found the blog page but all the redirected linked are pointing to incorrect pages.
Pingback: 30 recursos para celebrar una fiesta inspirada en LEGO | Cosas Molonas | Blog de Inspiración & DIY |
I was thinking the same thing about how to use the template. I think what she did was place the temlate over the dough, and use a knife to cut around it, thus cutting out the face shape. Does anyone know about the “drying” process? I know she said she likes to let her cookies dry out overnight before decorating and then lets the icing dry a few hours on the cookies. Are the cookies left out in open air, or in a container or the fridge?
Pingback: How To Throw The Ultimate LEGO Birthday Party | GossipViews.com
Pingback: How To Throw The Ultimate LEGO Birthday Party | Sharing Interesting Stuff, Updates News & Free Tips
Hello,
I also have the same questions as these ladies do, and also what type of icing was used on these cookies?
Thank you.:)
To hand cut cookies you roll out the dough like you would when cutting them with cutters, except you place the template on top and use a small paring knife or Xacto knife to cut around the edges. I try not to drag the knife, but instead make linear cuts and smooth out any jagged edges- it looks nicer when baked! Also, after you flood the cookies with royal icing and are letting them dry, leave them in open air. If I’m drying them overnight I’ll put them on a clean cookie sheet in a cold oven, then wedge a book between the oven door and the light sensor to keep the oven cracked open for ventilation but the light off. Hope that helps! 🙂 (For faster drying you can also put some silica gel packets in the area the cookies are in, but sometimes it will make the icing cave in.)
Pingback: a DIY menu for a Lego themed birthday party
Having trouble downloading the template. Every link I go to there is an error message or I don’t see the template to download. Help Please! Need for this weekend.
just found it
http://knittybittiessews.com/2011/03/lego-party.html
Hi…just wanted to know what cookie dough is used? I would like to use this for my son”s birthday, but baking is not my strong suit. Thanks for sharing these great ideas!
https://www.sweetsugarbelle.com/2011/06/basic-sugar-cookie-recipe-2/
My question is what kind of icing did you use and did you use icing to outline the Lego sugar cookies?
Pingback: Lego Birthday - Wesley Adventures
Hi, I have been going in circles for 30 min and I can’t find the lego head template anywhere! I have noticed that a few other people have had the same problem. Please help! Thank you!!!
Pingback: How To Throw The Ultimate LEGO Birthday Party | Viral Chirp
Pingback: Tasty Lego Foods & Recipes For Your Awesome Lego Birthday Party -Beau-coup Blog
Pingback: How To Make A Lego Pinata Head | HappyForever168
Pingback: How To Throw The Ultimate LEGO Birthday Party | Viral Camera
Your cookies are again amazing! I love your site and automatically check here first before I make a cookie to see if you have done it before. You ALWAYS have some amazing trip to it! Thanks for sharing!
Pingback: The Lego Movie Birthday Party Theme Ideas & Supplies | Birthday Buzzin
Hi, I was wanting to make these for my son’s Birthday. Can you tell me what recipe you use for the cookies? Thanks