Bunny Ear Cupcake Toppers
This is a rather long how-to, so I am going to try to keep my long winded-ness to a minimum. We’ll see how that goes =)
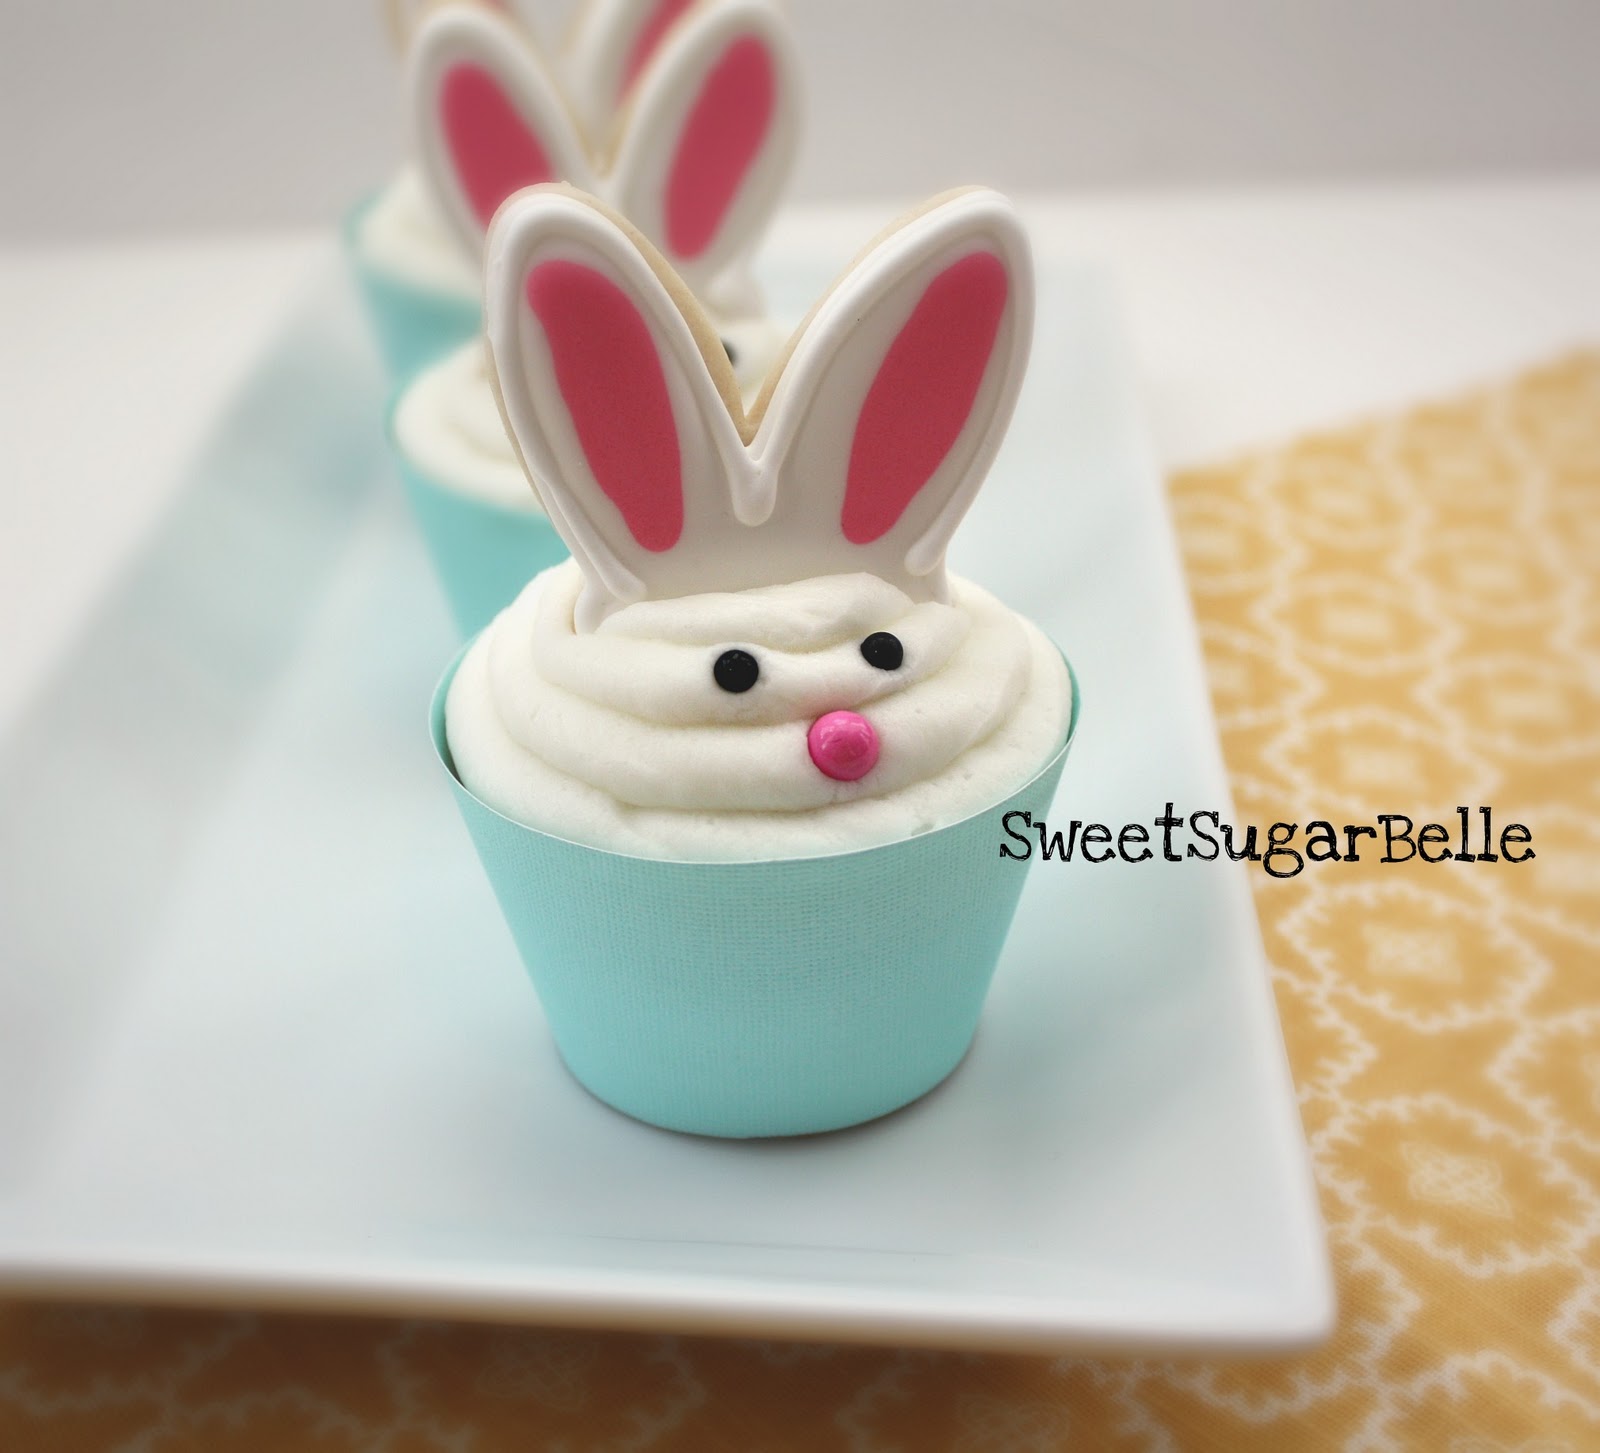
This is another project I got to check off of my to-do list. Last year, I had big plans to make these for my kiddo’s Easter party…I didn’t quite make it, but this is going to be my year! Aren’t they cute?
I tried to think of a cute catchy name, but I couldn’t, so maybe y’all can help me out with that one
You really need to start this project a day or three ahead of time. It’s a three-step process. Baking the cookie toppers, decorating them, and then constructing the cupcakes. It may seem a little drawn out, but your kids will thank you!
To begin, cut and bake your cookies. I used a Wilton bunny face cutter that I got from an Easter kit that Walmart carried last year. If you don’t have that one, don’t panic. You can cut the ears off of any rabbit face cutter you have around.
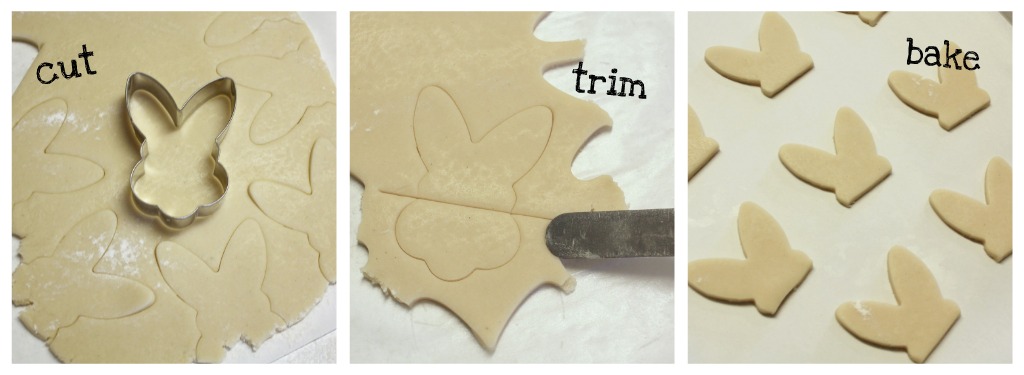
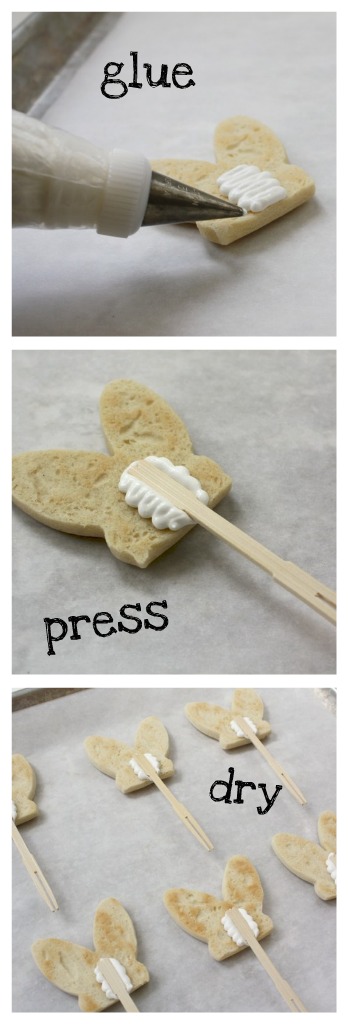
After they cooled {the next day in my house}I used very stiff royal icing to “glue” a bamboo fork to the cookie. You can skip this step by baking the stick into the cookie, or even skip the stick altogether, but for whatever reason I did it this way. Whatever works, just go with what strikes you that day =)
PS-I get those cool little bamboo forks at World Market. If you cannot find them, toothpicks work, OR if you are feeling industrious, cut popsicle sticks in half and use those.
These probably need to dry overnight also if you have the time
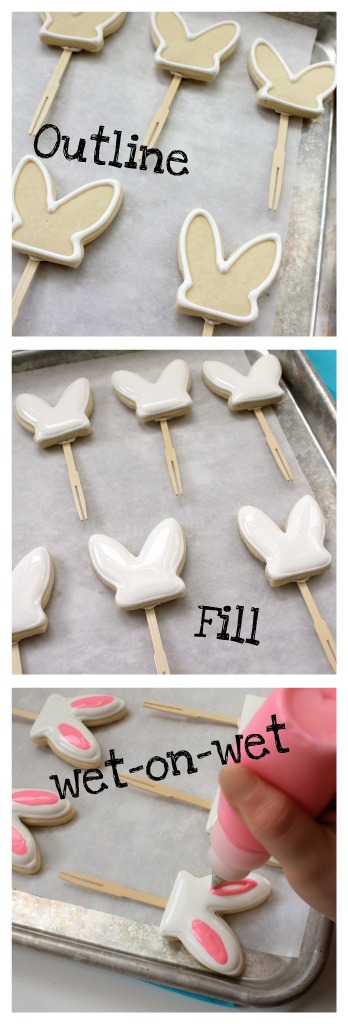
When this is done, it’s time to decorate the cookie toppers. It’s pretty simple. You only need two colors, white and pink. I used a #3 tip, outlined the cookie, filled it with white flood icing, and then added the ear middles using the wet-on-wet technique. When that dried, I outlined it again in white using a #2 tip {the last step isn’t shown, but you can see it on the final cookie}
Once again, let the cookies dry overnight, and the next day you will be ready to construct.
In the middle of all this, I happened to notice that the bamboo forks were a little longer than I wanted them to be. This was VERY easy to fix.
I happen to have an awesome weapon tool that I bought for making those cookie cutters I never got around to making.
Have any of you ever heard of tin snips? If not, this is what they look like. I think the only reason Bern-Dogg allowed me to get them is because he figured they’d end up in his tool box eventually anyway, BUT he was not so lucky.
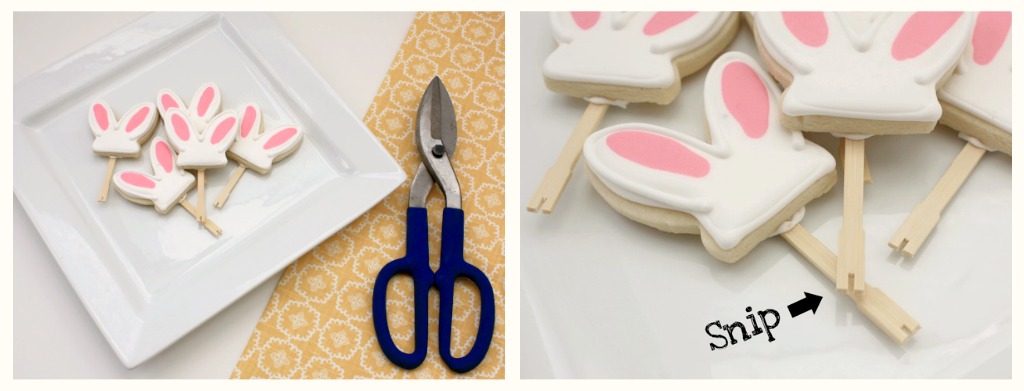
I love these things! The are basically SUPER SCISSORS! They allow me to easily cut things that I am usually to weak too cut on my own. So, in other words, he’s never getting them back!
A little FYI while I am thinking about it…These make cutting those popsicle sticks that I mentioned before MUCH easier…
Anyway, moving right along…For this project, I wanted to make a cute little cupcake wrapper with a fluffy little bunny tail. This is what they looked like.

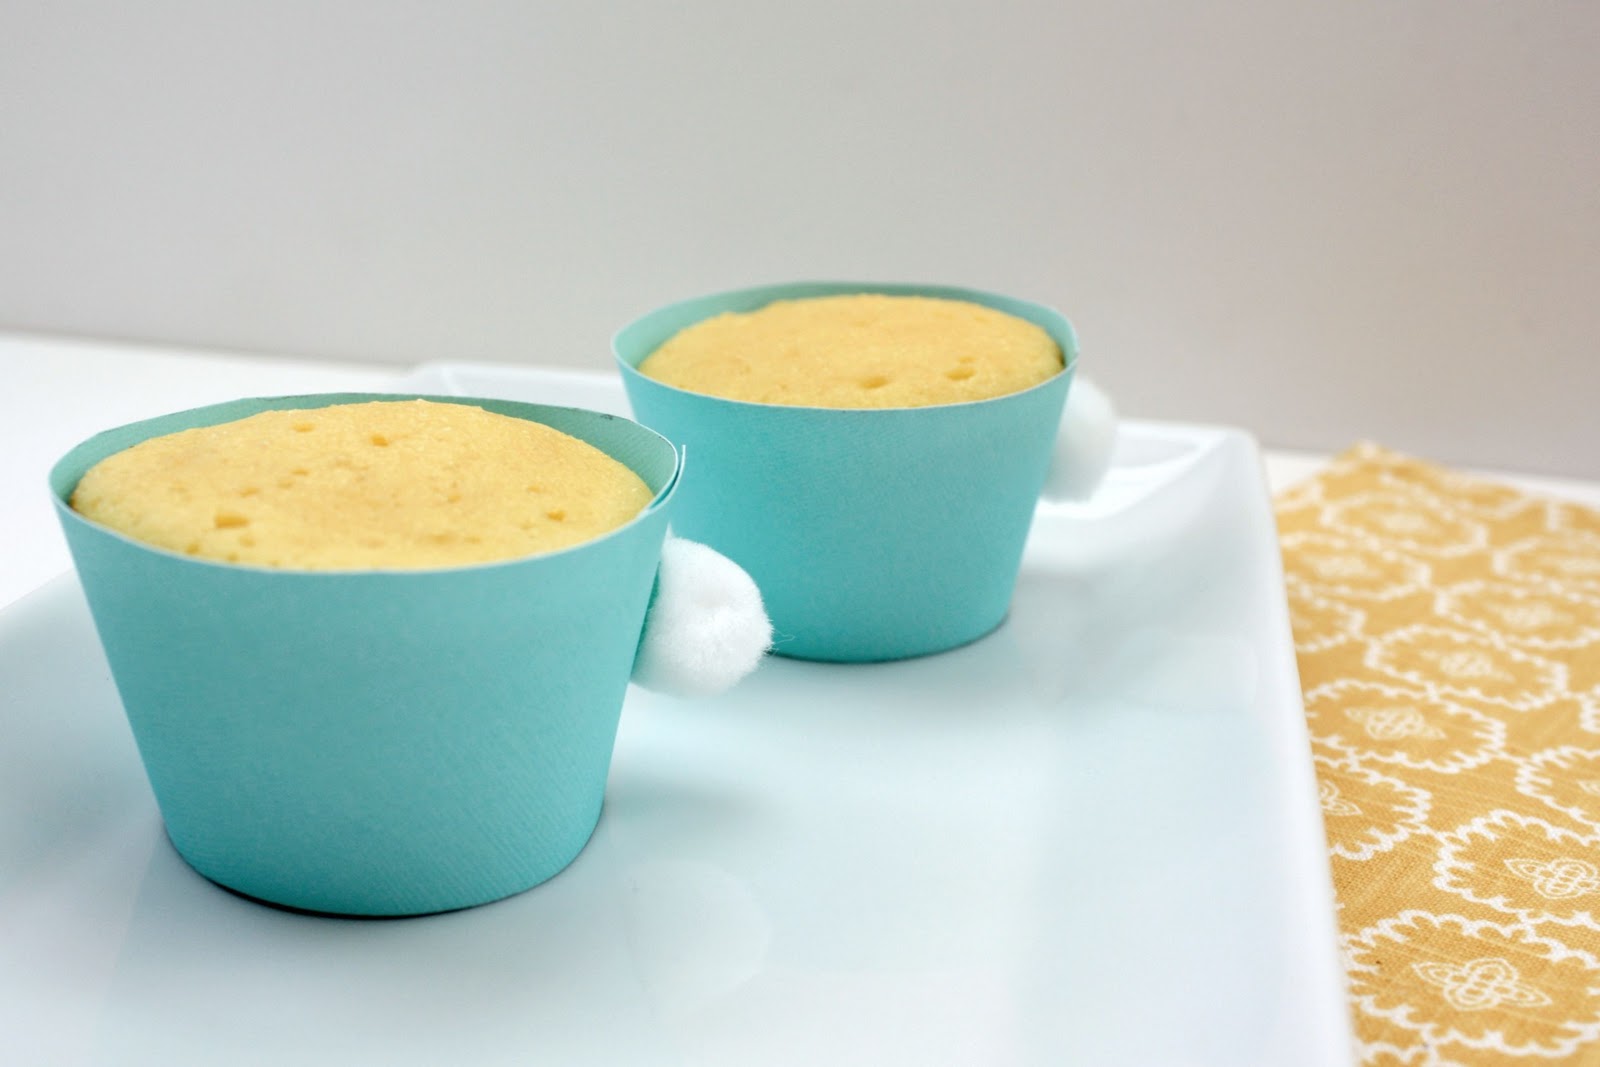
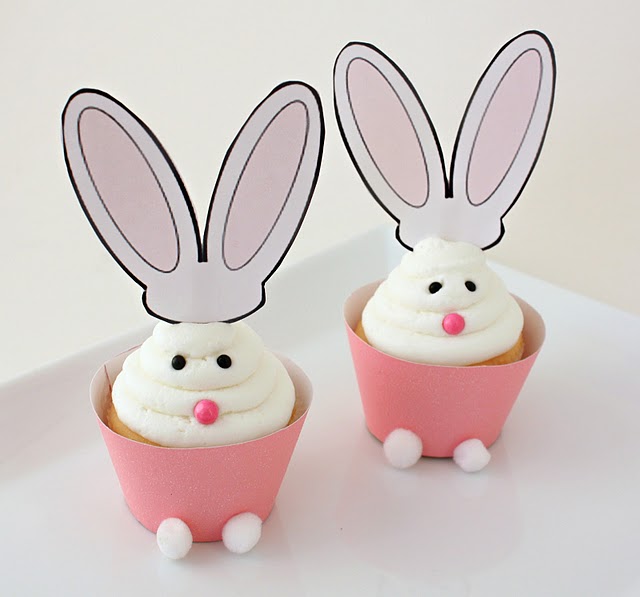
For more on these, hop {no pun intended} on over to my friend Mique’s blog, Thirty Handmade Days, for a {cute cupcake wrapper template, printables AND instructions =)}
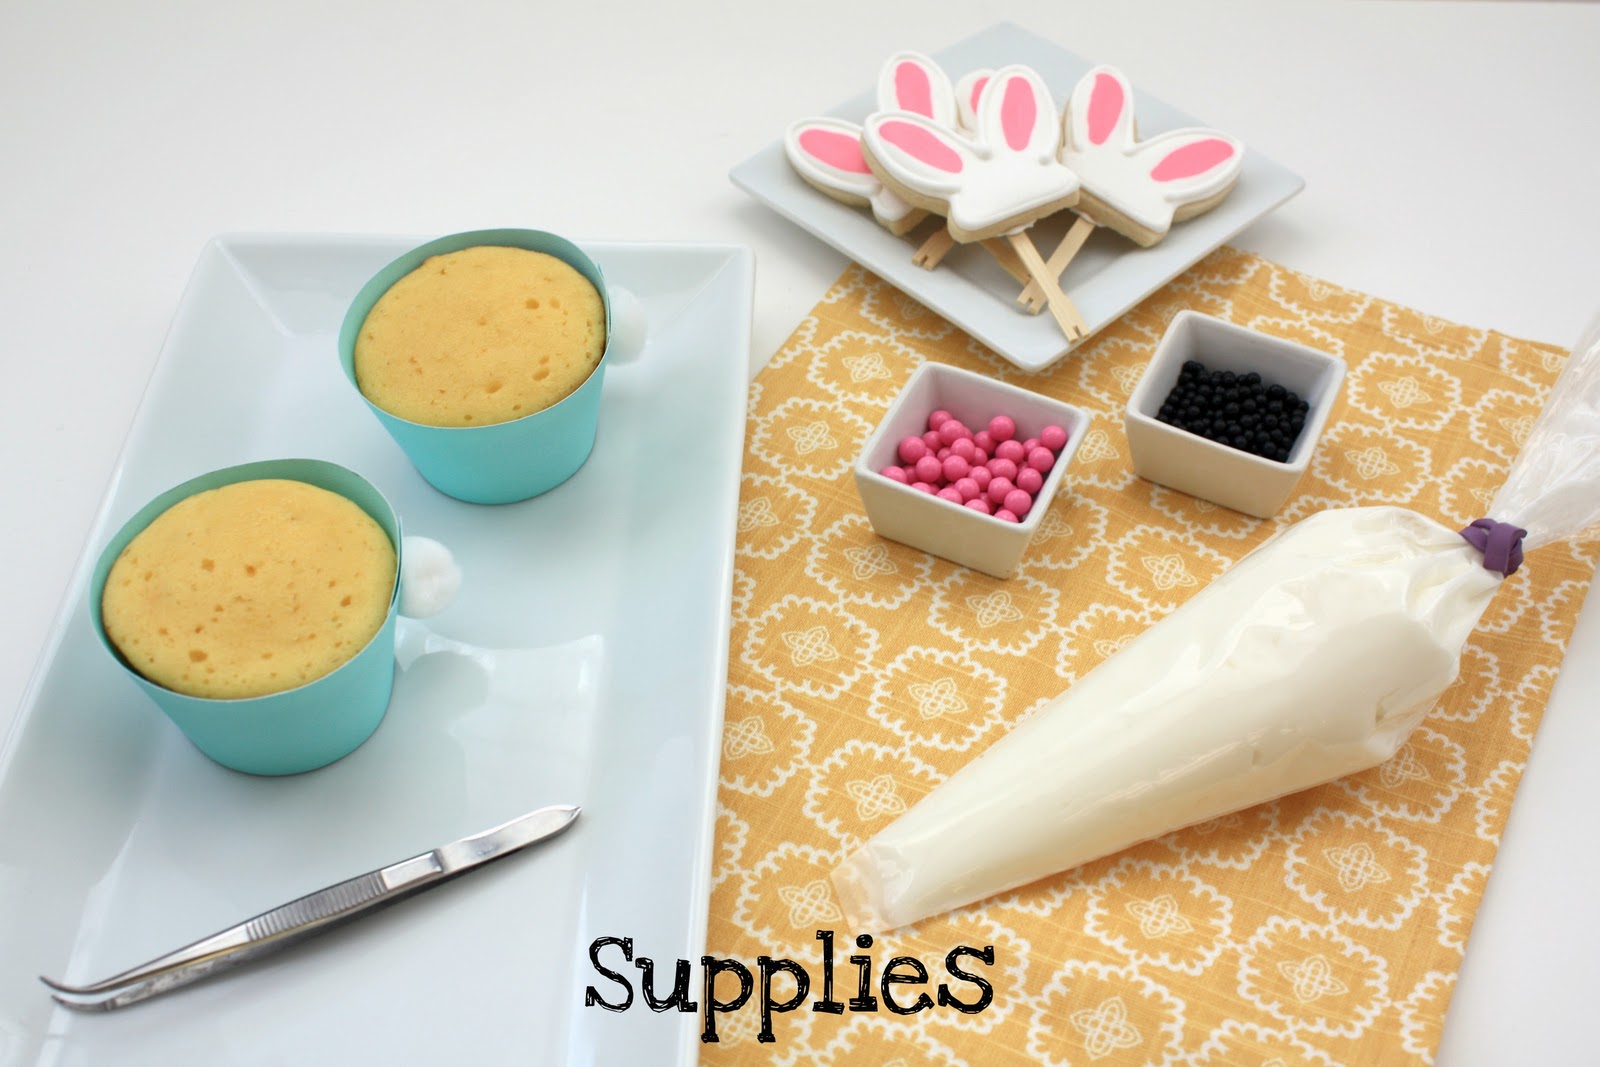
Once you get that all figured out, gather your supplies. You will need: wrapped cupcakes and a corresponding number of toppers, a pastry bag filled with white frosting and your desired tip, which I skipped this time, black sugar pearls {4mm}, pink candy beads, {8mm} and tweezers.
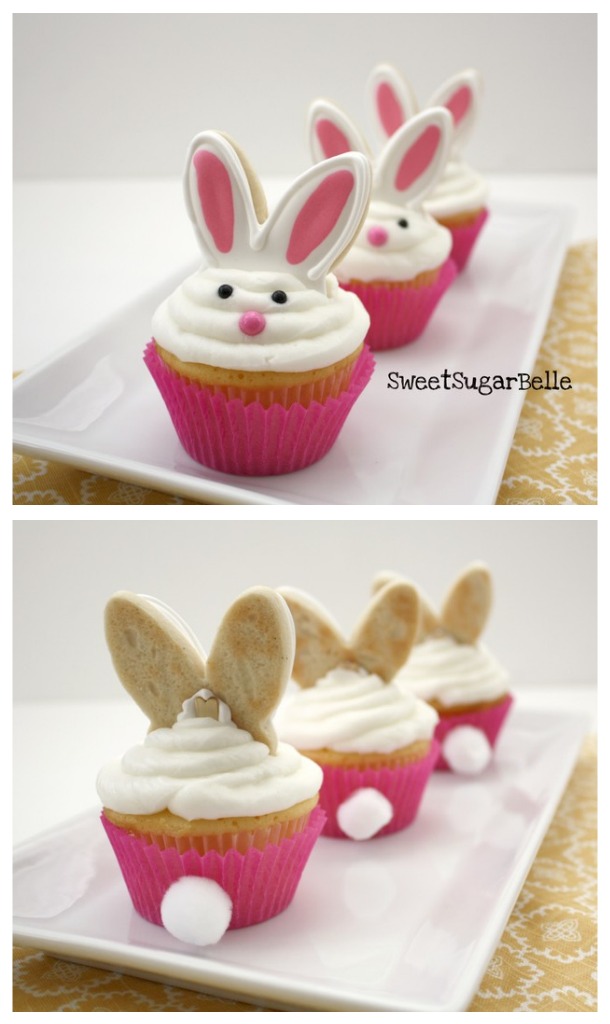
Frost your cupcake into a peak, and press your toppers down into the icing.
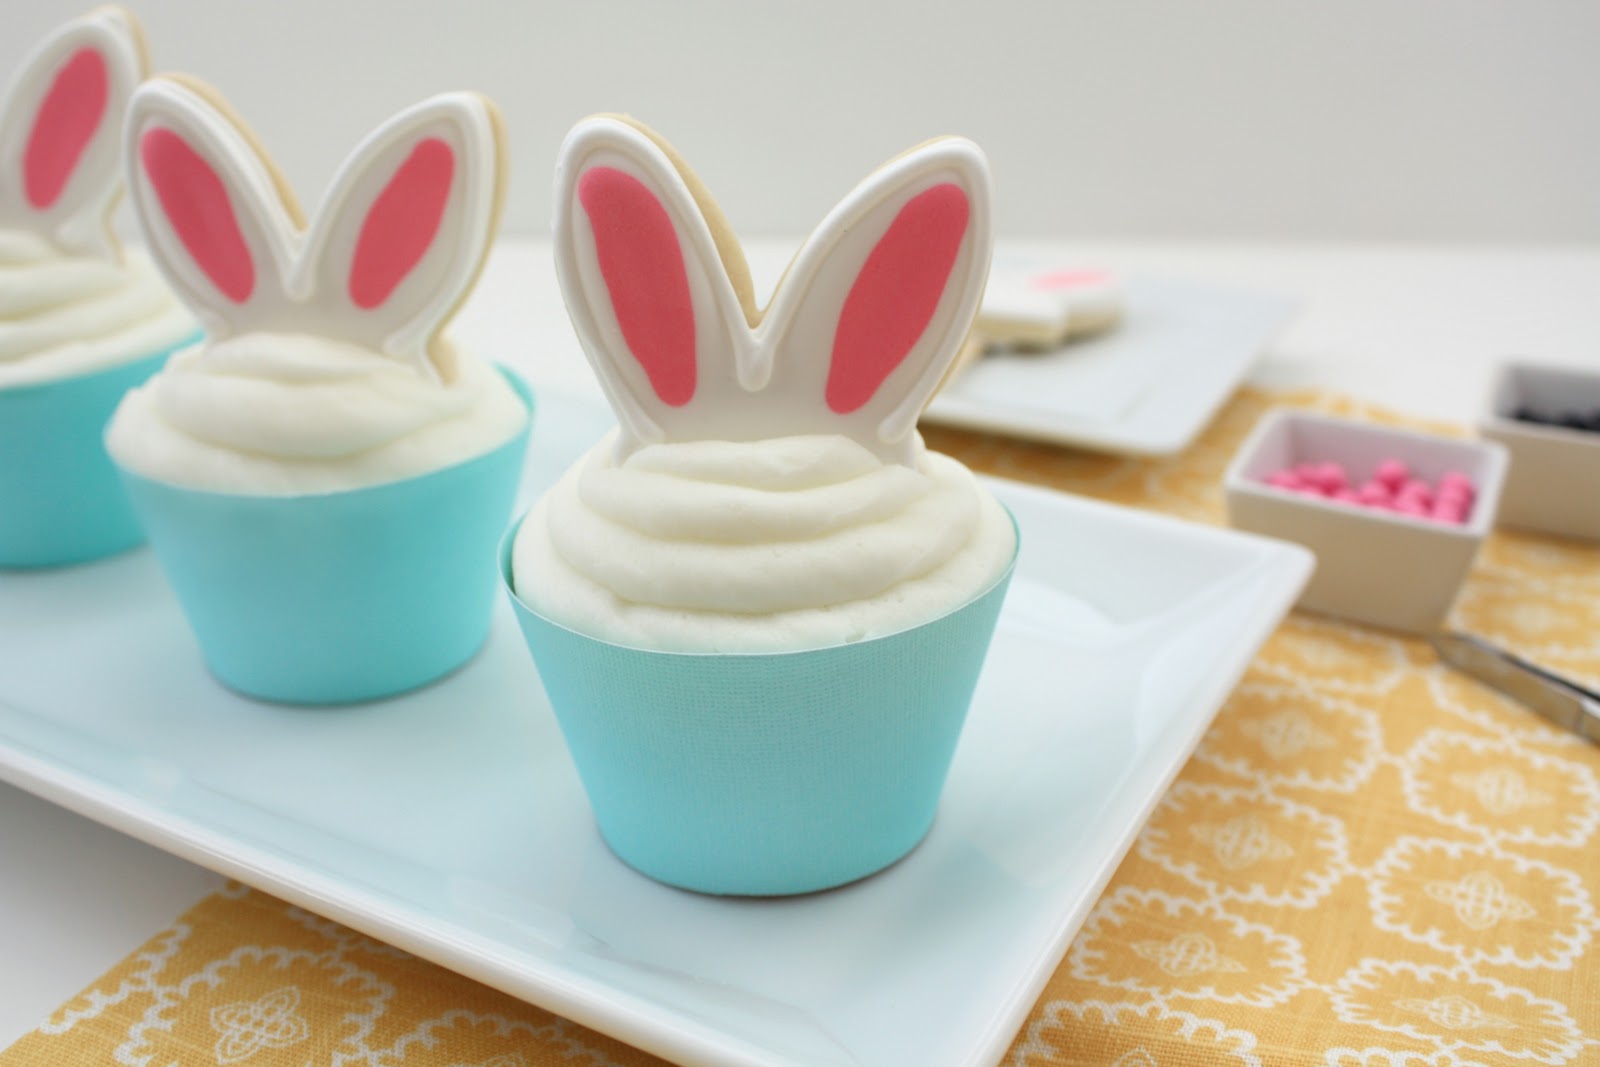
Then, using the candy accents, add your bunny face. Do this last because if you don’t the face will become distorted when you add the toppers, right, Beth? 😉
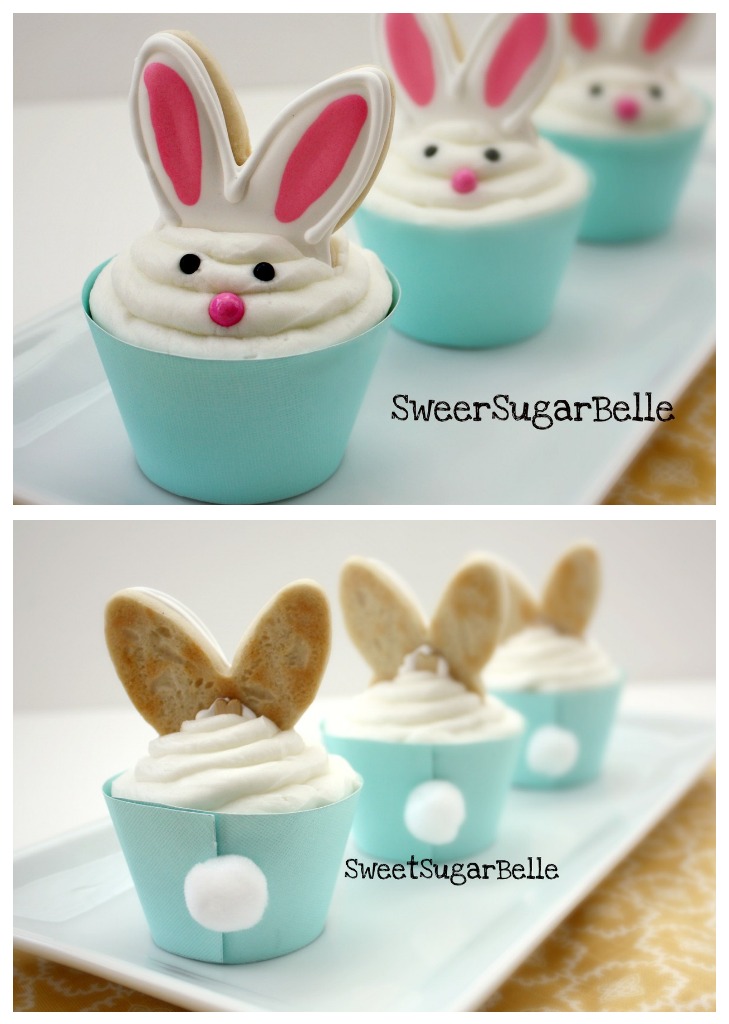
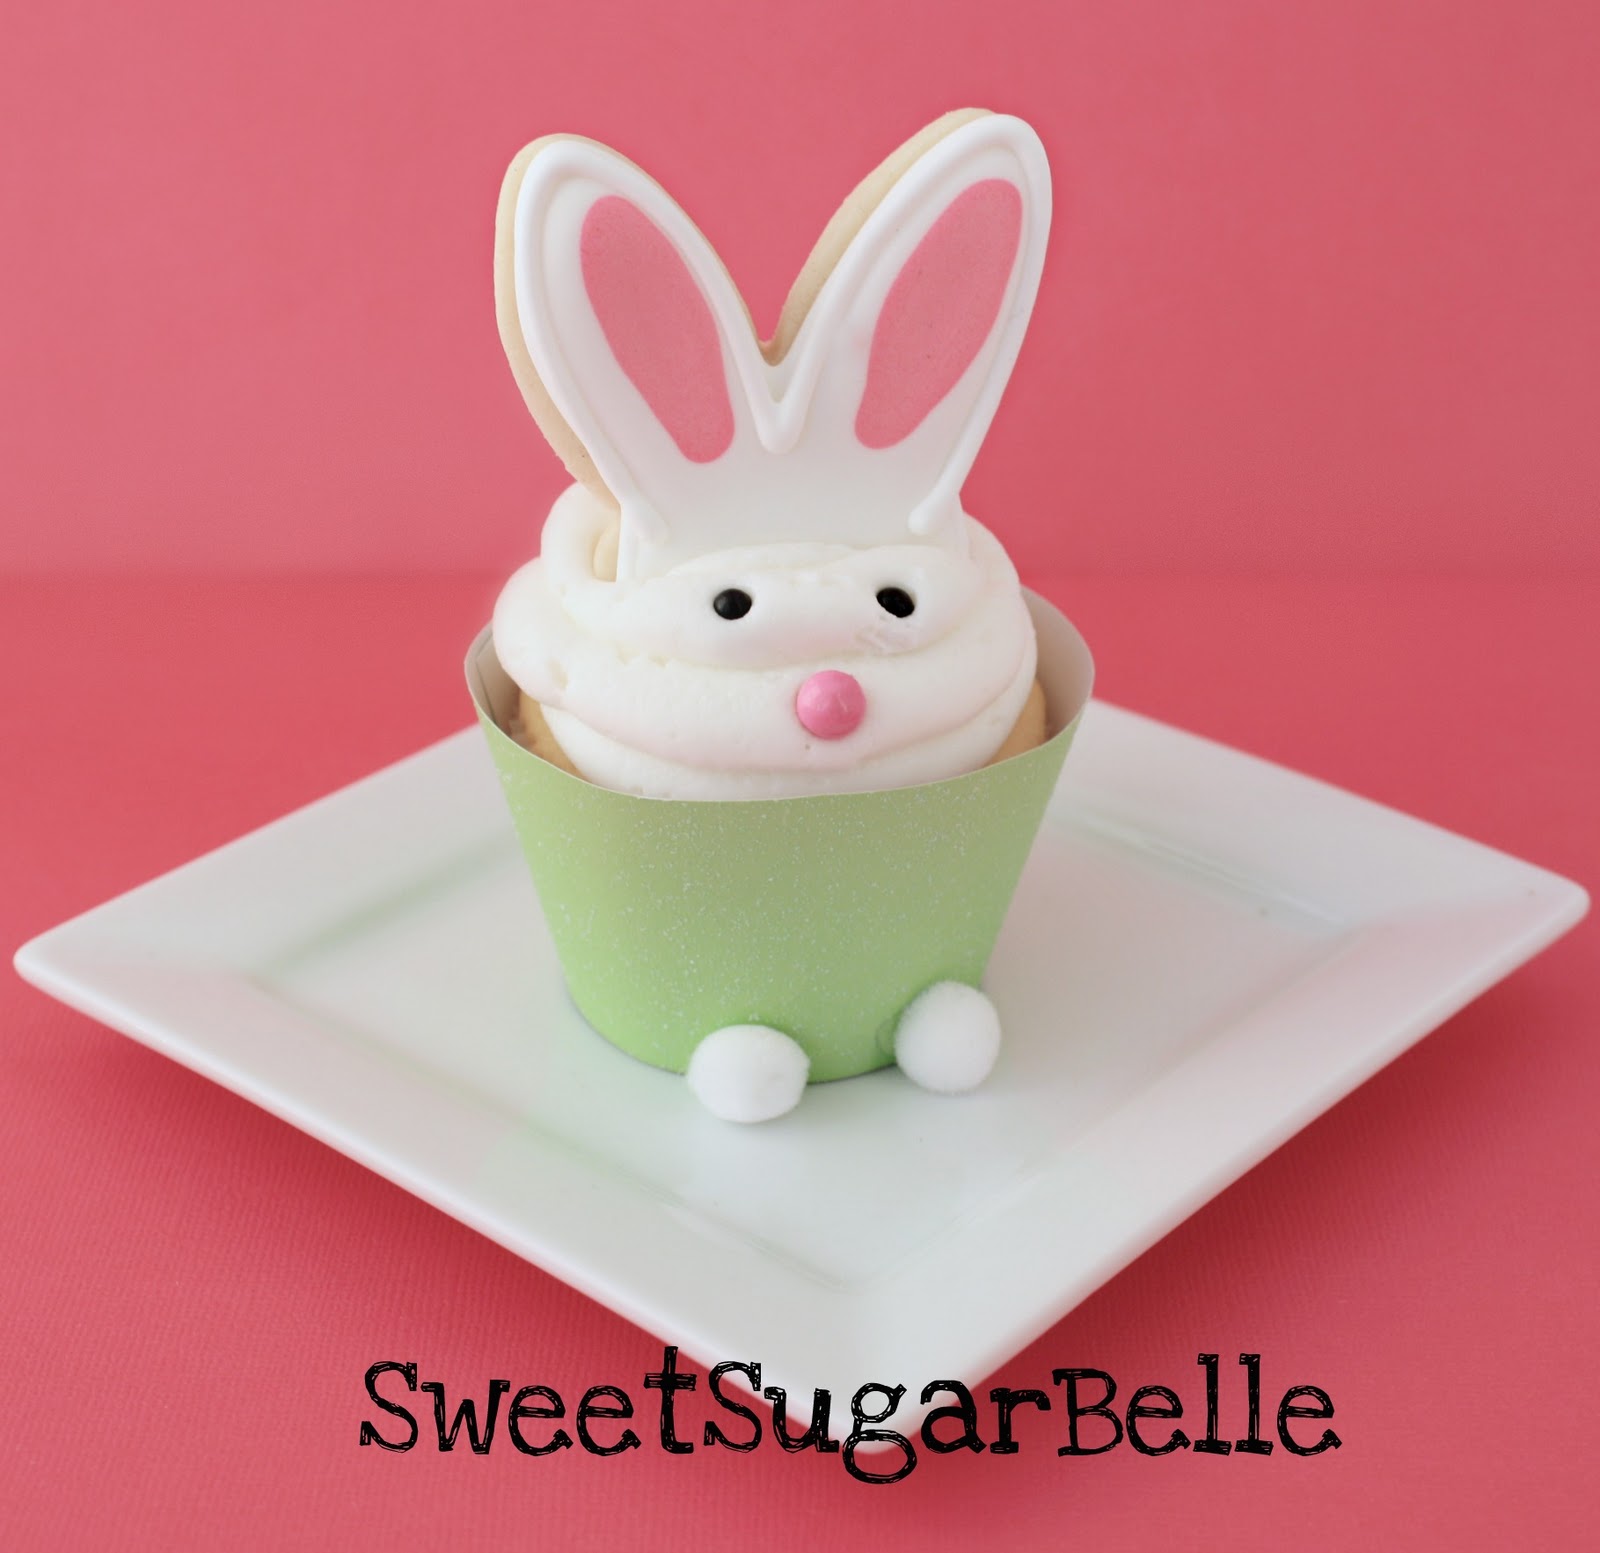
And there you have it, cute little bunnies with a fluffy little pom pom tail! I also made another version using a plain cupcake liner. It works perfectly as well!
These little guys are time consuming, but it’s not so bad for a once-a-year, special Easter treat. They are so cute I can’t help but SMILE. I made him green so he’d look like a bunny sitting in the grass!
If you don’t have two or three days to spare, Mique has just the thing for you. The PAPER version. Click on the photo below, or the link above to get yours!
I hope these will make it onto your Easter list this year. They will be the hit of your party, and it’s a fun project to do with your kids. They can definitely help with mixing, cutting printables, and constructing the wrappers and cupcakes {just keep them away from the tin snips if you like all of their little fingers}
What fun memories!
Happy Easter baking everyone!


It’s a SHAME that you don’t have your own store! You are SO TALENTED!! Thanks for taking the time to share your ideas…I can do a lot of this stuff but I lack your creativity 😉
I have to try these cute little guys this year! SO CUTE! What kind of frosting did you use for the top (bunny head)?
Your creations are incredible!!! Will these travel well? could I make the bunny ears on wed & th, hop on a plane on Friday and serve the cupcakes at a party on Sat ? I am also curious as to what kind of frosting you used on the cupcakes 🙂
Thank you !!!
Pingback: Lagniappe Friday - Feb 24th
Cutest ears ever!
Those are the cutest little things, ever! Loving them!
These are quite adorable…you’re so clever!! Damn, I wish we were neighbors…I could eat your cookie scraps! 😀
These are very cute!! Thank you for sharing them with us.
So cute! DEFINTELY going to try this; thanks! 🙂
What adorable bunnies…!!! Ok, I’m not a cookie expert so maybe at the end I will try with the paper version, but the idea to make the toppers with cookies is great…!!!
These are adorable.. thank you for sharing. I can’t wait to make them for my grandaughter.
These are really, really, really, REALLY adorable.
I may just have to make a version of these…thanks for the inspiration 🙂
Love these!!! Great job! Hugs from Conroe, TX
Pingback: Bunny Cupcake Drama… And Resolution : VerveCast
Such cuteness!
So dang stink’n cute, Callye!!!
Pingback: Easter Treats from Pinterest Pins
Pingback: Easter Bunny Cupcakes Recipe – Best Friends For Frosting
Pingback: Easter Bunny Cupcakes | Sweet Mia's Desserts
Pingback: Homemade Cupcake Stand « Employment Status: Homemaker
Pingback: Sweet Treats for Easter and Passover | The Design Tree by Greentea Design
These are awesome!! I’m gonna try it!!!
Pingback: Páscoa… | Blur-U
Pingback: Bunny Lemon filled Cupcakes with Lemon Buttercream | TidyMom
Pingback: Easter Yumminess | Julia's Kuku Parties
I am trying to make these and have one small question…what size cookie cutter did you use? I used one too big and the bunny ears looked like big blobs…also what cookie mix or receipe did you use?
Just finished step 1–the bunny ears. My 7 year old daughter helped make your basic sugar cookies. They are awesome. Can’t wait to start Step 2.
Pingback: Bunny Cupcakes with Sugar Cookie Ears « ipinnedit
I attempted to re-create your bunny cupcakes. It was a fun project, but I learned a lot along the way. I really enjoy your site and you have inspired me to try royal icing. I nominated you for the Kreativ Blogger Award! Check it out at: http://ipinnedit.wordpress.com/2012/04/18/kreativ-blogger-award/
Wonderful publish admin! i bookmarked your word wide web blog. i will glance ahead in case you could have an e-mail record including.
Pingback: the cupcake basics | part three | Ciao Bella!
Pingback: Sun & Sky Baby Shower Cupcakes: My First Cupcake Gig! | Make Me Cake Me
Pingback: ??????: ????? ????????? (??? ?’) | ??????
Pingback: Bunny Ears Cupcakes!
Pingback: Bunny Ear Cupcakes - Precious Photography
Pingback: Bunny Ear Cupcakes | Dreamy Blog
Pingback: Six Sweet Treats for Easter!
Absolutely adorable! I’m going to pair that idea with theses Easter Cupcake Wrappers with another cute bunny on them too. http://www.bellacupcakecouture.com/category_44/Easter-Cupcake-Wrappers.htm.
Thanks again for having an amazing blog!
Pingback: IW: 20 Sweet Easter Treats | perpetuallydaydreaming
Pingback: 12 Happy Easter Recipes | The HostelBookers Blog
Pingback: Ideas para Pascua | Mila punto com
Pingback: Easter Bunny Cupcakes | Boston Bakes for Breast Cancer
Pingback: Vanilla Chai Cupcakes with White Star Cookie Toppers | Make Me Cake Me
Pingback: Simple Easter Cupcakes and Cookie Toppers
Pingback: 25 Fun and Festive Easter Treat Ideas! | Pretty Providence
Pingback: Easter Egg Brownies from a Mix - The Bearfoot Baker
Pingback: Cute & Delicious Easter Inspired Cupcakes Recipes | Un - Complicate
Pingback: Lady From USA
Pingback: IW: 20 Sweet Easter Treats | Perpetually Daydreaming
Pingback: Easter Bunny Cupcakes - Giggles Galore
Pingback: 12 Adorable Easter Bunny Cupcakes
Just a quick note that your old blogger address for this recipe/post (http://sweetsugarbelle.blogspot.com/2011/03/bunny-ear-cupcake-toppers.html) is redirecting to the wrong place. it took me to some bunny cookies instead. (https://www.sweetsugarbelle.com/?bloggerURL=/2011/03/bunny-ear-cupcake-toppers.html)
Thanks so much, Amanda! I’ll have to get Robin to check it out. I appreciate it!
Pingback: Friday Favorites: Easter | bellagraciela
Pingback: 5 DIY Easter Recipes - Holstein Housewares
Beautiful beautiful d ecorations I will make some of them.
Pingback: 10 Cute Easter Treats – As Easy As Apple Pie
Pingback: 40 fun and Festive Easter desserts | afreshstartonabudget
Pingback: Easter Recipe Roundup | My Little Something Sweet
Pingback: DIY Easter Crafts | Alexandria Lifestyle
Pingback: Bunny Ear Cupcakes | My Little Something Sweet
Pingback: 35 Adorable Easter Cupcake Ideas