Flowers in Pots Cookies
I’m one of THOSE girls. YOU know the ones…I’m one of the gals that HATES to get flowers. It actually pains me {unless they are wildflowers or borrowed from my neighbor’s rosebush} to receive them. If my husband is going to spend $100 on me I’d much rather have something that will still be alive {or useful} after a week. For example, cookie cutters…
Anywho, I made these for one of the most inspiring ladies in my little world. Most of you have probably heard of Bakerella, right? She’s the cake pop lady.
Lately, she hasn’t been feeling very well, so I decided to send her some flowers to cheer her up. Of course, since I don’t believe in flowers, {and also because stolen borrowed roses don’t ship very well}, I made her a different set, SweetSugarBelle style. The best thing about these is that instead of dying, they dissapear into your tummy, AND they will be remembered for a long time. If there’s any doubt about that, my bum proves this theory.
For each cookie you will need:
-
bamboo forks trimmed to 2 inches
-
terracotta and green piping icing
-
black flood icing
-
black sanding sugar
-
3 1.5 inch cookie
-
2 inch cookie ring
-
#3 and #67 Wilton tips
-
mini-flower cookie
-
shelf-stacker rack {similar to this one}
First, I baked the cookies. The cutters I used are shown below. To elaborate on the list above, every finished cookie requires three 1.5 inch rounds, and one 2 inch round with the middle removed, which technically makes it a ring, so we’ll call it that. They also require one mini-flower cookie, no larger than 1.5 inches. If you don’t have a mini-flower, you can make a round work.
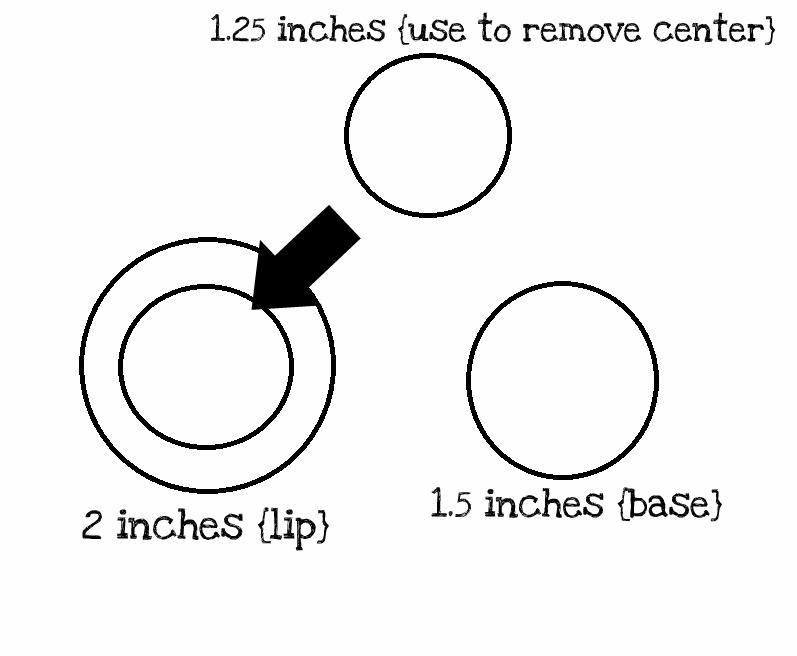
I will let you do the math since I never much cared for that subject.
Tint the dough you will be using for the pot whatever color you choose, I used a mix of orange, tulip red, and warm brown. For more help on mixing colors, see my color chart {HERE}.
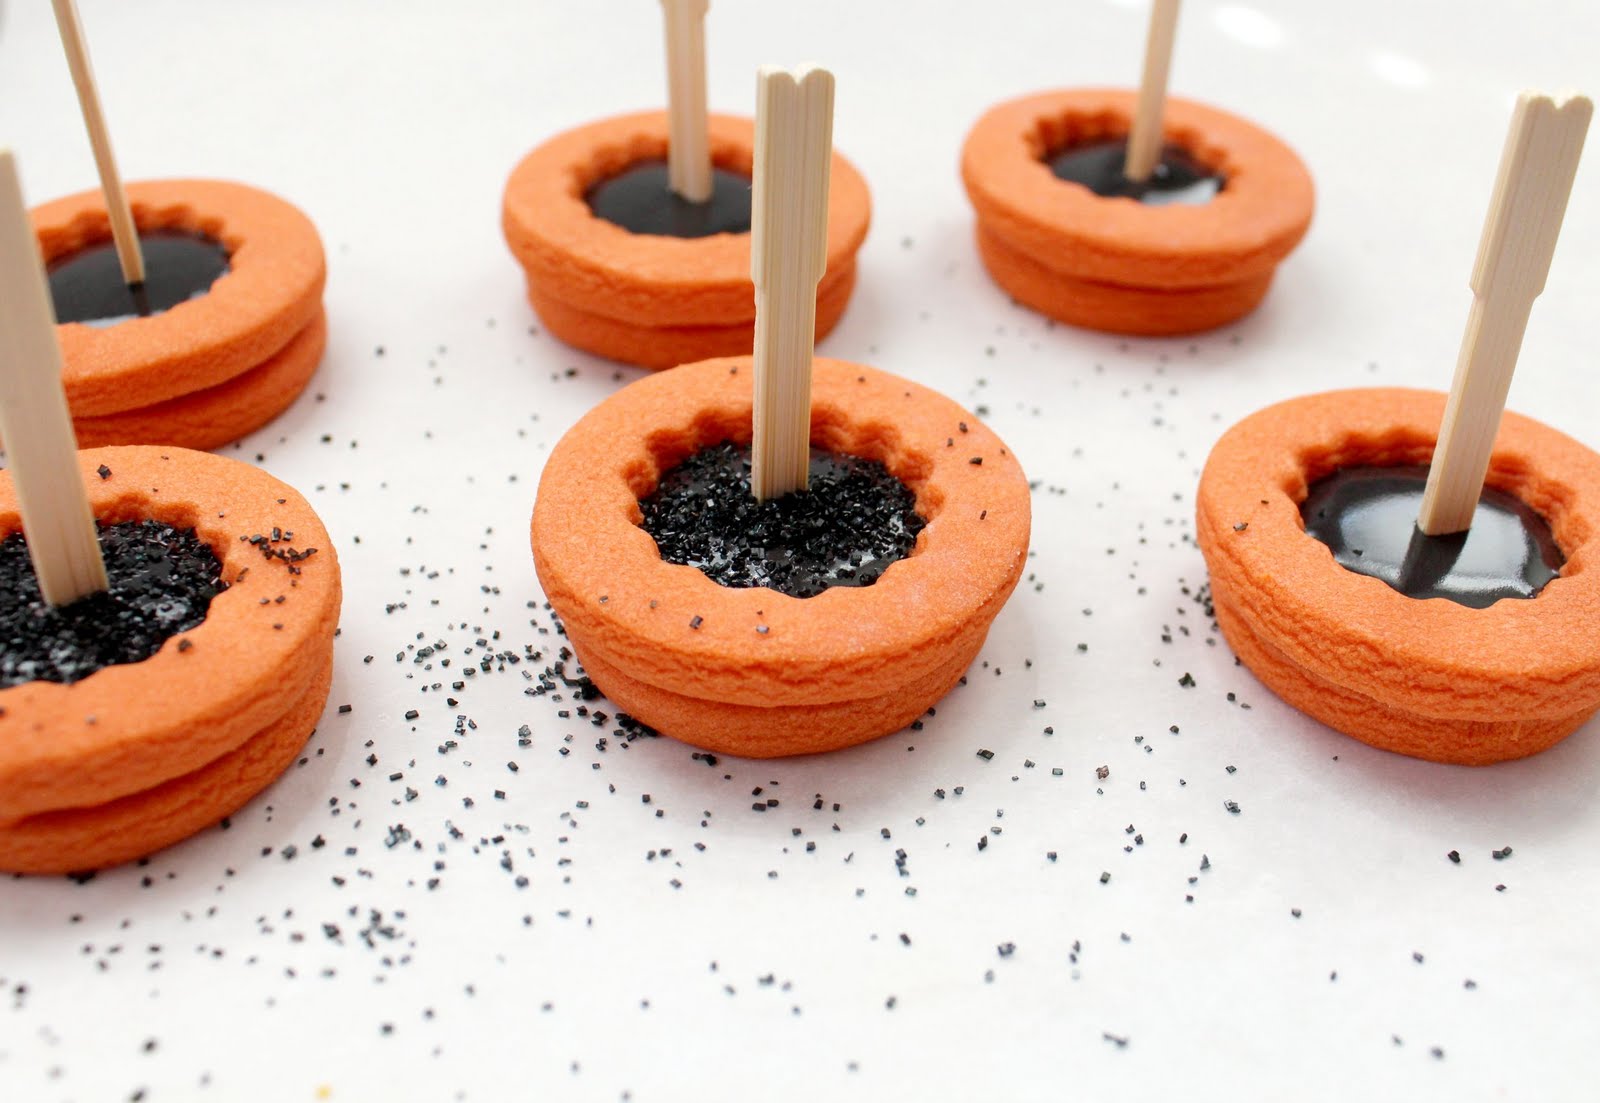
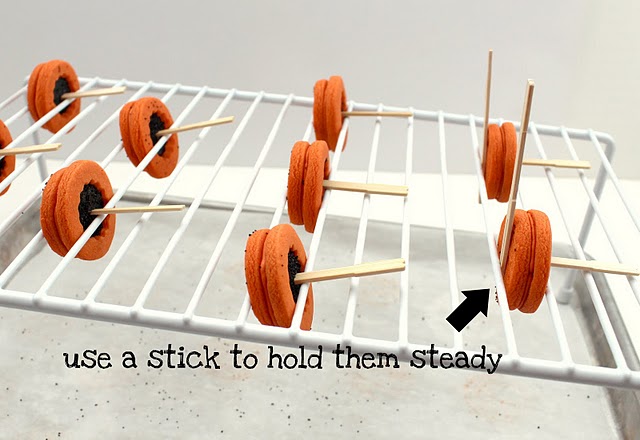
THIS STEP IS IMPORTANT! Immediately after baking, insert a trimmed bamboo stick into a 1.5 inch cookie for each pot you plan to make.
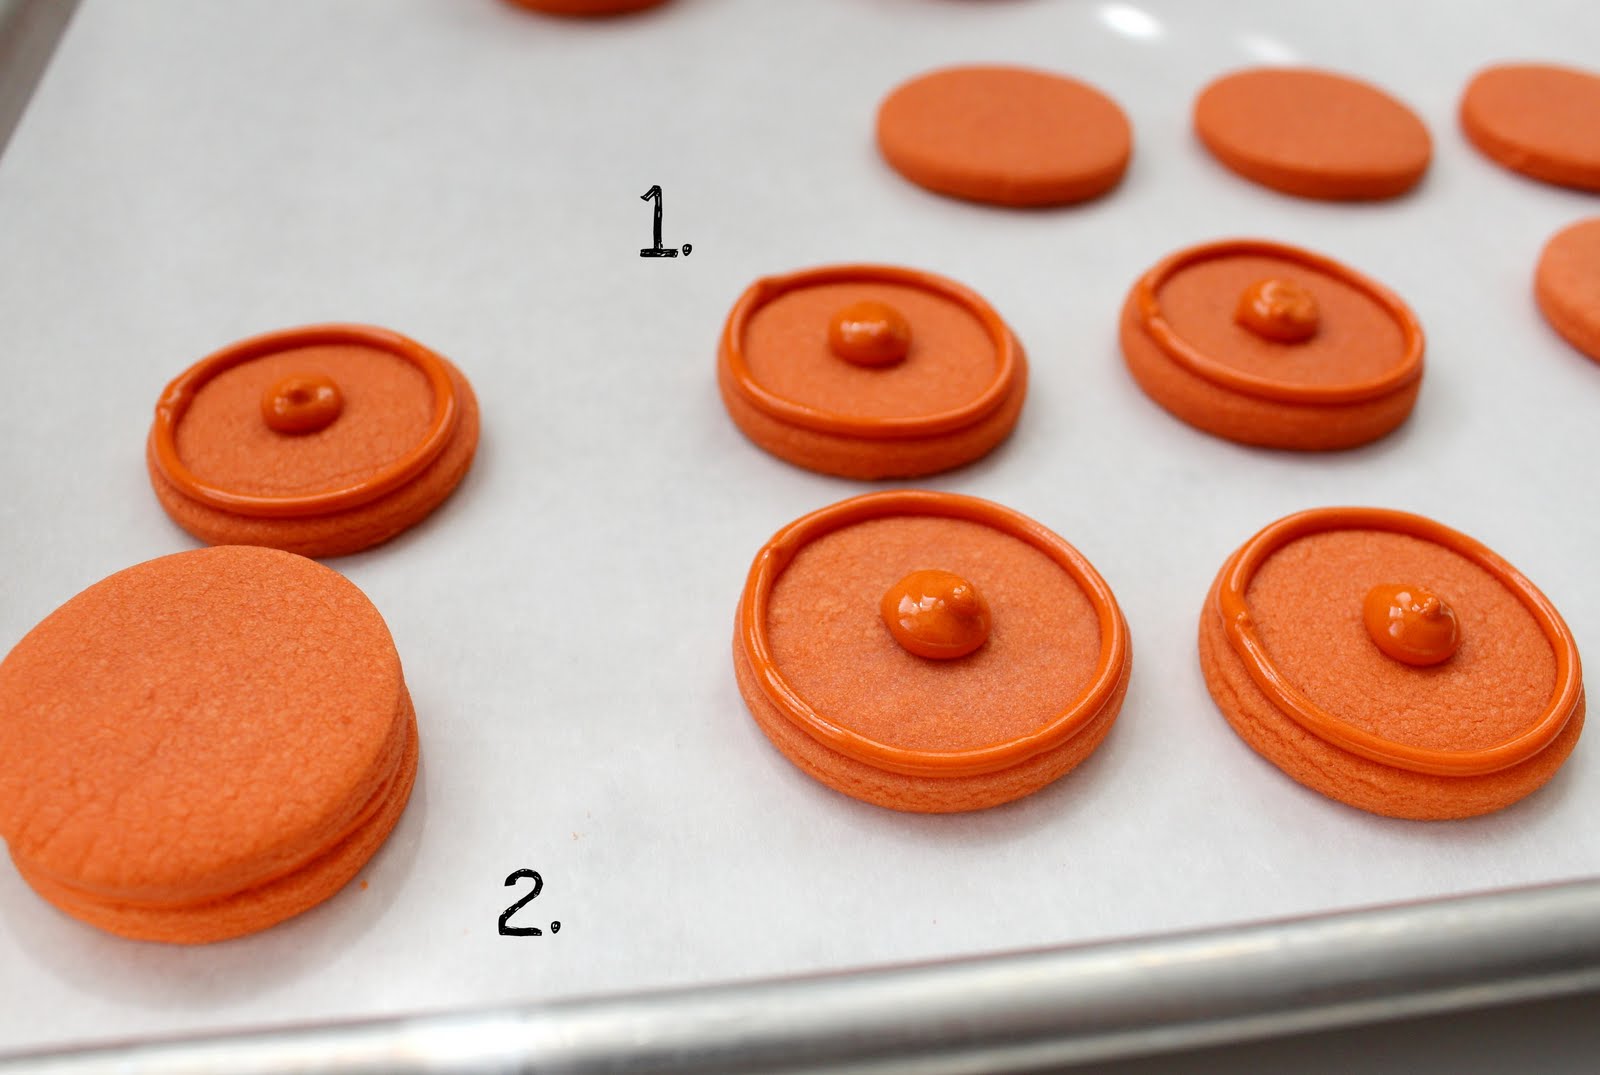
Let those cool and then it’s time to begin putting the cookie together. First use the terracotta icing to make a ring around the “stick cookie”.
*A little FYI…the cookie in the bottom left corner is how NOT to do it. Refer to the middle one.
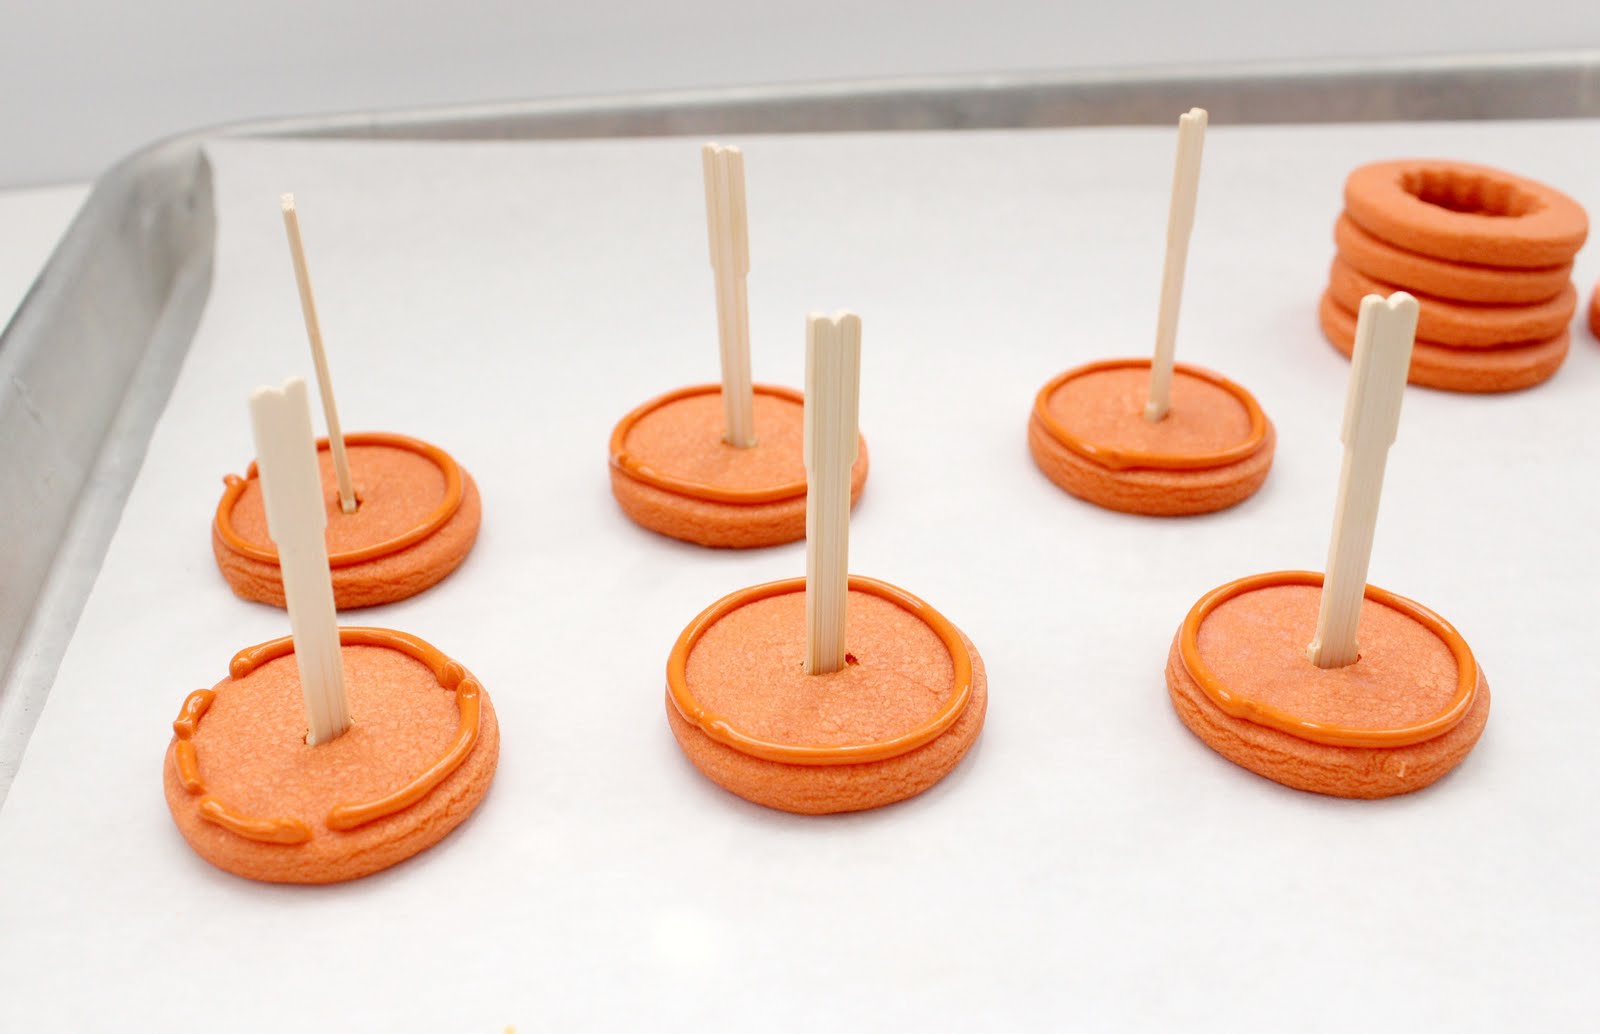
Drop the ring onto the icing to “glue” the pieces together.
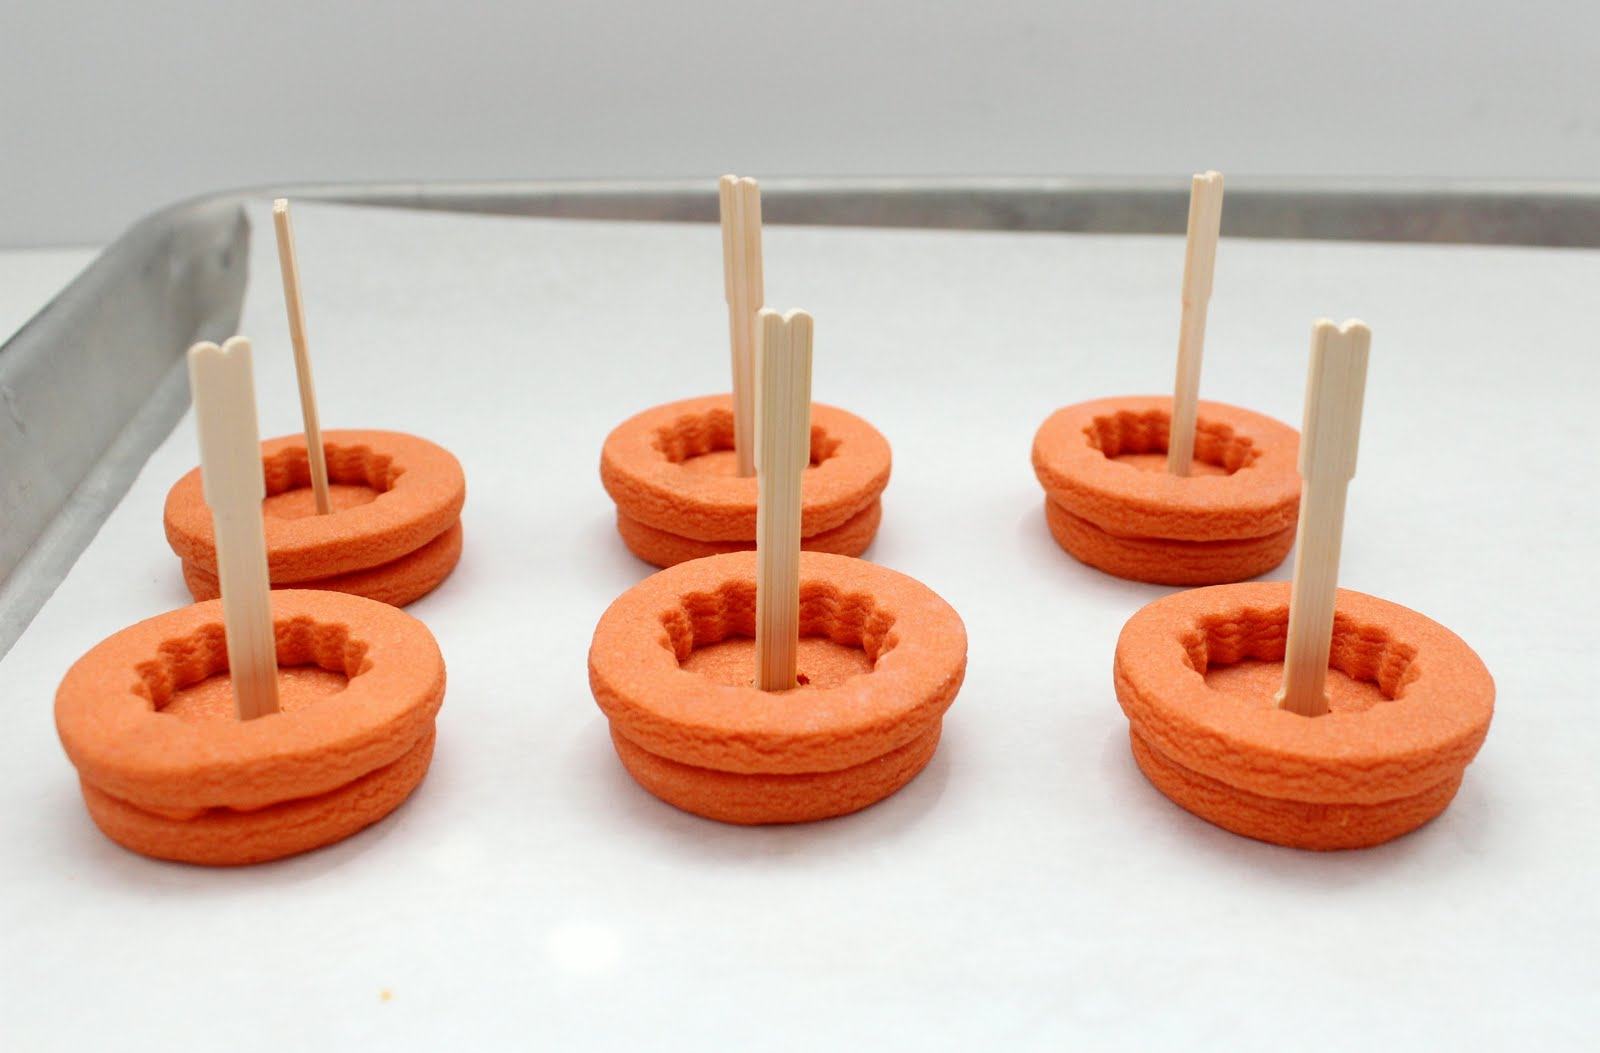
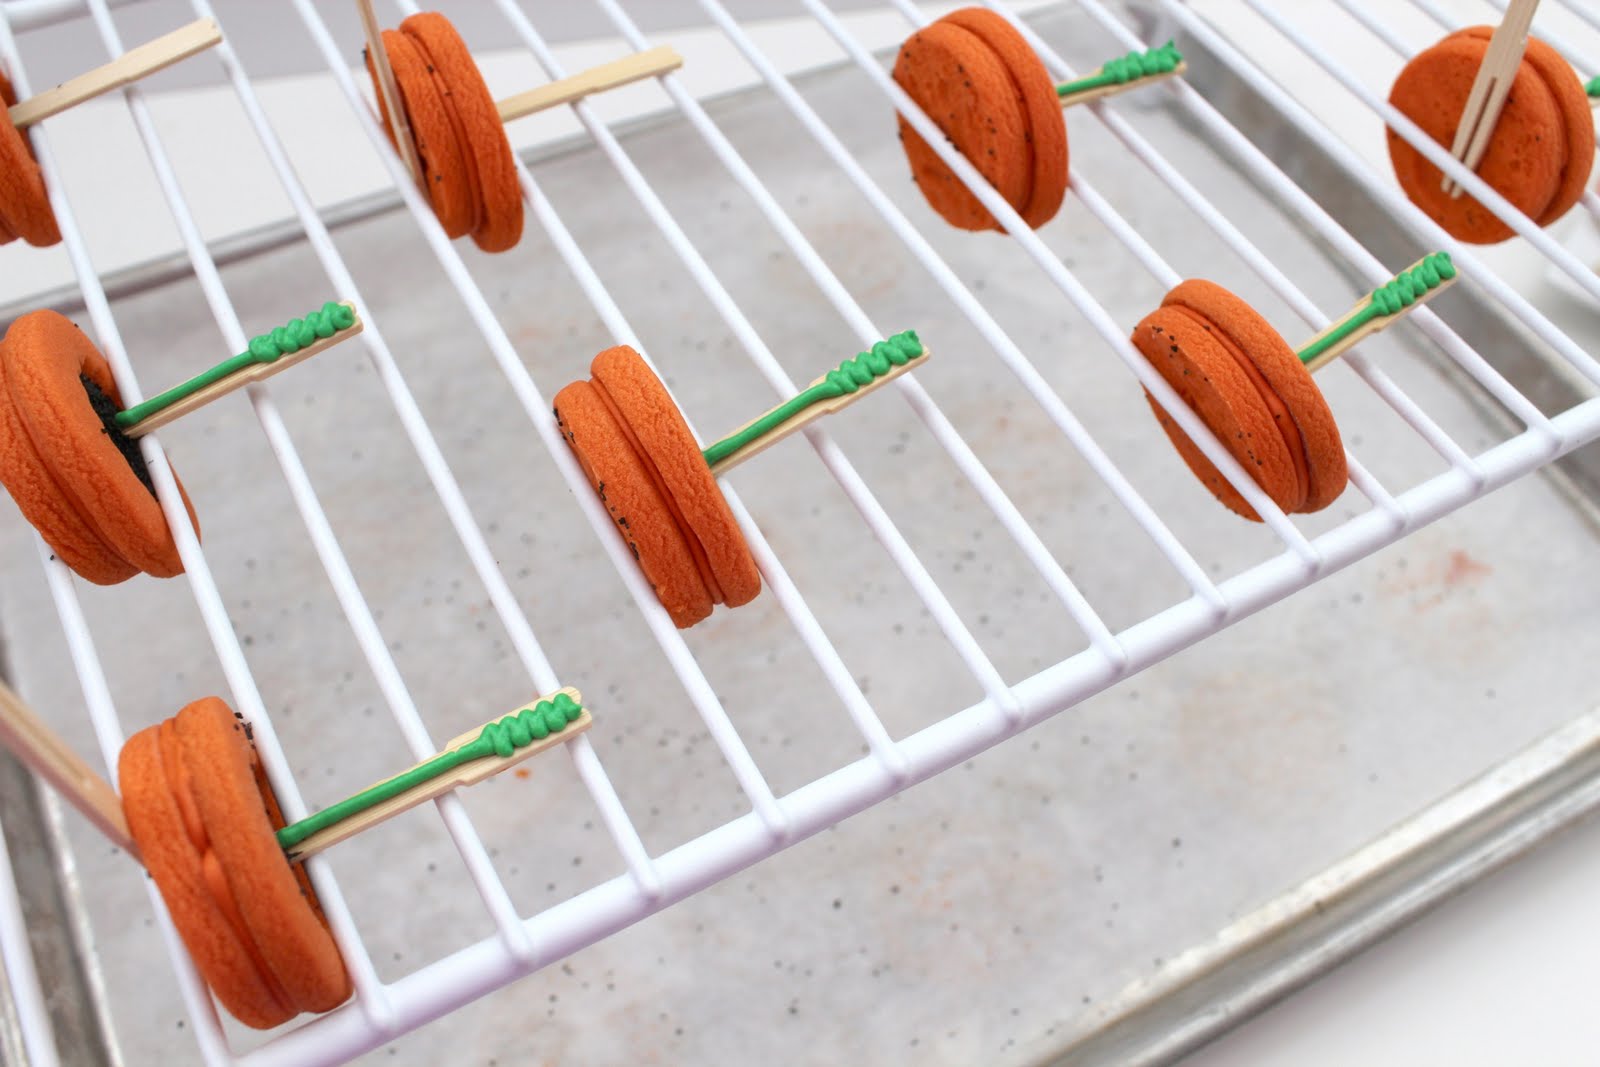
Next, fill the empty area with black flood icing. Not only does this make the cookie look more realistic, it also helps to hold the stick firmly in place.
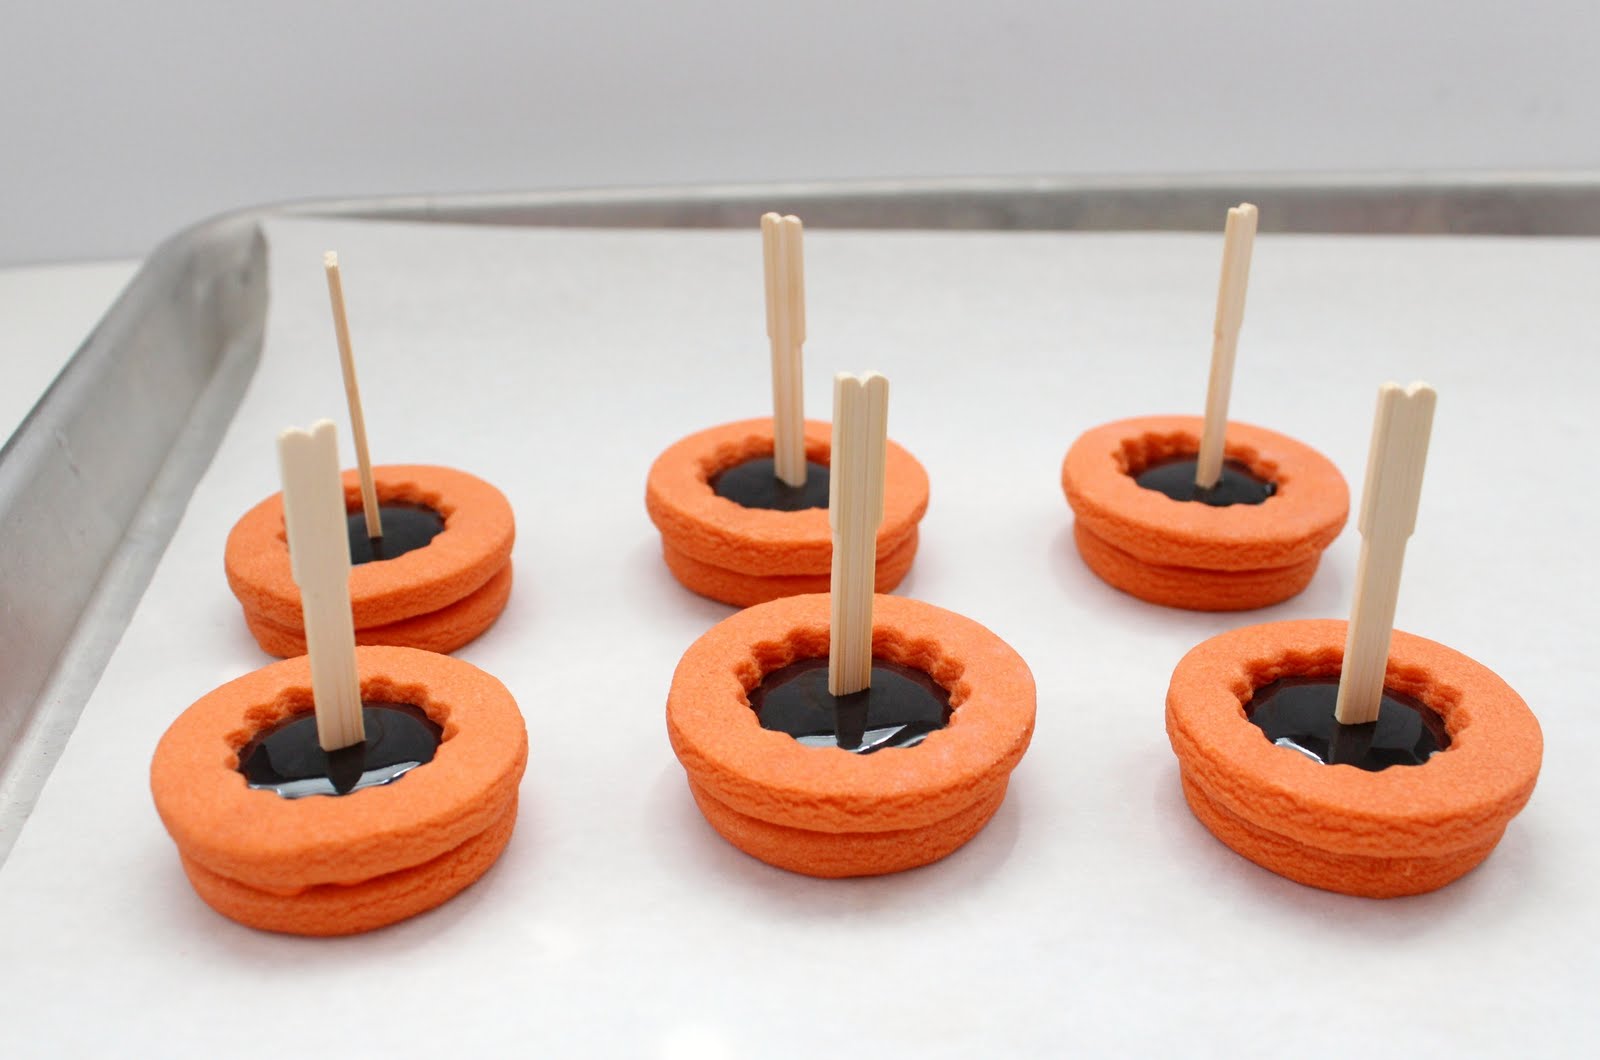
While the black icing is still wet, sprinkle it with black sanding sugar to look like dirt. Let it dry completely, preferably overnight.
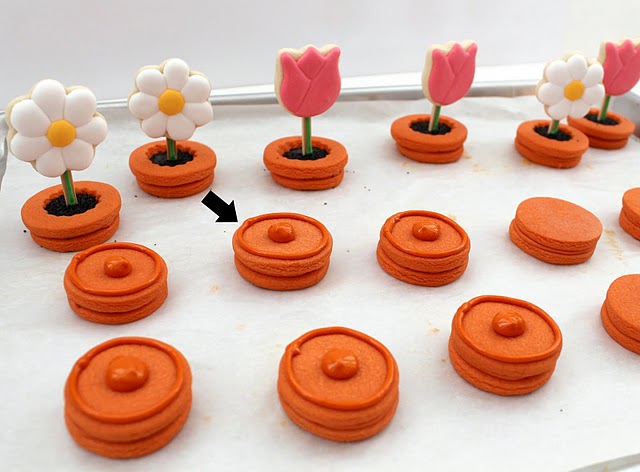
The same day, put together the base. The best method is pictured below. This keeps the cookie level and makes a nicer finished product.
Also, have several mini-flower cookies decorated and ready to go. A good technique for decorating these would be my 20-second icing. It would be a good idea to decorate them the same day you complete the steps above so they will all be dry and ready to go on day two.
Now to add the flower. This is where the shelf-stacker comes into play. If you don’t know what these are, they are little shelves that you slip inside your cupboards to add a shelf where there isn’t one.
It just happens that the cookies fit perfectly into the slots so that they will lay flat. I got this one at Walmart, and have only used it specifically for this purpose.
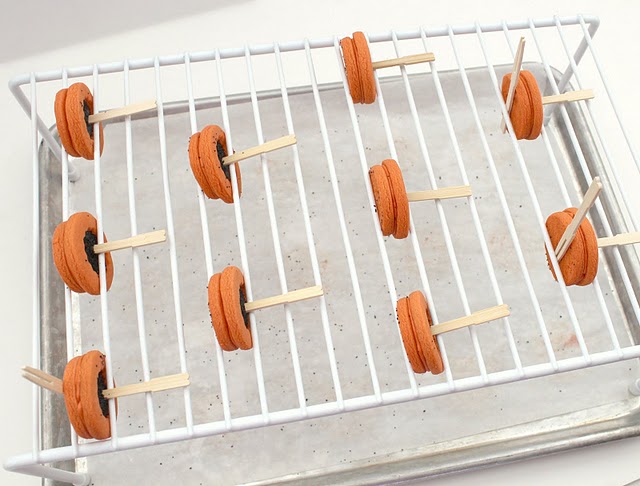
If for some reason they are loose, try the trick below to level them.
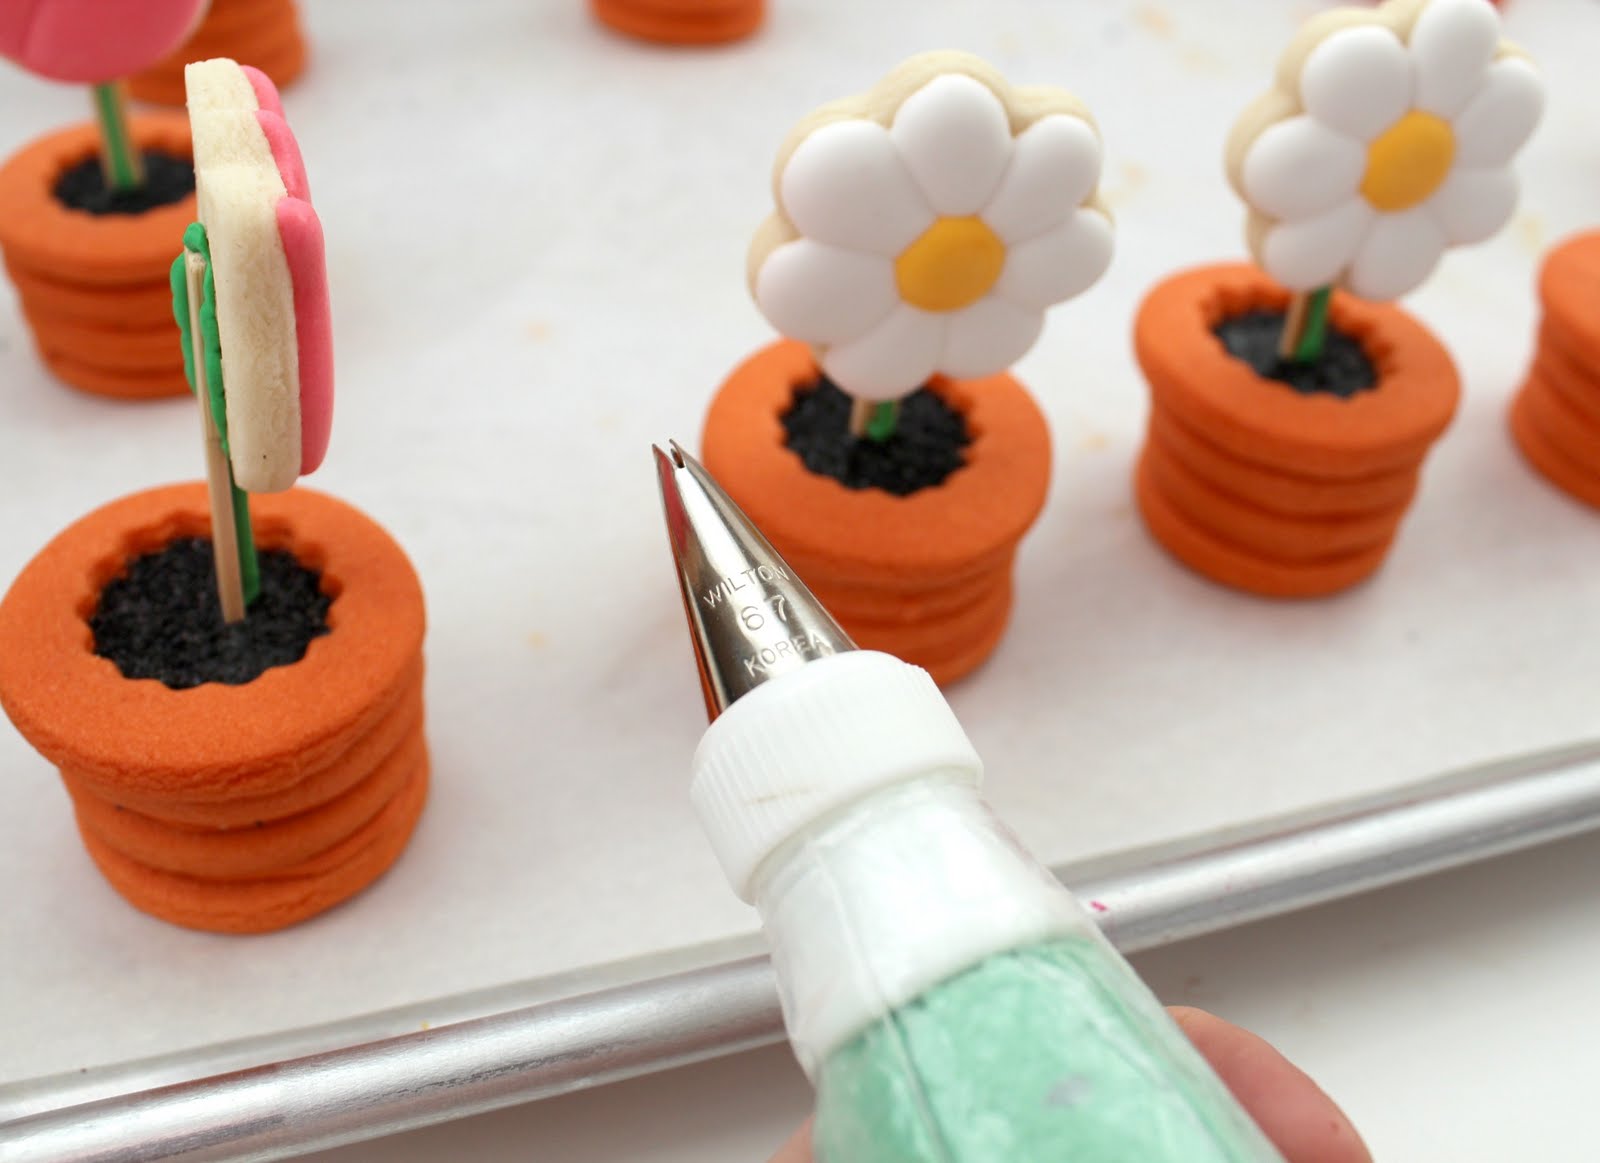
Use a #3 tip to add green royal icing for the “stem” as pictured below, then stick the finished mini-flowers onto the top of the stem.
Let them dry well. About 2-3 hours I’d estimate…
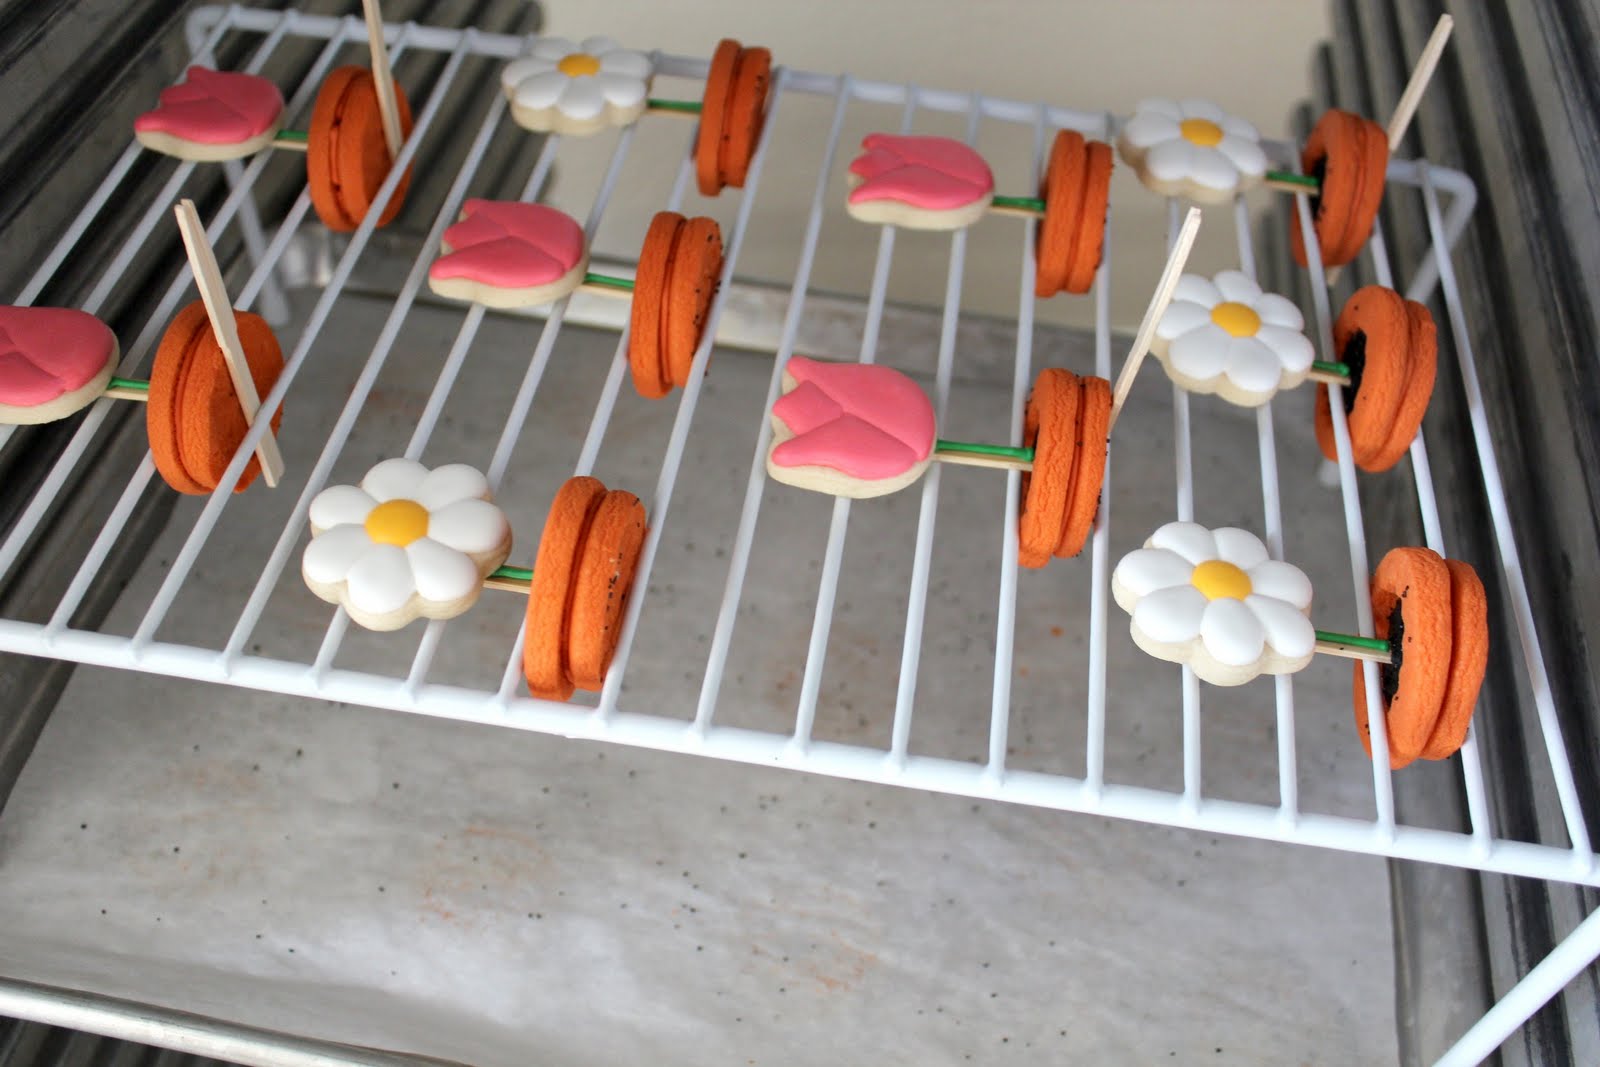
Then it is time to connect the two cookie parts as pictured below.
ALMOST FINISHED…
Use a #67 Wilton leaf tip to add leaves,
?
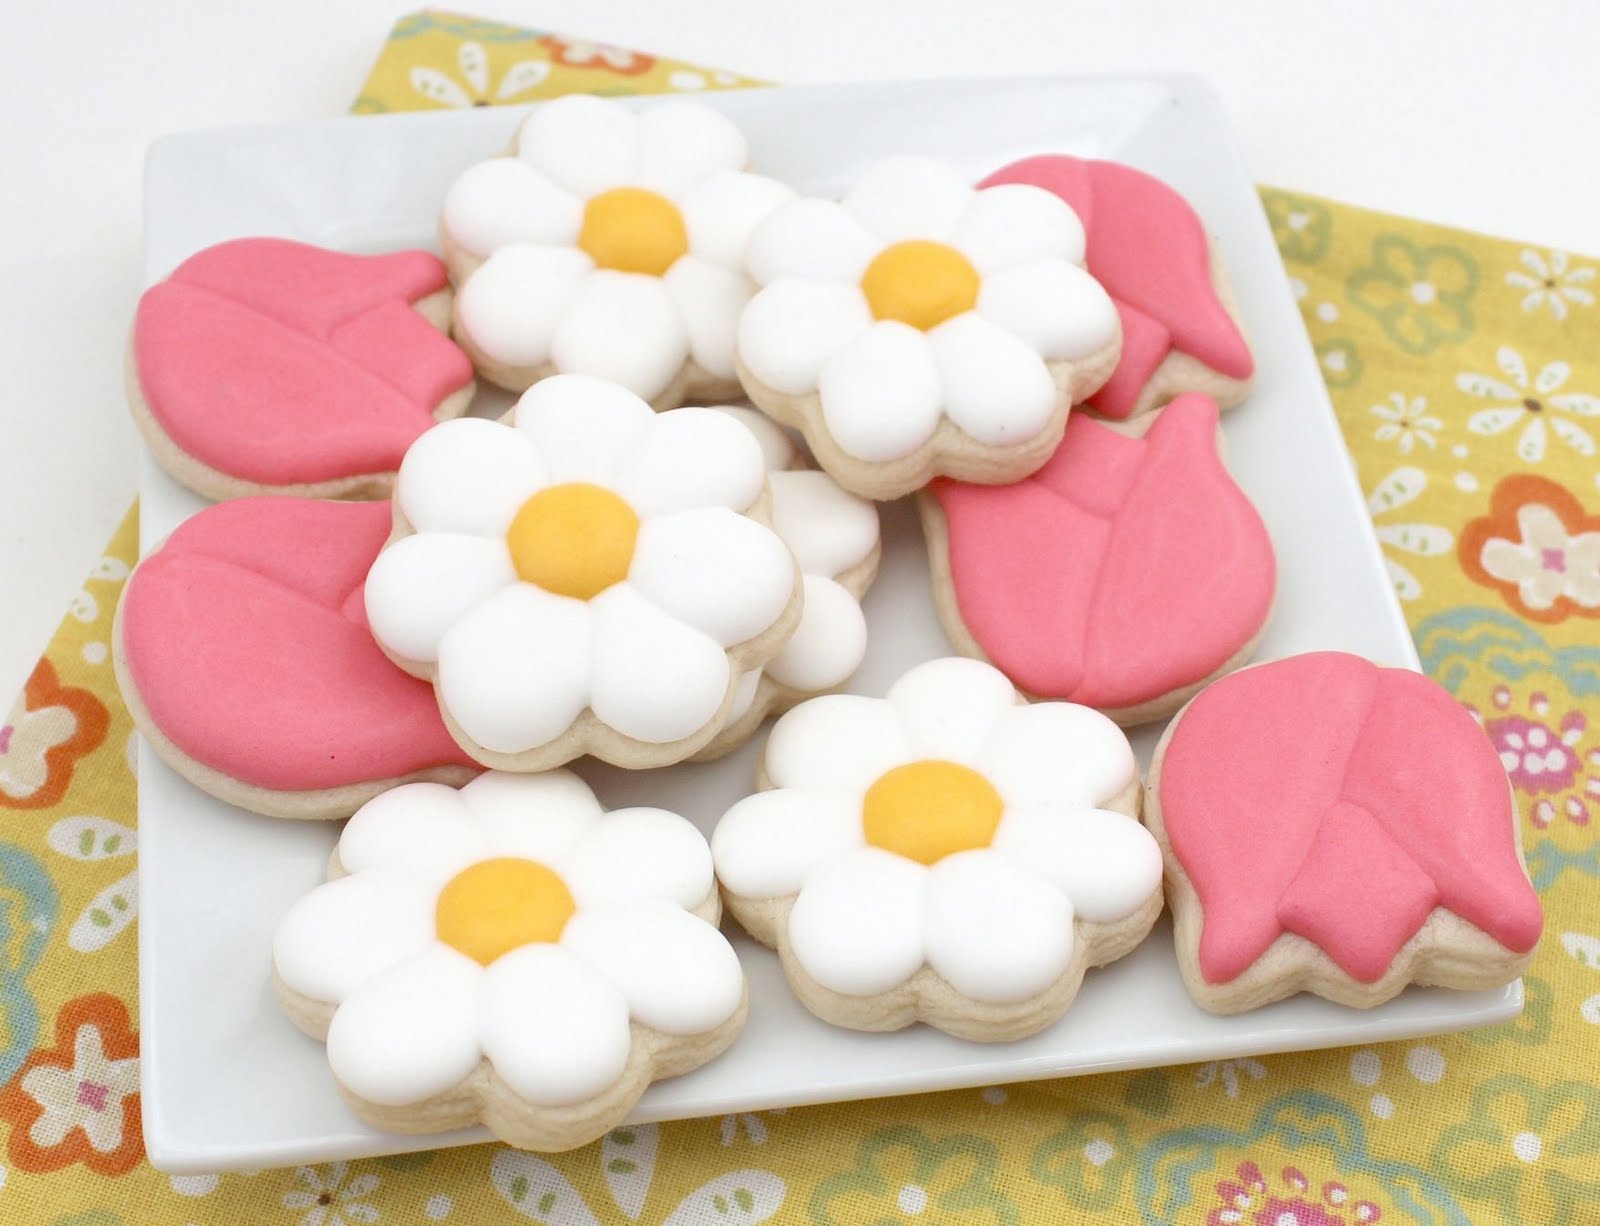
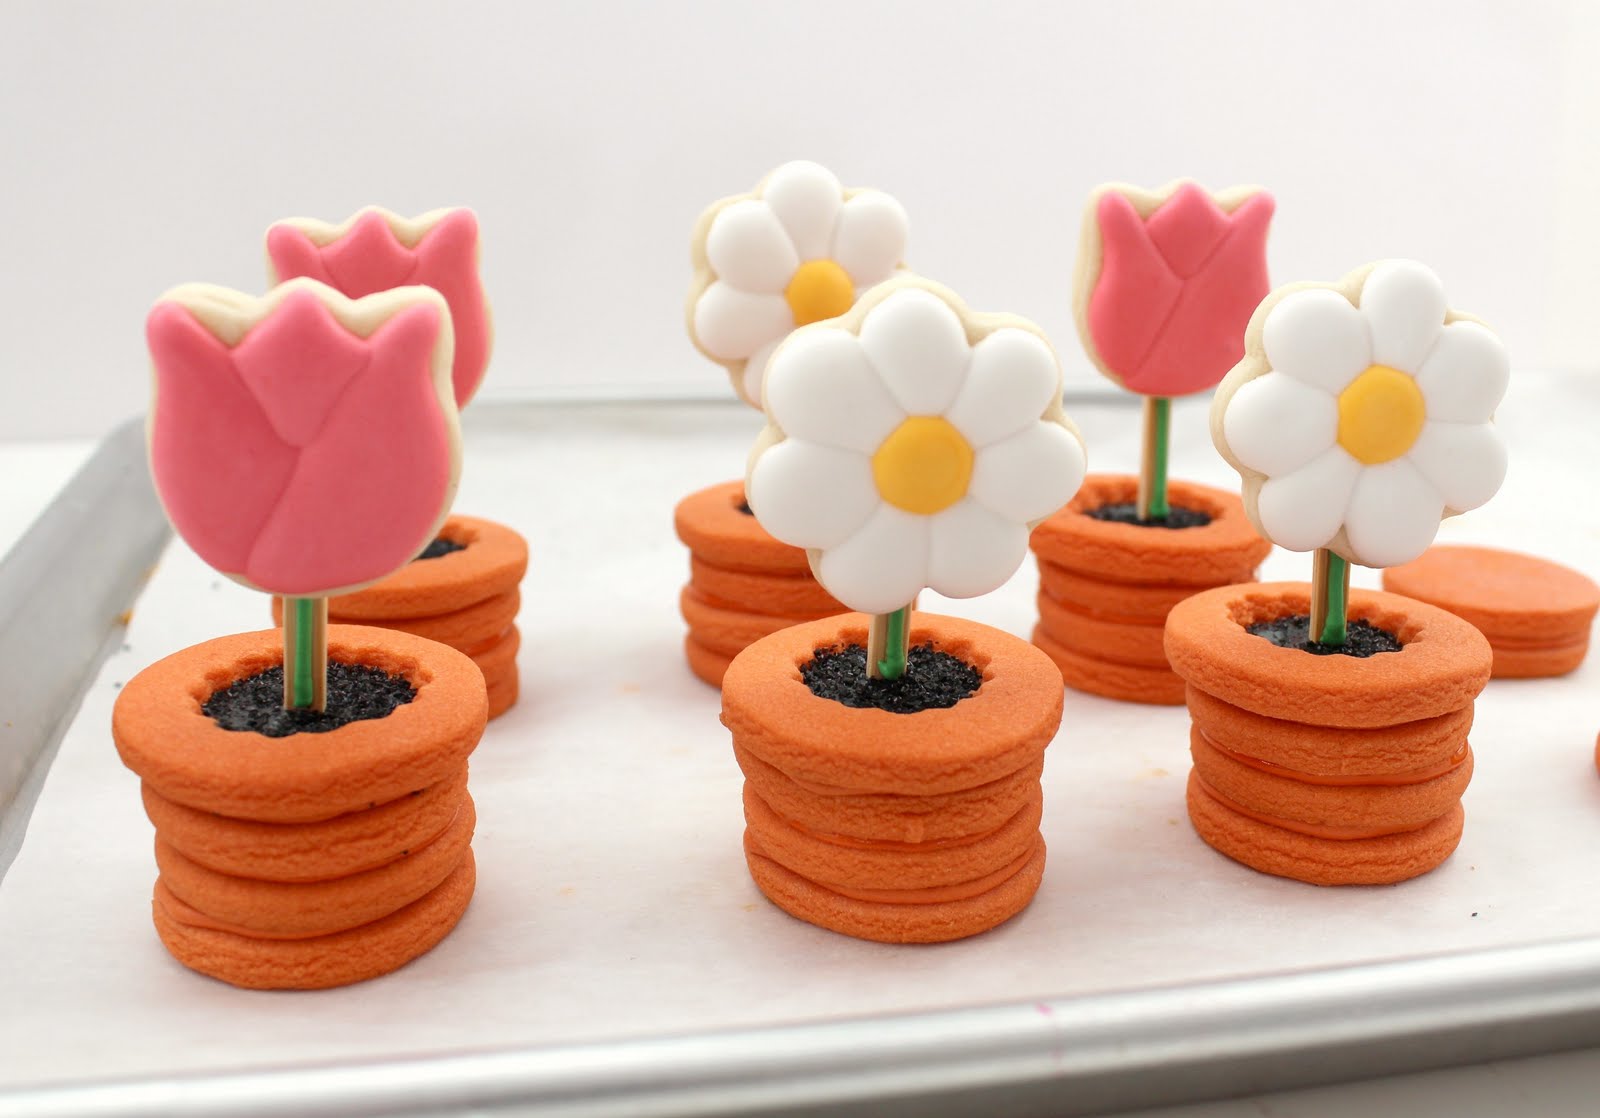
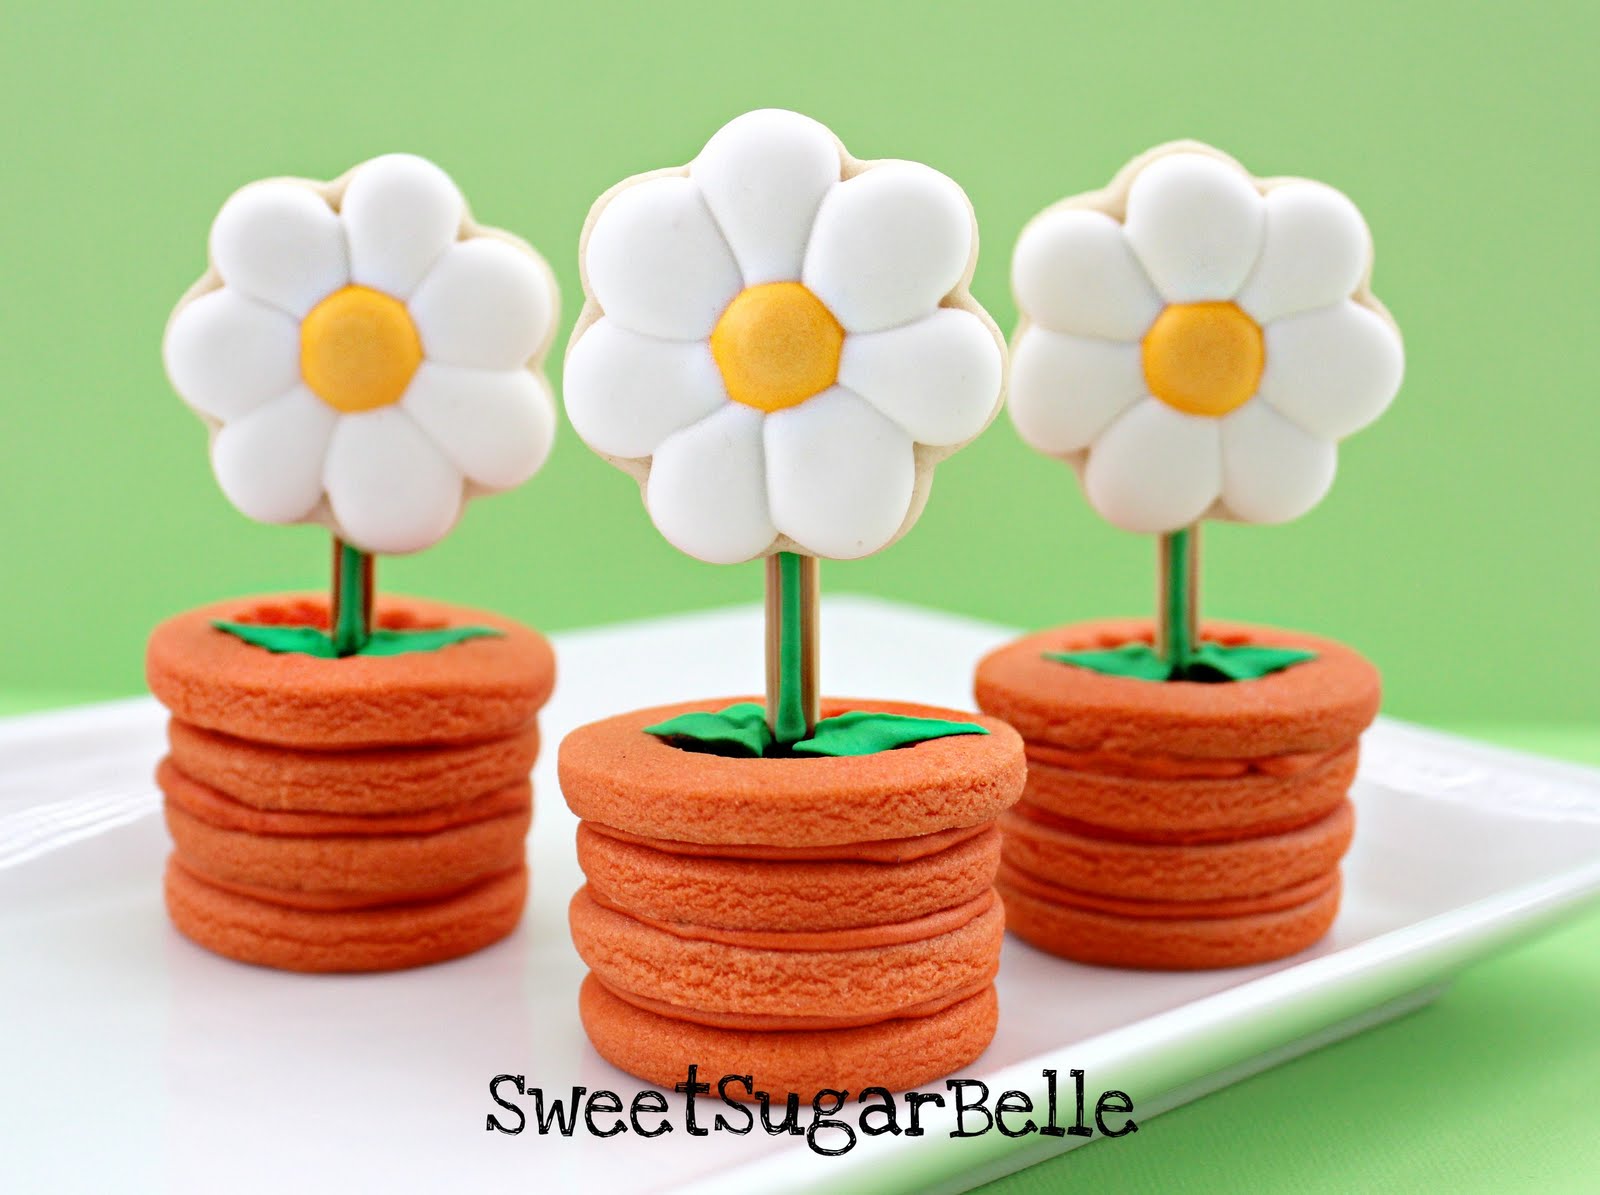
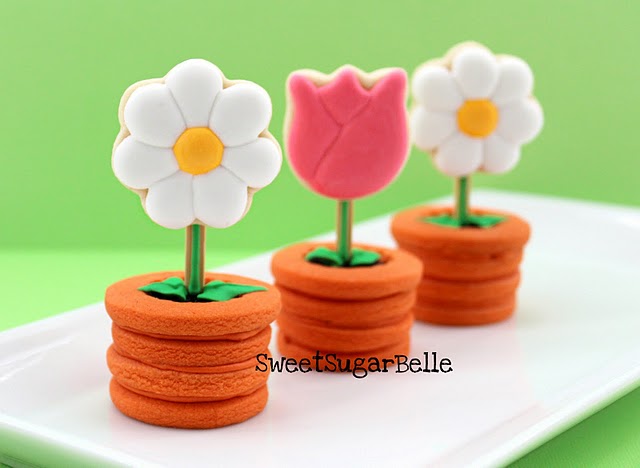
And finally, you have FLOWERS in POTS!
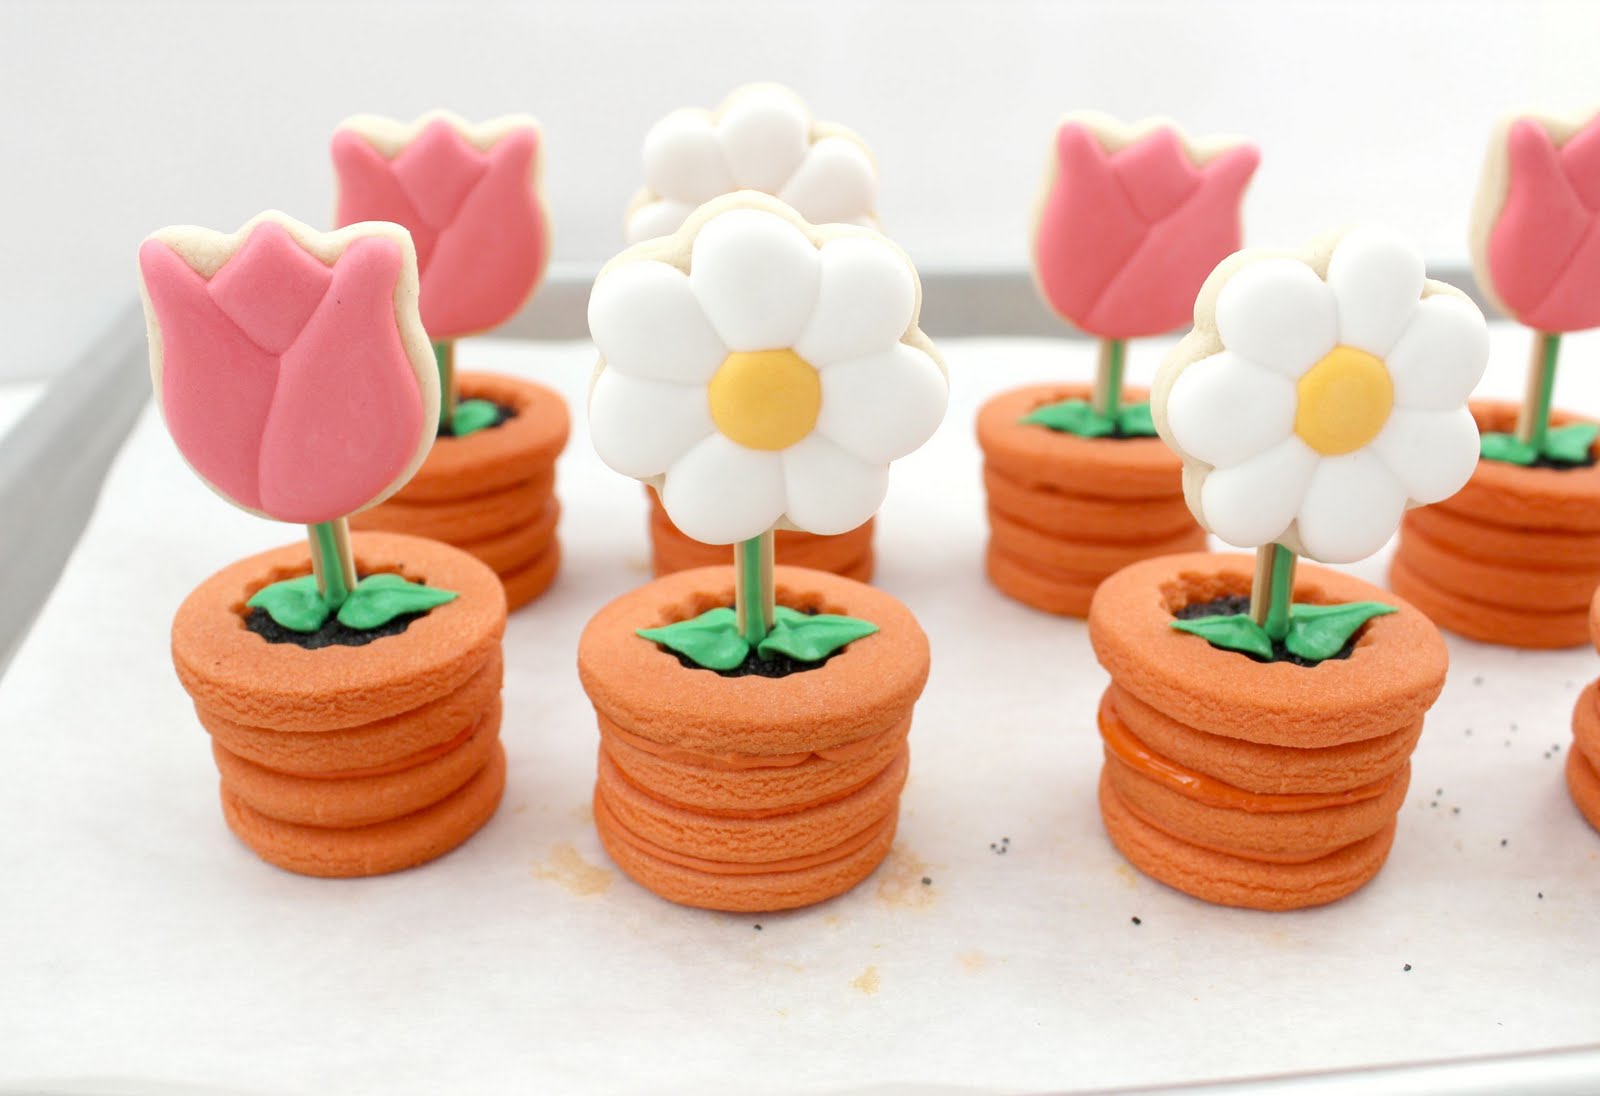
I made daisies,
and tulips =)
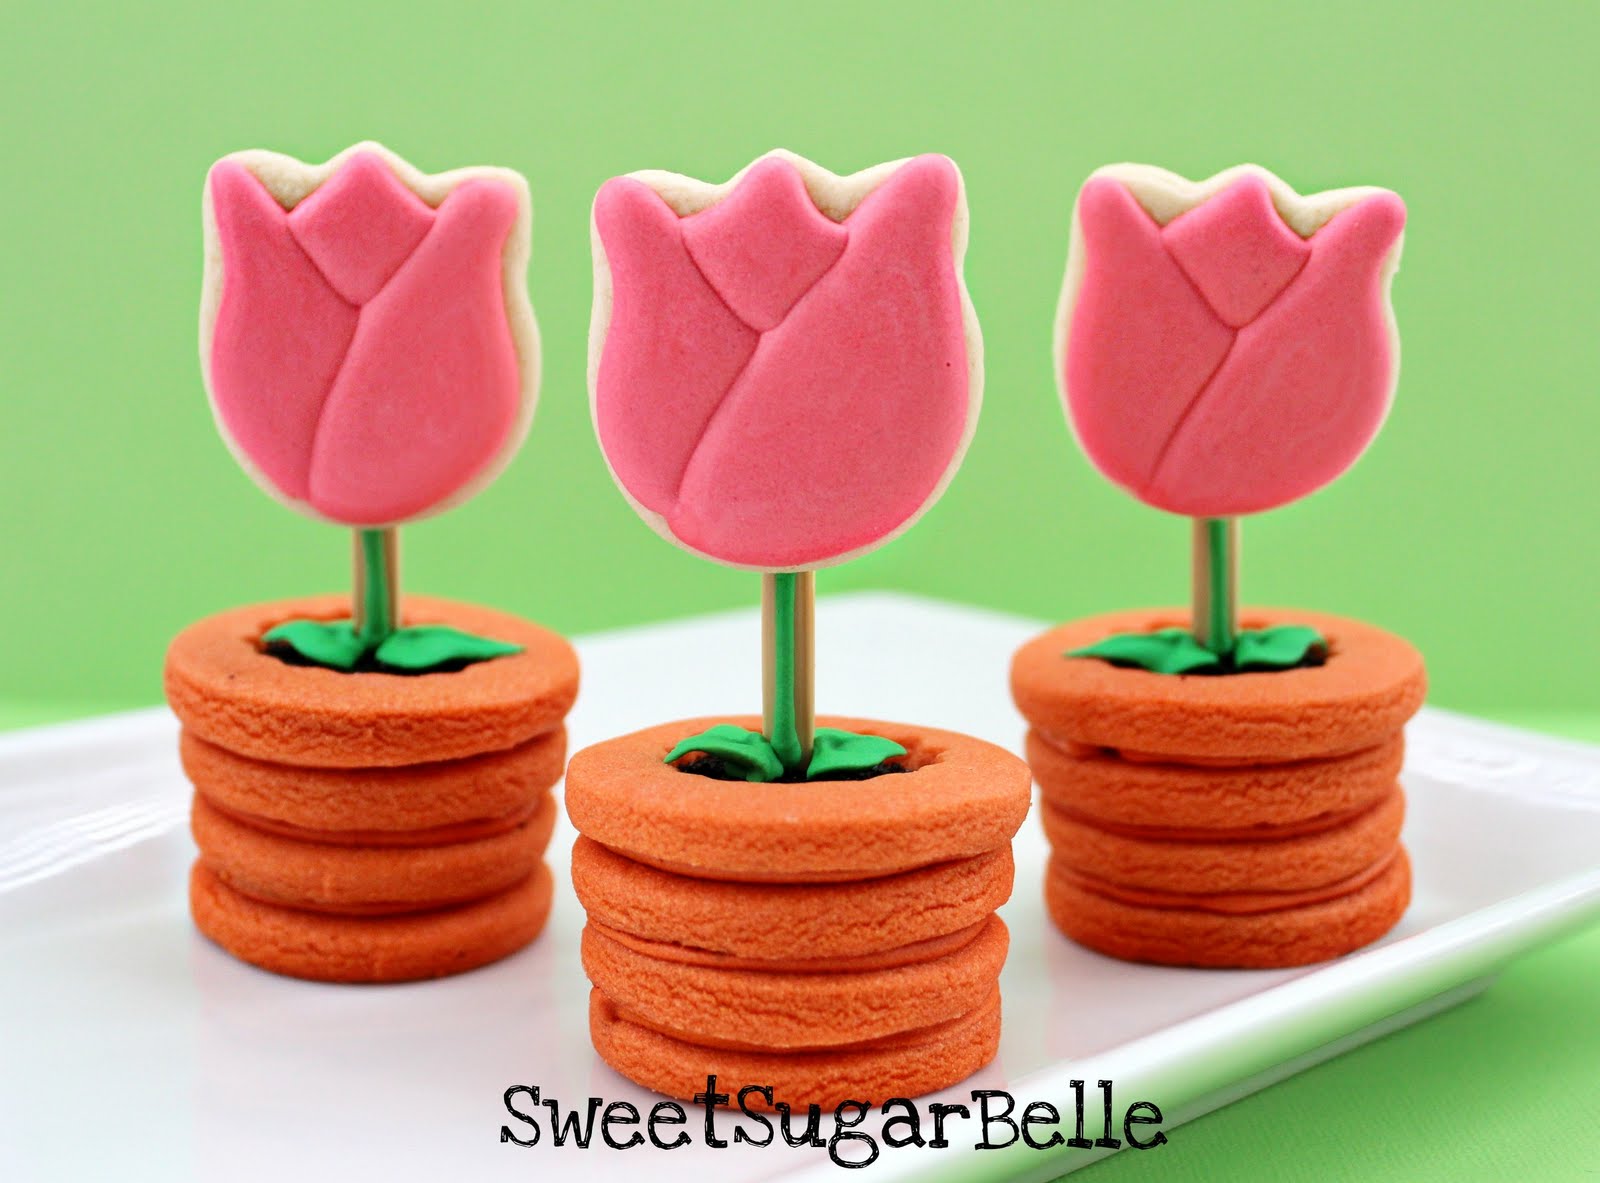
They sure made me happy, and I hope they lift Angie’s spirits too!
As cute as these are, at the suggestion of my friend Kim, I think they might be EVEN cuter with little ladybug accents, similar to these cookies…

In any case, I hope you will make these for someone you know that might need a little pick me up.
And to Bakerella, thank you for using your amazing creativity to inspire others!
Feel better SOON!


you are awesome and super cool to share your methods and secrets! thanks!
Those are absolutely adorable! I'm sure she'll enjoy them.
And I love Bakerella. I even made her baby chick pops for Easter. I posted my pic here: http://debzpicaday.blogspot.com/2011/04/day-42-of-365
You amaze me with your talent every day!
Deb
What a great idea…I think Bridgette started a gift trend…I want to make something and send it to Angie too! I can't believe that the pot is made of cookies, that's great! What an original idea. I too hope Angie feels better soon.
These are so gorgeous! I'm sure Angie will love them… And yeah, I'm one of those girls too. I used to love receiving flowers – now I just find myself thinking "man, do you know how much baking stuff I could have got for that much money…?" :o)
You are so amazing Callye! How on earth did you ever come up with these? Absolutely incredible. I bet these will perk up Bakerella right away! She is a lucky gal! Thanks for sharing your fun ideas Callye!
You are a sweetheart!
How did you manage to mail these? I would love to send these to my grandmother to brighten her day! Any tips would be so appreciated. Your creations are beautiful!
Hi. Thanks for sharing! Can you show us pictures of how you packed them for shipping too? thanks! 🙂
http://www.simplydolicious.com
Beautiful!!! Thanks a lot for sharing
Fun every visit, like the new design
OMG these are the cutest freaken things I have ever seen!!!!! I LOVE them!!! I will have to give them a try. I don’t usually work with sugar cookies, but you’ve inspired me!
I LOVE these! So cute! How in the world did you mail them?? I’d love to send some to a friend but have no idea how to even begin to package them. Would it be risky to send them to South Caroline in June?
Thanks for any help!
Hi. Im Bek- Im 12 years old and I have just started my own blog about my love of cooking and I LOVE these. I live in Australia and want to know how or where I can get these cookies or make them???
Cant wait to hear cause I want to make them NOW….. <3 Bex
These are so stinking cute, it’s unbelievable!!!
Pingback: 3-D Witch Hat Cookies
Thats good i like this
Pingback: Springtime Cookies | Diva Entertains Blog
I loved these when they were orginally posted and they never lose their appeal. Can’t believe that I didn’t comment back then. What strikes me about this the most, besides the fact that the idea is so original and perfectly executed is that the colour of the cookie pots match to a clay pot perfectly.
Pingback: [weekend projects] Spring Treats « Counting the Leaves
Pingback: Potted Violet Cookies
Oh those are sooo pretty! I’m thinking about using a cupcake as the base instead, but I’m not sure it’d hold the weight of the cookie… Maybe if it was a brownie cupcake.
Hi, can I ask wat color did you use to get the cookies to come in this color? Or did you mix red and brown or something like that?
Pingback: Potter Daisy Cookies
These are just too cute to eat!
“one sources, Prince Harry, the official did not disclose the date of marriage??ondon China Town is located in the City of Westminster in central London Soho , it is not only English , but also one of the largest Chinese community in Europe??inutes show that the Bank of England so far this year , the global economic growth momentum change, which slowly developed economies continue to maintain the momentum of recovery , growth in emerging economies has weakened??ondon Chinatown Chinese Association Secretary-General Zheng Jianqiang said the raids targeted checks are not based on clues , but the blind search, often empty-handed??e is to lose weight while dieting , the latest efforts include ” quit ” in the 24 daily breakfast omelet??ecause Chinese students applying quality rising rejection rate of 14% from 2010 to 2012 declined 2% , this point of view the measure has little effect on Chinese students??
Hi Sugarbelle,
You are so inspirational, thank you so much for your site. I made these cookies last year and they were such a hit I made them again this year for an end of school year present to the teacher with my daughter. I made a poinsettia version given it is for Christmas, yellow in the middle and red leaves. I pulled a knife through the petals before it dried to give it a more pointed leave like look and it turned out great. Yellow dots in the middle probably would have been even better but I had my 5yr old helping so we kept it easy. Thanks so much for sharing all your incredible ideas!
Pingback: Baking fun for sleepovers | Pearltrees
Pingback: More treats | Pearltrees
Pingback: BabyShower.com | Flower Focused Baby Showers for Spring
Pingback: Cookies Recipes | Pearltrees
Pingback: Recherches culinaires | Pearltrees
Pingback: Sugarbelle's Flower Pot Cookies - Wide HD Wallpapers and Pictures