Outlining and Filling Cookies with Royal Icing
Hi everyone! I hope you all had a safe, wonderful, and cookie filled Fourth of July. Normally, I would chit chat about all of the fun things I did in big ol’ Crane, America, but I have a lot to say today, so I’ll just get down to business. There is SO much information here that I have actually broken it into two posts. That said, y’all get comfy and get ready to learn.
If you hang around here long, you will notice I often talk about outline, flood, and twenty-second icing. With a little bit of cookie experience, this probably makes a lot of sense. If not, I might as well be speaking Greek. To help demonstrate what these terms mean, I took pictures and made videos to give y’all a good strong visual example.
To begin, there is only one type of icing that I use, which is ROYAL ICING. There are other recipes available on this site, but royal icing is my preferred medium, and is what I always use unless specifically stated otherwise. If you would like to try my recipe, click HERE for a printable version.
The other icing words I use like outlining , piping, flood, fill, and twenty-second icing are used to describe consistency rather than recipes.
Bottom line is, you are working with one icing and adjusting the consistency to make it do different things.
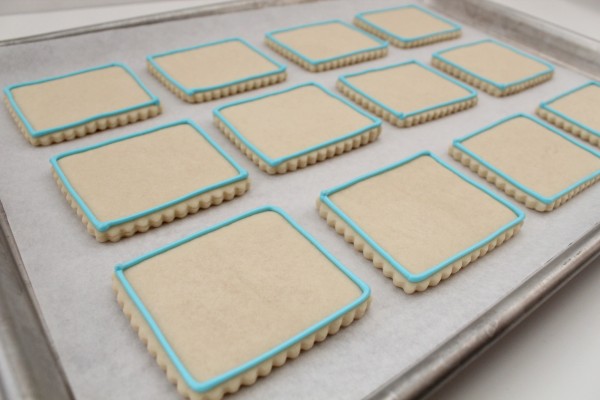
Normally, you begin by using piping icing to outline the cookie. This creates a border or “dam” to make sure the icing does not flow over the edges.
Outlines can be very basic or complex, but in MOST cases, they are the “blueprint” of the cookie.
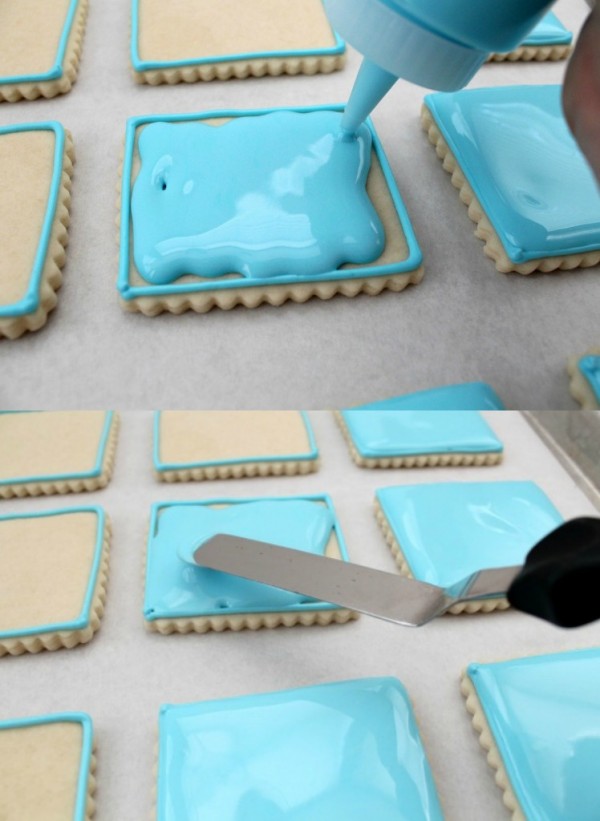
After the cookie is outlined, a thinner version of the same icing is used to fill the outlined area. This is called FLOOD icing. It will usually flow until it fills the entire cookie. If I am in a hurry like I usually am, I use an offset spatula to speed things along.
Now for a few videos.
I would describe the consistency of outlining icing as toothpaste. Here ‘s what it looks like before and after I put it in a piping bag.
I hope this helps clarify things a little bit. It takes a bit of practice, but you will be amazed at how easy piping will become if you get just the right consistency.
Now for flood icing. It should look more like this. I actually included a short side-by-side comparison of flood icing and twenty-second icing in this video, however, I’m going to wait until next week to get a little more in depth on that topic.
See? I would almost say it flows like shampoo. There is only a subtle difference between it and the twenty-second icing, but there IS a difference.
This video shows how you use the piping and flood icing together in sequence.
Are any of you getting the lightbulb effect? That’s how I describe the moment when something is suddenly demystified in my head. I LOVE that feeling! Yes, I am kind of a dork.
I would say that mastering consistency is the single most important cookie making skill. You can have all the talent in the world, but if you don’t have control over your medium, it will affect the final product.
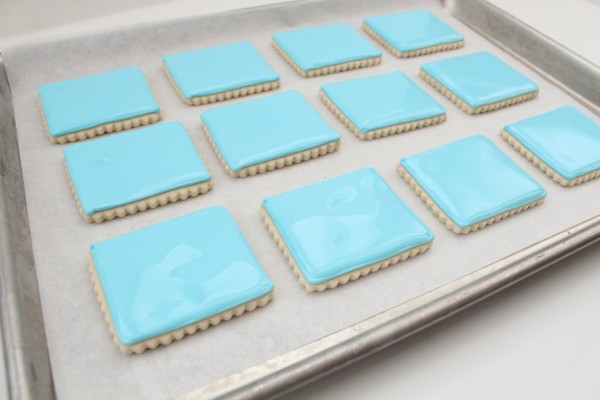
With a little practice, all of your cookies will begin life as pretty as these.
Just a few more tips before I go:
- Always use a spray bottle to thin your icing. I learned this trick from Gail, AKA One Tough Cookie, and include it on my all-time list of best cookie tips I have ever learned. You can read her “Give it a Shpritz” article HERE. I highly recommend it. It literally changed the way I cookie.
- Play around with the consistencies. What works for me, may not work as well for you. The key is to find your groove. I bet I know over 100 women who make excellent cookies, and not one single one of us does things EXACTLY the same.
- USE Karen’s bag trick when preparing piping icing. This isn’t even a request, it’s an order. When you are at the park with your kids and NOT home washing icing bags, you will thank me.
- Keep a toothpick, cookie scraper, or even a lobster fork {my friend Lisa SWEARS by hers} handy to pop those pesky bubbles
- I also have a helpful articles on Coloring and Preparing Royal Icing and a step-by-step pictorial on how I make royal icing that can be viewed by clicking the links.
Feel free to add any tips you might have, or ask questions. There is a no-dumb-question clause specifically attached to this post. Keep your eyes open for my upcoming post demonstrating the difference between flood icing, and the slightly thicker 20-second icing.
Once again, I hope everyone had a long and happy weekend full of food, friends, family and memories!
Happy “feels like Monday, but it’s Tuesday!”


Pingback: Basic Sugar Cookies | Whisk and a Smile
Pingback: Zimtschnecken | Lisbeths Cupcakes & Cookies
I love your site, and have learned a lot. I read your tips on tips, and always wondered hat size tip you use to outline with and how long do youl et the outline dry before flooding? Thanks…
Is there any way possible to see the videos? They say they don’t exist but was hoping you could send via email or had other links to them.
Thanks
Misty
Hi, I have tried your recipe for Royal icing twice now and love the taste of it but It is taking Extremely long time to dry? Am I not getting the consistency right Or is there something else I could be doing wrong?
I usually leave them overnight to dry in front of a fan. It can take several hours for it to dry completely.
Pingback: Valentea: Key to My Heart | guildencrantz
i don’t know if it’s just me but is the icing super sweet. I we never had a sugar cookie with royal icing before so I don’t have anything to compare it too.
Hi, I love your site. I am a little disappointed in that your videos are not available. Is this something you can fix? I would really like to see them – especially the ones on the different consistencies of icing. Please let me know if this is possible. Thank you for sharing your talent!
The original videos aren’t fixable. I will have to remake them because they were lost with my old youtube channel. But I do have plans to refill them as soon as I am able to. I am so sorry for the inconvenience!
Pingback: BBQ Cookies Decorating Tutorial - Moms & Munchkins
Your tutorials are the best. Every time I’ve used your recipe and method I get complimented because thought they were store bought. I do have a question though…. Where did you get your square scalloped cookie cutter?? I LOVE IT!!!
Mine came from a set almost exactly like this http://amzn.to/1HK0E8d
These cookies look absolutely perfect, great work!
I would love to see the videos but is says they no longer exist.
The videos say they don’t exist when you click on them. 🙁
How long until the flood icing sets?!
Could you please repost the videos or describe what happens in them?
Love your cookies! I would love to see your videos but it seems they disappeared! Any other way to see them? Thank you!
I’m on your Outlining and Filling Cookies With Royal Icing page and all of your videos are gone. What happened? I love your page and I would really like to watch your videos.
It says the videos don’t exist 🙁 is there somewhere to access them?
I wanted to know the same thing!!!! 🙁
AWWW.. just seen this…
SWEET SUGAR BELLE — JUNE 21, 2015 AT 9:32 PM
The original videos aren’t fixable. I will have to remake them because they were lost with my old youtube channel. But I do have plans to refill them as soon as I am able to. I am so sorry for the inconvenience!
Hey! I have tried different royal icing recipes and different mixing techniques and I always ended up having a powdery royal icing that doesn’t set hard and crumbles if you press hard on the decorated cookie. I’m using a hand mixer and there are really different opinions about making royal icing using a hand mixer. Do you think I should lose hope because it will only work with a paddle attachment? I also experienced something that I can’t figure out, I hope u can help me with it too: I dried strawberries dipped in chocolate cookies in the oven and then let them cool down for 6 hrs. The outline of the chocolate part looked darker than the filling – is tht related to the oven? Cz I mixed the color for both batches before dividing them up.. Would really really appreciate your help here. Thanks!
This was amazingly helpful! Thank you so much!!!!
I have tried RI several times and have always gone back to buttercream (for taste) but I love the glossy professional finish of RI. So I tried your technique and absolutely loved it and loved the taste. Obviously, I had never used enough flavoring. But my question is mine were a tad dull when dried. Any ideas or suggestions on keeping the maximum amount of gloss? Thanks so much, your technique and recipe are AWESOME!!!
Excellent post. I like all your post. I have a sheet all your articles. Thanks for this best post.
So You Don’t Use A Piping Bag? You Use One Of Those Sauce bottles?
This sounds really exciting. I loving it.
I really like the way you teaching us some great recipes.
Pingback: How To Throw A Cookie Decorating Party | Sing Viral
Pingback: La casa de la Bruja {plantilla para casa de galleta y cómo preparar el Glasé Real o Royal Icing para decorar galletas} – Antojo en tu cocina
Pingback: Thanksgiving Pie – Cookie Tutorial | American Cake Decorating
Pingback: Gingerbread House | The Gingerbread Journal | How to make a festive gingerbread house for Christmas or any holiday – The Gingerbread Journal
Pingback: My first time Sugar Cookies!
Greetings
After making the royal icing what do I do to get flooding consistency and so forth. Do you add water?Was trying to look at the videos but they have been disabled. I would really appreciate your help. Thanks
It says your video’s don’t exist 🙁
Pingback: Puppies and Bow Ties Baby Shower + Free Printables! – Celebrate with Rebecca
What is Karen’s bag trick?? Her website is closed! I’m so curious 🙂
None of your video work in this article….would be nice if they could be fixed. Thanks
Love reading all of your articles! I’m sad that none of your videos work though! And I can’t click on your hot links because they say page unavailable?
Pingback: 4 simple sugar cookies that will make your 7 year old swoon - Peanut Blossom