Airbrushing a Lace Pattern on Cookies
Have you ever had an amazing idea only to realize that it wasn’t nearly as great as you thought it was? It turns out that I have “terrible” great ideas all the time.
I’ve been planning an airbrushed lace cookie tutorial for almost a year but never could find the time. Lucky for me I waited because I came up with what might possibly be the most complicated way EVER to create this look .
 Wouldn’t I have been embarrassed if I had not run across this ingenious idea from SugarNosh Treats BEFORE I opened my big mouth? My attempts may or may not have involved cardboard, Exacto knives, glue guns and an iron…I’ll spare you the gory details. I think it’s best to let Heather take it from here.
Hi, my name is Heather, and I am the artist behind SugarNosh Treats. Today I am sharing my quick and simple technique for airbrushing a lace pattern on cookies.
To make these cookies you will need:
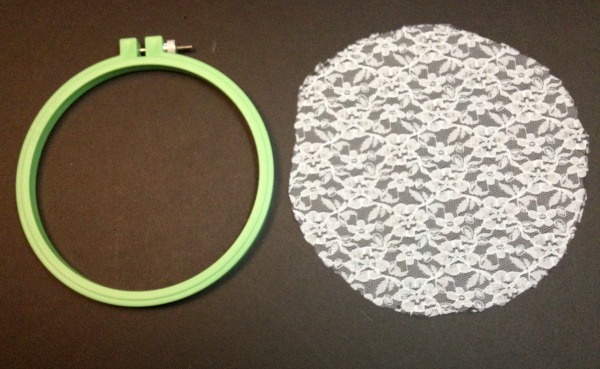
- 1/4-1/2 yards lace
- Embroidery hoop
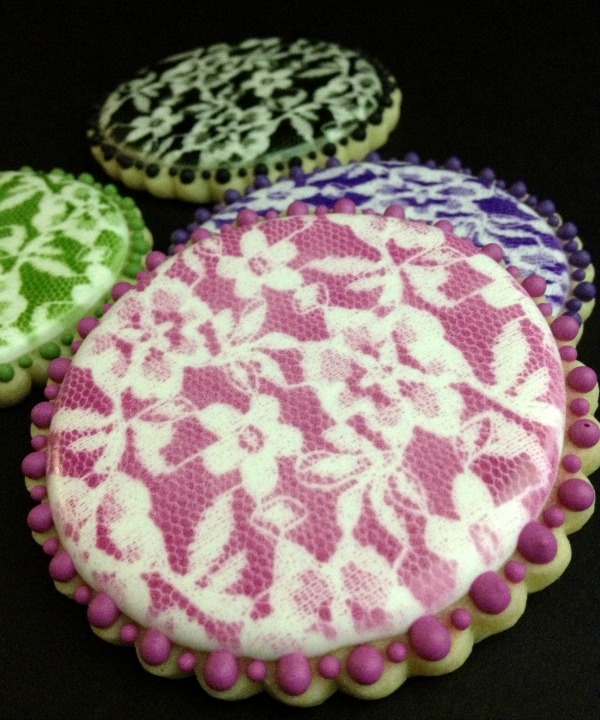
- Americolor Airbrush colors { I used Electric Purple, Avocado, Violet, and Super Black}
Most fabric and craft stores sell lace by the yard. The lace I purchased was about six dollars a yard, but I only purchased half a yard which is enough for several cuts. If you’re really on a budget they will usually let you buy as little as ¼ yard, which is plenty.
The best type of lace for this project has more of a mesh/net background. Solid or tightly woven fabrics will just act like a mask and you won’t get that pretty lacy look. Lace with beads and sequins is also not recommended.
Embroidery hoops are available at both Joann Fabrics& Hobby Lobby as well as various online retailers. I use is the Susan Bates “Hoop-La” Plastic embroidery hoop. It comes in a variety of sizes. The 6” & 8” were less than three dollars.
To cut the lace, lay the hoop on the lace and trace around roughly ½” larger than the hoop. Your finished circle should be 1” larger than diameter of the hoop.
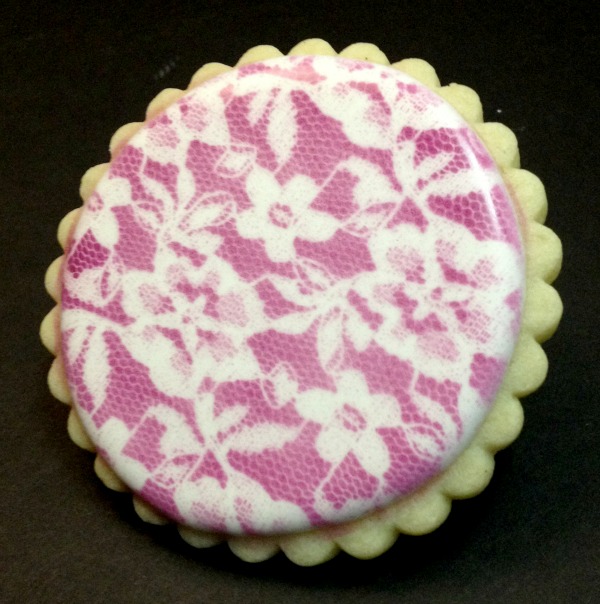
Once the lace is in the hoop, it should be firm but not overly taut. It should have a small amount of give so it can touch the surface of the cookie more completely instead of “balancing” it on top. The lace acts like a mask. The pattern visible will be the color of the icing base.
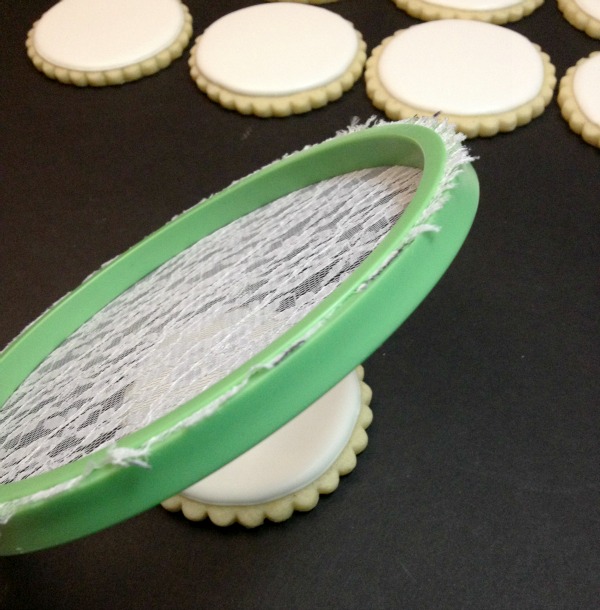 Before airbrushing, outline and flood the base cookie and let them dry completely. The hoop should be placed with the lace surface directly on the cookie (as shown in the photo) Build colors in light layers being careful not to over-saturate the lace. The design will be less detailed if the spray is too heavy.
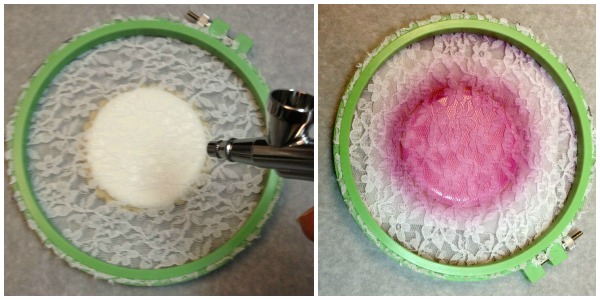
If you are only airbrushing a portion of the cookie, flood & spray that portion of the cookie first. Over spray can be covered with the rest of the design. Another option is to cut a mask out of parchment for more simple shapes and place it on the cookie under the hoop/lace.
Absolutely do not remove the hoop from the top of the cookie until your color has reached the desired intensity. You’ll never be able to line the pattern up again to respray. It’s really not necessary to wait for any drying time before removing the hoop. Lift it straight off the cookie.
If working with multiple colors, work from light to dark in the event that your lace has accumulated a lot of color or have additional lace pieces to switch out. (This was never really an issue until I had to really concentrate a lot of color to get a nice finish with the black airbrush color. Normal spraying doesn’t seem too be a problem)
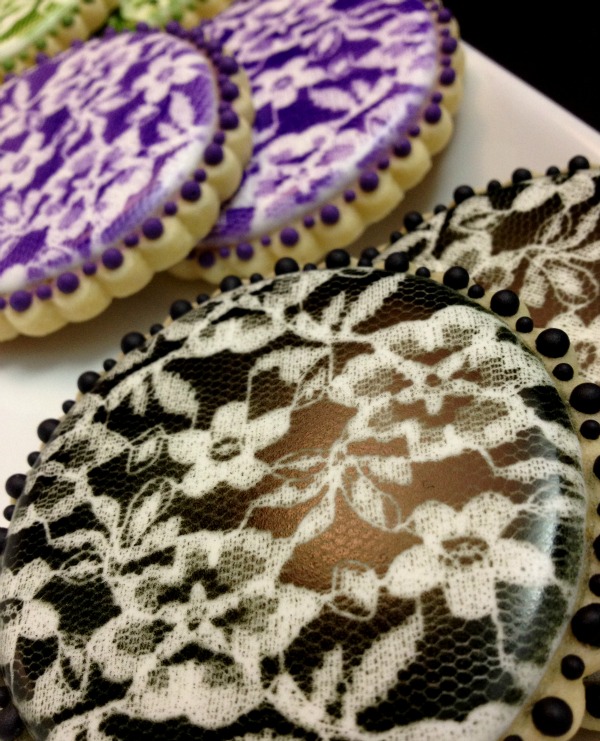
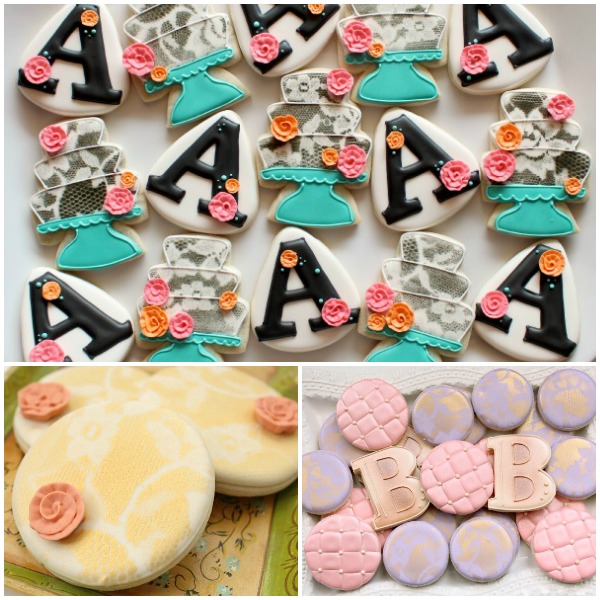
Airbrushed lace cookies are a great option for simple “filler” cookies. They’re beautiful, but do not take a lot of time to make. A lace pattern also also serves as a great great background for monograms, silhouettes and other lettering.
![]()
Thank you so much for sharing your skills, Heather. I wish I had had your help when I attempted airbrushed lace. I see two problems {overspraying and moving the lace before the color was dark enough} that I could have definitely avoided with your tips! I hope that everyone is encouraged to dress up their cookies with this simple but stunning idea.
For more helpful ideas, be sure to check out these posts:
- Shabby Chic Lace Effect on Cookies via Montreal Confections {for those of you who prefer video tutorials}
- Creating Piped Lace with Food Color Spray via My Little Bakery
- Piping Lace On Cookies
- How to Make Cakestand Cookies
- Airbrush 101 via The Barefoot Baker
Be sure to pop on over to SugarNosh Treat’s Facebook page and give Heather a big ol’ thank you for being the super resourceful decorator she is!


Wow!! Thank you for sharing!! Can’t wait to have the opportunity to try!!
This is a wonderful tutorial….these cookies look amazing and seem “easy” enough to create 😉 so now I will have to add an airbrush into my list of things to buy! Thanks for sharing you mad crazy talented cookie skills Heather 😉
This is great, thank you! I have a wedding shower order and these will definitely be in it!
What an awesome idea! The cookies look fantastic and Heather’s instructions are so easy to follow. Thanks for this wonderful tutorial!!
Brilliant!!! Love how simple this is to do but it still produces stunning cookies! Thank you for sharing!
Great idea and tutorial. Thanks for sharing.
These are absolutely gorgeous cookies! What a great idea – love it! 🙂
Wow… that really creates a stunning cookie design! I can’t believe how simple the process looks. I don’t have an airbrush gun yet. Do you think this technique would work with spray can food coloring? Callye, I still think it would have been fun to see what you came up with involving a glue gun and iron! 🙂
LOL…I am getting flushed just thinking about it, Janine! I cannot believe I made things so hard. It does work with spray color. That’s what I used for the pastel set with the B. I was just really heavy handed.
Thanks, Callye. I’ll have to give that a try. I’ll put it on my cookie to-do list. It might be a year or so before I get to it though… you know how that goes 🙂
that is such a cool effect. I may just have to open my airbrush box to try it.
These are just so elegant…I can’t believe how easy!!!
This is the coolest thing Ive seen in a loooooooooooooooong time.
I cant wait to try it.
Thanks for sharing!
Ansa
Heather, I loved this technique ever since you shared it on Facebook! So GENIUS, yet so simple!! Thanks so much to you and Callye for sharing it with us!
Thanks Mike! Can you believe I almost didn’t even post that? So happy some cookie friends convinced me it was worth sharing. It really is such a simple & quick technique and but the results are really impressive.
These are awesome! Can’t wait to give this a try – great post!
that is simply amazing!!!
Una fantastica idea con unos resultados sorprendentes.
Enhorabuena
Un saludo
What a great idea! You have explained this wonderfully! I might have to have a go at it! :0) Thanks so much for sharing your talent and technique!
Brilliant!
THESE ARE TO FRIKEN COOL! If I were to make these ahead of time and freeze them all frosted with the lace pattern and everything, how long would they last frozen to thaw out and still be as good as new?
How do I love these….let me count the ways!! Okay, let’s just say I love this look and I am going to do it! I’ve been wanting to do lace forever and now is the time.
Callye- thank you so much for sharing my how-to. I’m can’t say enough about how tickled I am that so many people are talking about trying it. I can’t wait to see everybody’s creations! Thanks again for all you do for the “cookie community”.
Absolutely gorgeous !
Can you use the wilton mist spray to do the same thing? I don’t bake that much and don’t want to get a air brush just yet.
i will totally be making these for Mother’s Day! loooove!
These are beautiful! Tiny question: doesn’t the spray cover the un-iced edges of the cookie? Or is is blocked by a baking paper template?
WHAT BRAND OF AIRBRUSH DO YOU LIKE?
Pingback: Vintage Floral Easter Bunny Cookies {Free Printable}
would like to know what kind of material for spary color, thx !
Pingback: Basketball Cookies
Thank you I just started with my cookies ,, you help me a lot