Accenting Cookies with Stamps and Airbrushing {Guest Post}
Until recently, decorated cookies were often limited to basic royal icing, fondant, or glaze. Fortunately, in the last few years there has been an explosion of techniques that add detail and dimension to a cookie design . Follow along as one of my favorite decorators, Christine Shen, of Sugar Cravings, demonstrates how she uses stamps and airbrushing to add another layer of detail to her beautiful cookie designs.
![]() Hi Everyone! I’m Christine from Sugar Cravings. Before I get started with my tutorial I want to say how absolutely honored I am to be here. When Callye asked me to guest post for her I screamed…literally screamed. After calming down a bit I replied that I’d love to help. Then I panicked. Yup, panicked. What do I write about? What will people want to learn from me? I decided to talk about two things I’m pretty passionate about, stamping and airbrushing.
Hi Everyone! I’m Christine from Sugar Cravings. Before I get started with my tutorial I want to say how absolutely honored I am to be here. When Callye asked me to guest post for her I screamed…literally screamed. After calming down a bit I replied that I’d love to help. Then I panicked. Yup, panicked. What do I write about? What will people want to learn from me? I decided to talk about two things I’m pretty passionate about, stamping and airbrushing.
Here are the materials you’ll need:
- Base-coated cookie that’s had at least 24 hours to dry {very important for stamping!}
- Black and/or brown food color marker {I suggest Wilton Bold markers}
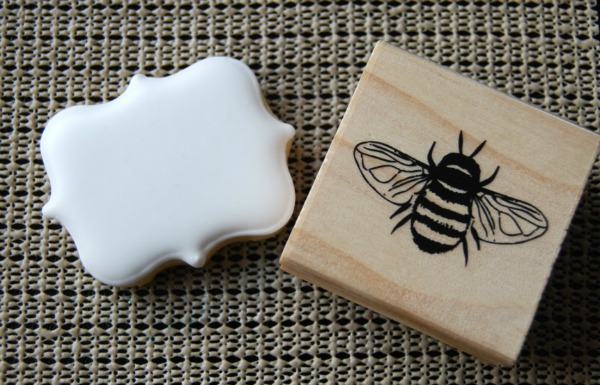
- Stamp of your choice {clean or that has only been used on food surfaces}
- Airbrush
- Brown and gold airbrush paint
- Luster dust in Old Gold {optional}
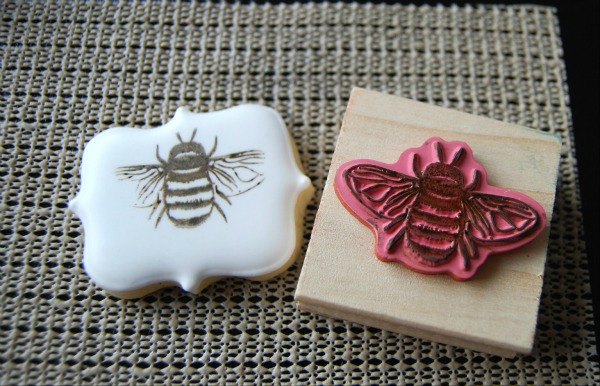
Most or the time I used really bright, vibrant colors in my work but I fell in love with this bee stamp from Michaels and knew I wanted to build my post around it. I guess I could have gone with traditional yellow and black but I seem to be on a vintage kick right now and thought browns and golds would be really pretty.
 The first thing you need to do is load color onto your stamp. Some people use a stamp pad specifically filled with food color. Others, like my friend, Vicki, from Sweet Tweets use an airbrush. What works best for me is to use the side of a fat Wilton marker.
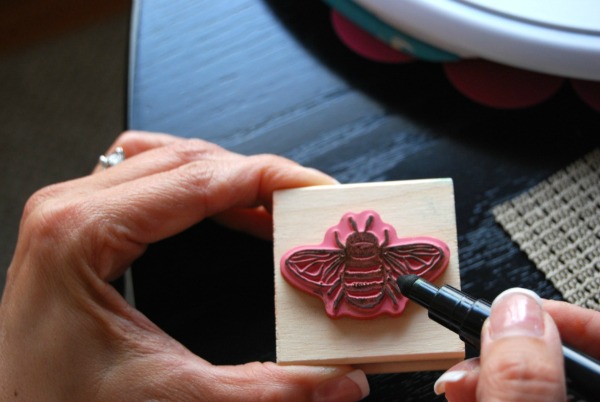 I use the side of the marker tip and run it all around the surface of the stamp several times to make sure it’s covered. You want to do it several times until you can see that she surface is visibly wet.
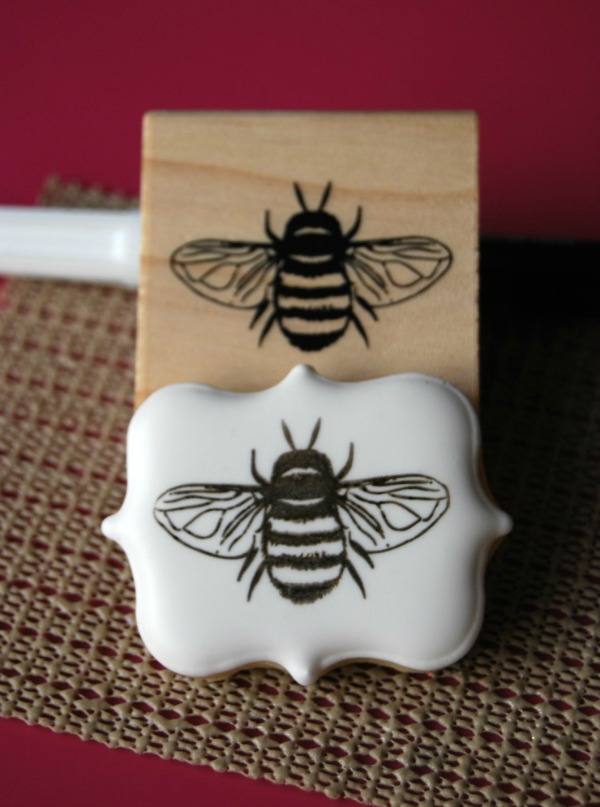
Next you’ll line the stamp up over your cookie and press the stamp down. Be careful not to jiggle it, but you do want to apply enough pressure to transfer the impression {but not so much you crack the cookie}.
 **NOTE: don’t worry if your impression didn’t transfer perfectly. I’ll touch on that at the end of this tutorial.
You could absolutely leave the cookie this way, and it looks really nice, but why not make it more interesting by adding some airbrushing to the edges?
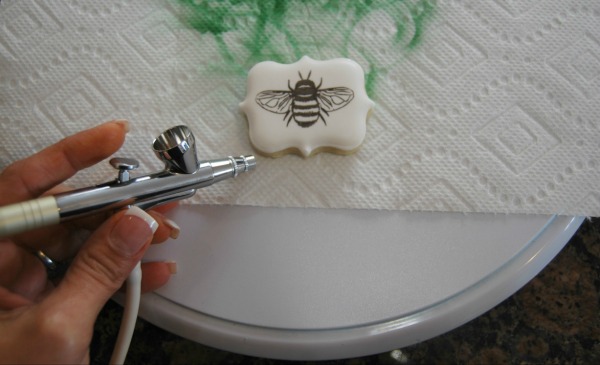 Here’s what my airbrushing set-up usually looks like, Have you ever tried airbrushing the edges of a cookies and found that you needed to pick it up to get color on all sides? And when you pick it up have you noticed that it leaves a bunch of color on your fingers and a fingerprint where the color used to be? In order to alleviate this problem I started airbrushing on a turntable. All I have to do is turn it to get all the sides. Keeping it on a paper towel not only keep the turntable somewhat clean, but also adds an extra “hand” for positioning the cookie where I want it to be. If you don’t have a turntable you can still easily do this on your counter with a paper towel underneath. Just drag the towel when you want to turn the cookie.
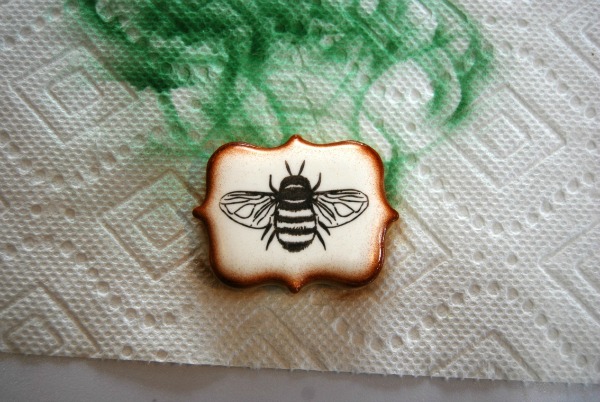 Here’s my cookie after I’ve airbrushed the edges with brown {ignore the green, that was from something else I was doing simultaneously!}. It’s pretty like this, but I also wanted to add some gold for interest.
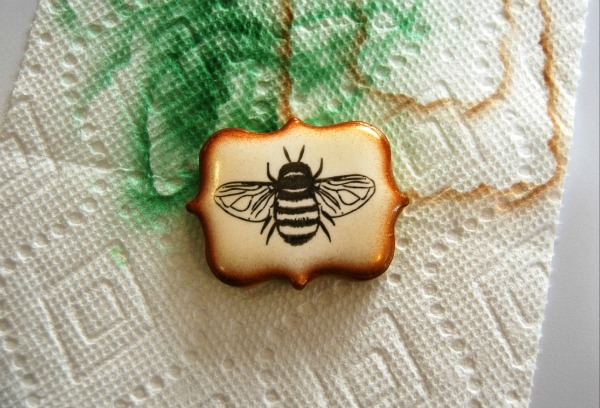 And here it is after adding gold. See how it made the cookie a little warmer looking? And I love the metallic shine of the gold.
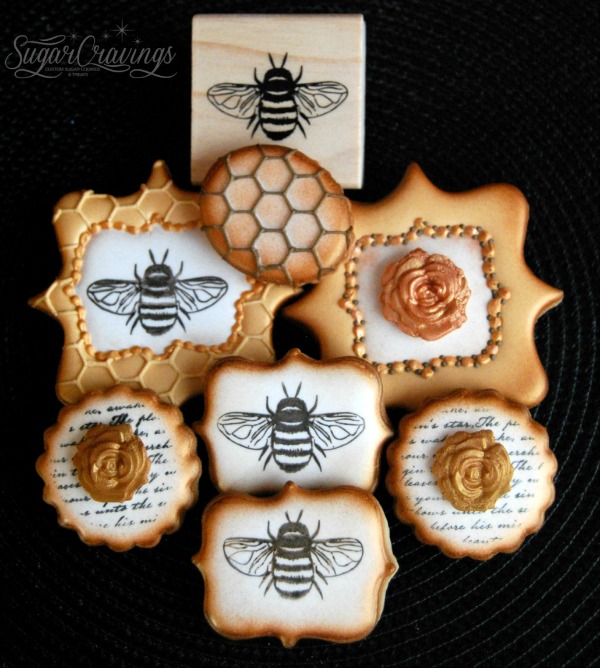
Here’s the finished set!
 So, let’s say that you tried to stamp onto the cookie but the impression didn’t take all the way…like this:
 Don’t throw that cookie out. There are several things you can do to fix it. You can add airbrushing to the edges {but come in on the sides a little more to “cover” the area that didn’t transfer} or you can fill it in yourself! I’m a bit of a stickler when it comes to matching colors so I use a very fine paintbrush and my original markers to paint in what’s missing.
Take your paintbrush and run it along the tip of the marker to load it with color. Then, using the stamp as a guide, filling the parts that are missing. I bet no one will even be able to tell that it didn’t transfer perfectly the first time around.
I realize that stamping and airbrushing can both be a little intimidating but I encourage you to try. It’s really fun and adds beautiful elements to your cookies!
Thank you for taking the time to read my post. If you have any questions I hope you’ll ask, either here in the comments or on my Facebook page.
Callye, thank you so much for inviting me here today. You have done so much for all of us in the cookie community and I honestly wouldn’t be the cookier that I am if it weren’t for you and your guidance!
XO,
Christine
![]() For more beautiful bee cookies, “bee” sure {pun intended} to check out these posts:
For more beautiful bee cookies, “bee” sure {pun intended} to check out these posts:


It’s a real art isn’t it, to decorate biscuits with imagination? Well done 🙂
Thank you so much, Petra!
I’m picking my jaw up off the floor….I love seeing you in action! Great blog post, Christine!
Aww – thanks Hayley!! You were my inspiration for these. I never look at anything bee-related without thinking of you! XO!
So beautiful Christine!!! I need to go find all my rubber stamps!
Thank you so much! I just used one of your designs last night and will be posting a shout-out to you. Thank you for the sweet comments!
I love these! I own a honey company and these would be so neat to sell at the farmers market 🙂 Thank you for sharing this design idea!
How fun! Thank you very much!
Awesome technique Christine, and super beautiful cookies!
Thank you, Jill!! XO!
Great post Christine! And those cookies are glorious! I love the suggestion of airbrushing gold at the end.
Thanks Vicki! 🙂 I forgot to ask if you minded me including your name in the post…hope that was ok! 🙂 XO!
I tried stamping last week with Americolor foodcolorin but it didn’t work. So
I guess I am going to have to make some more cookies and practice some more!! Thanks for this AWESOME tutorial!!
I’d love to see what you end up doing, Pauline! It can definitely be intimidating and sometimes frustrating but if you keep practicing then pretty soon you’ll get the hang of it. Thanks for the sweet comments!
These are absolutely exquisite! I always love seeing the impact that your airbrushing gives to your wonderful work and it was so fun to see how you combined that and stamps in these wonderful cookies!
Thank you so much, Tracy! 🙂 LOVING my new cutters, BTW!!!
Hi, I love stamping on cookies and these cookies are so cute. I use sponge daubers by Stampin Up. I dip them in airbrush food color. They work great!! Its quicker and easier then using a marker. (my markers never work when I want them to)
Great suggestion! I’ll have to look into those!
Thank you for sharing. I have thousands of Stampin’Up stamps. I can’t wait to try this on my cookies. Do you have an airbrush too?
Great Tutorial!! I’ve been wanting to stamp on cookies!
Thank you Erin! Have fun playing! 🙂
I was thrilled to see Christine guest posting today, she is one of my favorite cookie artists of all time. This set of cookies is just BEE utiful and the detail is exquisite, thank you for sharing your talent!
Thank you so much, Kim!!! 🙂
I just love seeing you do this technique as I just did my first ever stamped cookies this past week 🙂
Absolutely amazing work and your cookies are bee autiful Christine!!!
Thank you!!! 🙂 Would love to see your stamped cookies!
Christine, my first round did not come out well as it crackled the icing…any rips on how to prevent that? Also, I will share next attempt with you via FB. I think I already liked you on there, but if not I will <3 Winn
You did great Christine! I’ve been thinking about investing in an airbrush …. actually considering ordering one today …. then poof! …. I see your post and now I’m convinced I should take the plunge. Would you mind sharing the model you use? There are so many to choose from and as with most things there are probably some that are better than others.
Thank you for your inspiration and I love following your awesome FB posts of your cookies!
Thank you, Dyan! I have a Pegasus airbrush that I purchased from Karen’s Cookies. I also have a Duff but the Pegasus is my favorite by far. 🙂 Have fun airbrushing!!
Thank you Christine….that was the one I had in my cart at Karen’s….she just got them back in stock yesterday. I must tell you how much I appreciate it when experts like yourself actually reply to our questions….especially when I know you get so many. Thank you for taking the time to share your knowledge and talent with us.
So excited to see Christine here!! I love everything she makes and she’s my local cookie buddy! Congrats on the feature Christine and gorgeous cookies as always! You make stamping look easy! Also, thanks for the link love on my beehive cookies, Callye! 🙂
Aww – thanks sweet Michelle! I was excited to see that Callye linked your cookies, too!!! 🙂
A guest post from one of my FAVORITE cookiers?? Awesome! Christine, you are the queen of airbrushing–thanks for the tips!
Thanks Penny! Big love to you, my friend! 🙂 XO!
lovely , and you make it look so easy. Thank you ?
Thank you Alicia! 🙂
Where can you get the air brush
I purchased my Pegasus model through Karen’s Cookies. You can find them at http://www.karenscookies.net
This set looks wonderful! I tried stamping my cookies once, but it’s time to try again, Thanks for the tips, Christine!
Thank you so much, Sue!
I buy stamps for creative inspiration and never stamp a thing…..wonder where I put them? I love this post! Plus, just bought an airbrush and have done nothing but stencils….thanks for the ideas!
Yay! I hope you have a blast with both!! 🙂
Christine, these are simply gorgeous! I love the use of the turntable! I don’t think I’ve ever even used mine! So clever!
You are the airbrush master! Your cookies are always so flawless and I don’t think anyone uses the airbrush as well as you. It adds so much depth to your designs.
What’s an awesome guest post, Christine! I always love your airbrushed cookie sets. It’s great to see a behind-the-scenes aspect to your decorating process. 🙂
I found you through flickr a few months back and am so happy I did!! I stop by your flickr account weekly AND Sweet Adventures of Sugarbelle and was excited to see you have guest posted some of your (incredible) techniques that contribute to your creative process!! I never would have imagined the bee was created with a stamp! What a time saver 🙂 Your work is just beautiful!! Thanks again, Christine!
Hermoso tutorial, pero recomiendo a las personas que no poseen aerógrafo, que traajen con pincel, la técnica perfecta la da éste accesorio, pero en muchos lugares es muy costoso, así que intenten con patinas comestibles, quedarán sorprendentes, un abrazo. Bogotá-Colombia
What airbrush do you recommend??
Hi. I tried to stamp on sugar cookies. Left frosting it dry over night like you said so it was good and hard. I can not get the color to stay on the stamp! What do I do now? I’m using liquid air brush dye. Do you add anything to it to make it stick? I did not use the marker because I wanted the color teal.
Hi. I’m thinking about buying an airbrush. Can you recommend one? Which one do you use? Thanks. for the help.
This is some delicious art! I couldn’t resist adding this tutorial to my latest post: Honey Theme Wedding Ideas 🙂 Hope you like it: http://royallacebridal.com/38-honey-themed-wedding-ideas/
Love it! Thank you! Quick question. Can you Airbrush first and then stamp? Thanks!
I’m wondering what was used to make the rose on the cookies. I can’t find it in the links. Can you tell me how they are made?
These are made with fondant molds. If you’re looking to purchase your own, I reccomend this site: http://www.christinesmolds.ca