Coloring and Preparing Royal Icing
I do lots of weird things. Some of them don’t make sense until I explain the logic behind them. The way I color and prepare my royal icing is one of these things.
Keep in mind, this is not the only way, just my way.
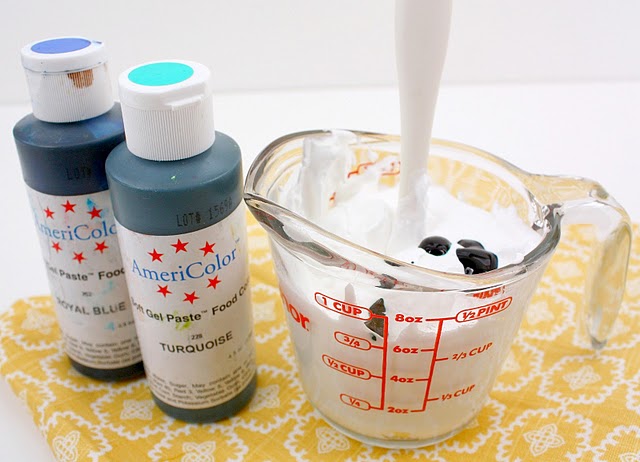
I begin with VERY stiff RI. YOu can find my recipe by clicking HERE. See how the spatula stands straight up in the icing? It should be so stiff that even if you were to thump it, the handle would barely move.
Also, I ALWAYS mix icing in a measuring cup. This helps me know EXACTLY how much I am mixing. I know to use the 2 cup size if I am filling an eight ounce bottle and a piping bag. I go with the one cup size for less. Try this. I really think it will prevent you from over or under mixing. Next, I choose my color. In this case, I want a teal shade, so I am using a combination of turquoise and royal blue.?
To begin, I add the amount of color I’ll need. This is where my printable color chart comes in handy!
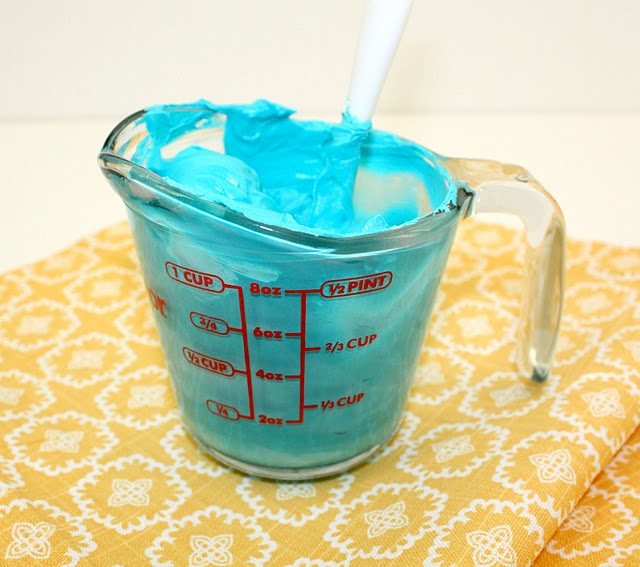
At this point, I mix it thoroughly. A few notes:
- when I am making icing ahead of time, this is the consistency at which I make and store it. This keeps it from becoming too thin as color is added and also prevents it from separating.
- If I know I will be using a lot of a particular color {like orange at Halloween, red at Christmas and Valentines, green right about now} I make a large bowl of it, and take out and thin as necessary. It allows the color to develop, and ensures that I have enough icing available to ensure all of my cookies are uniform in color.
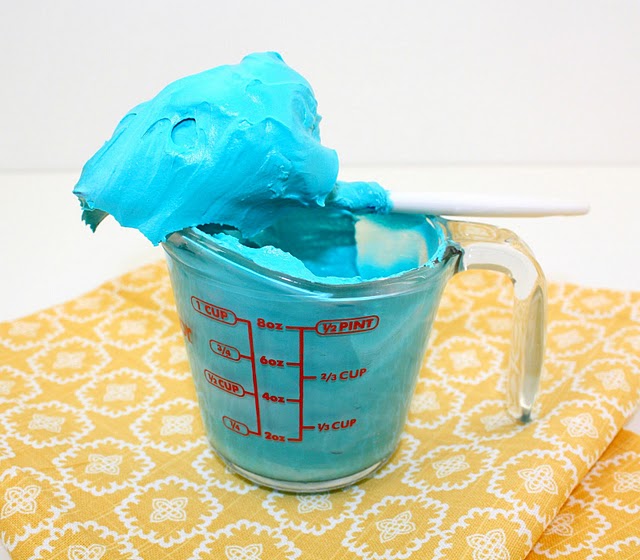
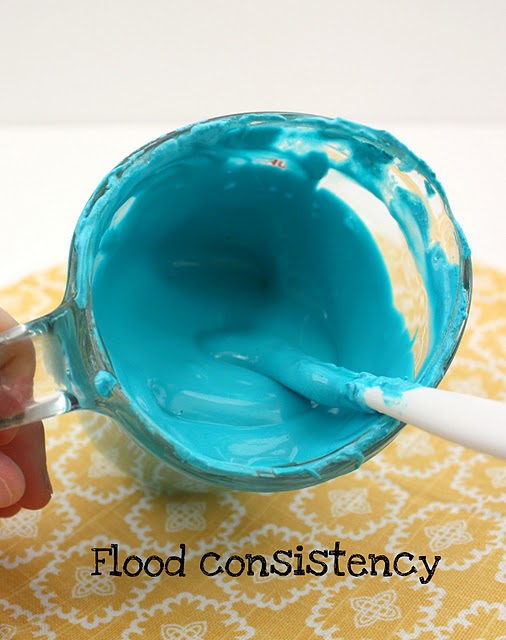
See how stiff it is? Is should sit just like this without falling off the spatula.
When I get ready to fill my bags, I thin the icing to piping consistency. I used to stand at the sink to do this until I learned an awesome trick from Gail, AKA, One Tough Cookie. Please check out her spray bottle tip {HERE}. TAKE my word on this. I can honestly say, it’s one of the best royal icing tips I have ever learned, and since then, I have never gone back!
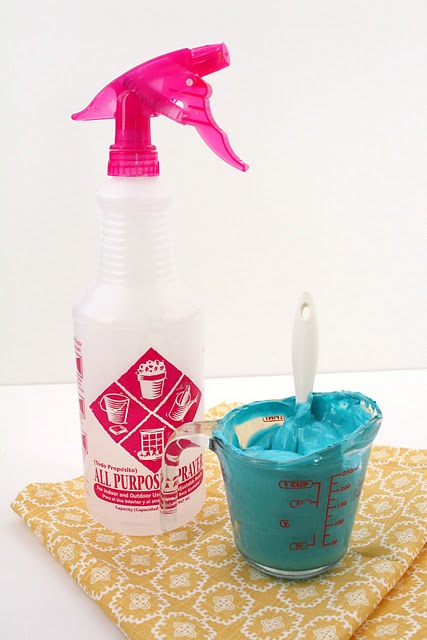
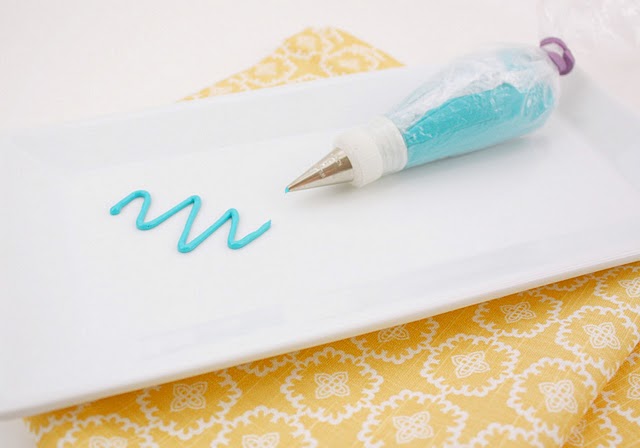
Using my spray bottle, I first thin my icing to piping consistency. This is about what it looks like. Think toothpaste, or Softscrub cleanser. It need to be soft enough to flow smoothly through the tube and curve without breakage, but stiff enough as not to lose it’s shape.

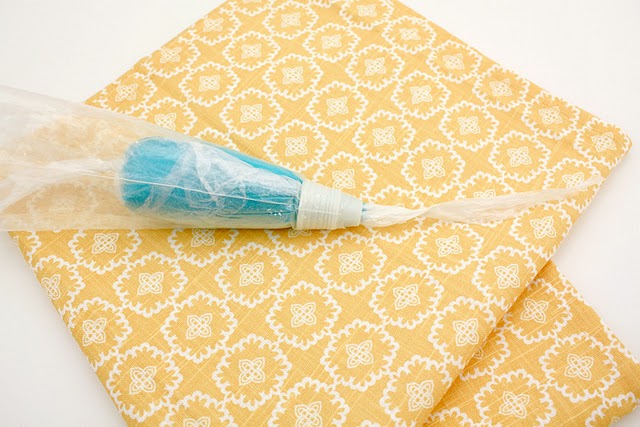
See how it’s thick enough to hold it’s shape but not so thick that it keeps a peak? This is what you want! Now you are ready to bag it, If you don’t like to wash icing bags, you are going to LOVE the next part. I have ALWAYS used disposable bags for many different reasons. I like that they are clear, so that I can easily see which color is which. Also, they are a little more budget friendly then pastry bags. To me disposable does not really mean disposable. A lifetime of being forced by my Nanny to wash Ziplock bags, made me physically unable to throw away perfectly good icing bags. However, anyone who has ever washed them knows, it’s awful, so, now I always use this nifty little trick I learned from Karen, of Karen’s Cookies. Just follow the steps below:

When you twist the ends, do it the same way you would if you were twisting up a towel to pop someone. Horrible mental image, but it was the only way I could think of to describe it. Slide the pouch you made into a bag fitted with a coupler, and you will be left with this…
At this point, use scissors to snip off the end
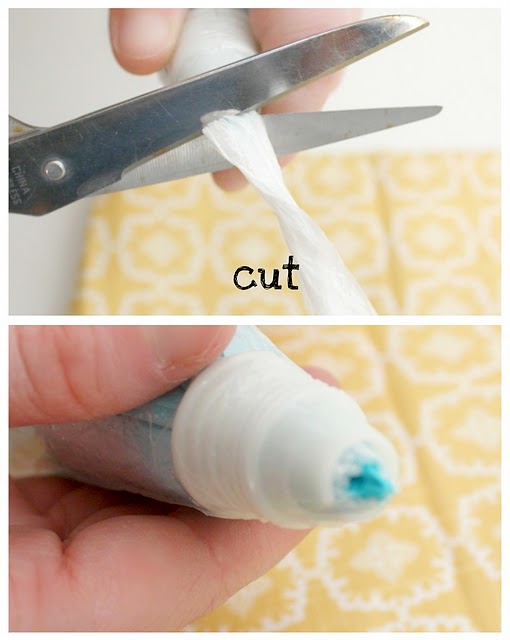
Add the desired tip and coupler, and you are ready to roll!
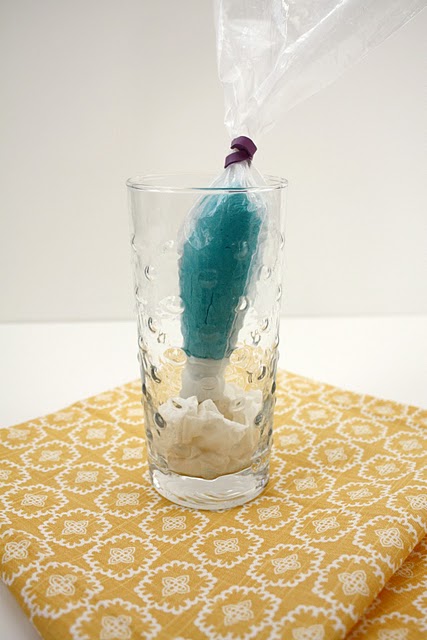
To keep the tip from crusting over and so that they are easy to identify and access, I place my prepared bags in a glass with a damp paper towel in the bottom.
The last thing I do is thin my icing to flood consistency using the spray bottle as before {think shower gel}
A little tip…if you will let the thinned icing sit covered with a damp towel for several minutes, all of the air bubble will rise to the top, and you can easily stir them out.
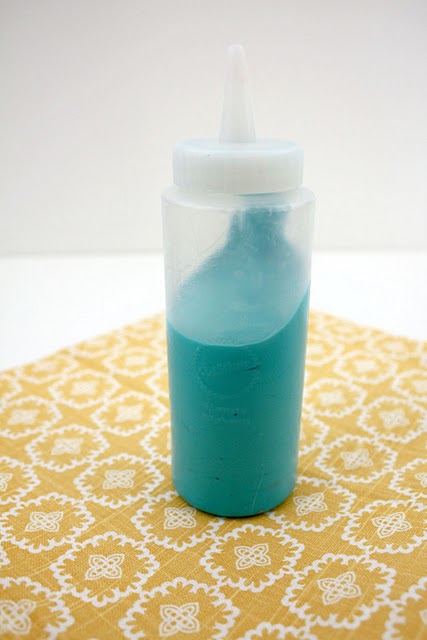
Put it in a bottle, and it’s ready to go. This is another time the mixing cups come in handy. The pour spout really makes is MUCH easier to transfer the icing from cup to bottle.
Repeat these steps for every color you plan on using for your cookie design. If you would like to see this live, Karen has made a very nice video demonstration which you can view {HERE}. As a matter of fact, she has lots and lots of helpful videos and tutorials, so bookmark her!
Keep in mind, this does take awhile. I spend on average one hour preparing icing before I even begin to decorate cookies. The good thing is, that once this is done, I can sit down and work on them uninterrupted, children cooperating, of course.
Like I said, there is more than one way to ice a cookie, but these simple tips should put you well on your way to coming up with your own method. I hope everyone tries it!
Good luck and happy decorating!


Pingback: Chewy Molasses Gingerbread Cookies - So Fawned
Pingback: Christmas Cookies {Roll Out Sugar Cookie Recipe}
Pingback: How to Make Deep Pink, Magenta, and Fuchsia Icing
Other than using a measuring cup to fill icing bottles, can you recommend another way?
I use a disposable icing bag and rubber band the small opening. Put the empty banded bag in a drinking glass, open up the bag with your hand and scoop in the icing, Twist the open end closed, unband the small end, put the small end in the bottle and sqeeze the icing into it.
The Bearfoot baker pours her mixed icing into a sandwich baggie then snips off the tip and pours into bottles with no mess at all. She reuses the sandwich baggies over and over by putting a rubber and around the cut end.
Pingback: The perfect sugar cookie | Adirondackmimi
Oh my I love the tip about the plastic wrap inside the piping bag. Your instructions are so easy to follow. So much to pin so little time. Thanks!
Pingback: Sweetsugarbelle's Royal Icing Recipe
Pingback: Fifteen Icing Recipes for Cookie Decorating
You are hilarious! Loved all the info! I have 4 kids and always know I COULD make the cookies for their parties but get intimidated by the perfect work I see on etsy and Pinterest. What are the plastic ketchup looking bottles that you used? Thanks!
Pingback: How to make a Monster High Cookie | Suz Daily
Do you spray the same amount of water everytime? or is that different?
Pingback: Royal Icing Quick Tip - The Bearfoot Baker
Pingback: Royal Icing Decorating | Pearltrees
I Like you recipe it close to what am doing here but could you help me here.
Thank you so much for this info! I was in the kitchen tonight for two hours trying to get my icing ready. I was in tears so I decided to quit and try again tomorrow! I know what I did wrong now. So thank you!!
Pingback: How to make Royal Icing | Suz Daily
Pingback: How to Make Navy Blue Icing
HELP! I have been asked to make Snowflake sugar cookies for a Frozen themed birthday party in Aug. Disclaimer, I have never made RI before, and I do not own a stand mixer. You have many recipes and many posts about RI, but they are the best I have seen and most informative, but I feel overwhelmed. I don’t know what posts to follow! In one post you line and fill with the same icing? Thank you for the help in advance. I plan on practicing this weekend.
Katie, do you have an electric hand mixer? I am also making “Frozen” cookies for this weekend! Im not pro but I have a good Idea!
There is a lot of information here. If this is your first time, I suggest using as few consistencies of icing as possible, perhaps piping (outline) and flood. Here is a video that might help you. http://www.universityofcookie.com/2010/12/snowflake-tutorial.html
Oh I love, love, love your trick with the plastic wrap. I always turn my piping bag inside out to wash but this will make it so much easier and quicker to clean. I also have a little laugh with your tea towel popping.
Thanks for the great tip.
Pingback: Pumpkin Pie Cookies - The YoYo Foodie
Hi, I have been making cookies for several years and I have noticed lately that my flooding is spotting when it dries. I have tried everything to prevent it but haven’t had any success. It doesn”t matter what color I use. It looks fine for several hours to overnight but then starts to get dark spots throughout the flooding. Do you have any suggestions or ideas of what might be causing my flooding to have a blotchy appearance?
It may be that your house is too warm. It might be “butter bleed.” You can read more about it here. ^^ To prevent it, try cooling and storing your cookies in a very cool dry place. http://www.sweetambs.com/tutorial/royal-icing-consistencies/
Brilliant!!! I too HATE cleaning my piping bags (and I’m too Dutch to throw them away), so your tip on keeping the piping bags clean with plastic wrap is nothing short of amazing! Thank-you, thank-you, thank-you!
I find I am like others in being totally intimidated by RI. I don’t understand if when it dries, doesn’t that mean that the cookies are basically pretty little “rocks”? Yep, you guessed it, total newbie, when it comes to RI! I am so lost…. Help! 😉 Thanks!
In my humble, non-professional, opinion the concept is daunting but not that tricky once you get into it. For me, the secret is a soft and buttery cookie. The RI is a thin layer on top of a soft, delicious cookie so it’s almost like the little crunch of a candy shell on an M&M.
If you were to ice cookies like you ice cakes and put on a inch thick layer, then yes…they would be “rocks” not safe to eat. But a thin layer goes nicely with a thick, soft cookie.
Thank You SO much! I truly appreciate your reply. Maybe I’ll get brave enough to try experimenting with some royal now. I meant no disrespect at all by my question, I’m just totally clueless, so your reply means a great deal.
OH my GOSH!!!! Where have you been all my life?!! Why I haven’t thought of this plastic wrap tip before? Great tip…great site…thanks for sharing!!!
Thank you for this tip. I will start using this it will really save time on cleaning!
I think you could write a book and call it “Cookie Decorating According to Sweet Sugar Belle”. I see different blogs here and there about having trouble with cookie dough or icing. All they need to do is to use your recipes and they won’t have trouble. You have enough wonderful tips to fill a book.
Pingback: ???? | Mimi
How long does icing keep?
I am having issues getting dark rich hues. Like navy, and deep red (rather than pink!). Do I really just need to add more and more coloring and then let it rest?
Yes. Add more and wait. It amazes me at how much the colors darken even in the time it takes me to mix an entire palette. For a little darker navy, try adding a drop (or three or four) of violet
Genius way to not have to wash out bags!
The best info on preparing decorating frosting. Will try out these ideas this week. Thanks
I’ve been having a lot of issues with my colors separating lately. And some colors have started to seperate within a couple hours. Any tips on how to stop this?
Hi! I’m kind of new to cookie decorating, I came across this post and it’s absolutely magical, I love your descriptions! I was wondering, how do you know how much icing you need? i’m always afraid I’ll run out in the middle of a batch!
thank u for ur information ,,,nicee
Pingback: Cookie Decorating Tips | Apostrophe S
I’m really hoping that someone, anyone can help me! I’ve left numerous comments and never gotten a reply, so this is really my last ditch effort. 🙁
When I make my flood icing and put it in my bottles, I’m noticing that the water rises to the top, causing it to seperate. This starts happening within an hour. I know my icing is mixed well, none of my decorating utensils come in contact with oil and that all my containers are fully dry before using them.
I can’t even begin to tell you how much RI I have thrown out in frustration! And anyone working with RI knows that that is basically throwing out money!
How long can flood icing sit in its bottles? How can I prevent it from doing what’s explained above? I really love decorating cookies for my family and it has provided an extra income for us, but at this oint in time, I feel like throwing in my cookie towel!
PLEASE HELP!!!!
I leave my flood bottles upside down in another cup (with their red tips on). After a while they do seem to separate but does shaking the bottle or stirring the frosting help reconstitute it? I think what was said in the blog post is true: store RI at its thickest consistency. The thinned stuff won’t stay “good” for very long. So you might just want to make smaller amounts of thinned (I find it goes a long way).
Pingback: Back to School Cookies - SevenLayerCharlotte
Pingback: SWEETSBYSCRATCH
Hi there,
Great information. I’ve added most of what you wrote to my “Tip” sheet to use when I start to finally attempt to make and ice cookies!
I wanted to mention that since the links to Karen’s Cookies are not working (she must have shut down?), I did find a slew of her older tutorials still on YouTube. Hopefully that will help someone: https://www.youtube.com/playlist?list=PLa7C5pgA0ySyke4Q8kZEjvRIMEAyXC2vE
Have a great day!
I am have a cookie decorating event at church for the kids, and was wondering, if I made the icing a day before and distributed in the squirt bottles, would they be ready to use the next day or would I need to water them down more? I’m trying to figure out the best way to make the icing a day before and be ready to use right away.
Question? What is the best coloring to use? (I.e. gel.paste, liquigel, or oil coloring)
The spray bottle tip leads me to a page that is unavailable! I use a spray bottle but don’t know if there’s a knack to it. Can you help me out?!?
I’m sorry about that! The blog and post that I referenced is no longer active. I don’t think there’s really a knack to using the spray bottle, it’s mostly for precision and convenience. The hardest part is figuring out what consistencies feel right to you. There are a few guide posts on this blog, but really, it’s a little different for everyone. You’ve got to decorate a little to figure out what works best for you. I hope that helps!